background image

14

FKGW 56 A1

GB

Introduction

Information concerning these operating instructions

Congratulations!

With your purchase you have decided in favour of a high quality product. Familiarise yourself with the product 
before installation and before taking it into use for the fi rst time. In this regard, please read the following 
assembly instructions and safety notices attentively. Use this appliance only as described and only for the 
specifi ed areas of application. Retain these instructions for future reference. In addition, pass these docu-
ments on, together with the product, to any future owner.

Copyright

This documentation is subject to copyright protection.

Any copying or reproduction of it, including as extracts, as well as the reproduction of images, also in an 
altered state, is only permitted with the written authorisation of the manufacturer.

Intended use

This round barbecue is intended exclusively for the preparation of grilled foods. It is suitable only for use outdoors. 
This round barbecue is intended for use only in domestic environments, not for commercial applications.

No liability will be accepted for damage resulting from incorrect or improper usage, the application of force 
or unauthorised modifi cations.

Claims of any kind for damage resulting from unintended use, incompetent repairs, unauthorised modifi cation 
or the use of unauthorised spare parts will not be accepted. The user is the sole bearer of the risk.

Safety

This section provides you with important safety information regarding the handling of the device.

The device complies with the statutory safety regulations. Incorrect usage can lead to personal injury and 
property damage.

Basic safety instructions


 WARNING

Warning about burns!

1.  Place the grill on a secure, level and fi rm surface during use, otherwise it could tip over.
2.  CAUTION! Do not use spirit or petrol to ignite or reignite the grill! 

Use only ignition aids complying with EN 1860-3. The defl agration could cause an uncontrollable 
development of heat.

3.  ATTENTION! During use the grill will become very hot and may not be moved, otherwise it could tip over.
4.  ATTENTION! Keep children and pets well away from it!
5.  Wear appropriate grilling gloves and use grilling tongs when grilling.
6.  NEVER leave a hot grill unsupervised.
7.  Allow the grill to cool down completely before cleaning it.
8.  NEVER use water to extinguish the glowing charcoal.


 WARNING

Warning in regard to suff ocation!


Use the grill ONLY outdoors!


Do NOT operate the grill in enclosed spaces or roofed-over areas.

IB_85798_FKGW56A1_LB1.indb   14

02.01.13   09:57

Summary of Contents for FKGW 56 A1

Page 1: ...KUGELGRILLWAGEN FKGW 56 A1 KUGELGRILLWAGEN Bedienungsanleitung IAN 85798 ROUND BARBECUE Operating instructions...

Page 2: ...Page 13 Klappen Sie vor dem Lesen die Seite mit den Abbildungen aus und machen Sie sich anschlie end mit allen Funktionen des Ger tes vertraut Before reading unfold the page containing the illustrati...

Page 3: ......

Page 4: ...em e Verwendung 2 Sicherheit 2 Grundlegende Sicherheitshinweise 2 Lieferumfang 3 Verbindungselemente 3 Montage 4 Montage vorbereiten 4 Ben tigtes Montagematerial 4 Inbetriebnahme 10 Direktes Grillen 1...

Page 5: ...che jeglicher Art wegen Sch den aus nicht bestimmungsgem er Verwendung unsachgem en Reparaturen unerlaubt vorgenommenen Ver nderungen oder Verwendung nicht zugelassener Ersatzteile sind ausgeschlossen...

Page 6: ...17 Achse 18 2 x Rad 19 2 x Radstrebe 20 2 x Verbindungsstrebe kurz 21 Querstrebe 22 Linker Seitentisch 23 Lochplatte 24 Kohlerost 25 Kohleteiler 26 2 x Handgri 27 Grillrost Verbindungselemente A B C D...

Page 7: ...n zu Ihrer Sicherheit immer nach au en zeigen um Verletzungen zu vermeiden Ziehen Sie erst nach Beendigung der Montage alle Schraubverbindungen fest an sonst kommt es zu unerw nschten Materialspannung...

Page 8: ...ittels hitzebest ndiger Unterleg scheibe 6 x 18 F Unterlegscheibe 6 x 18 D und Schraube M6 x 16 B an die Kohlesch ssel 7 Schritt 3 Stecken Sie die zwei Standfu streben 15 in eine der Seitentischstrebe...

Page 9: ...8 D und Mutter M6 H fest HINWEIS Beachten Sie dass das obere Loch der Radstrebe 19 zum Verschrauben benutzt wird Das untere Loch wird f r die Achse 17 ben tigt Schritt 5 F hren Sie die Achse 17 durch...

Page 10: ...Seiten tischstrebe 10 mittels Schraube M6 x 45 A und Mutter M6 H fest Schritt 7 Legen Sie die Kohlesch ssel 7 mittig auf die vier Haltepunkte des Rahmengestells und verschrauben Sie sie mittels Schra...

Page 11: ...A1 DE AT CH Schritt 8 Setzen Sie die Haube 2 auf die Kohlesch ssel 7 und befestigen Sie sie mittels Bolzen 6 x 30 und Sicherungssplint K Ziehen Sie zum Abschluss der Montage alle Schraubverbindungen f...

Page 12: ...edarf setzen Sie die Kohleteiler 25 auf den Kohlerost 24 Haken Sie die beiden Handgri e 26 am Grillrost 27 ein und setzen Sie es in die Kohlesch ssel 7 ein Sie k nnen nun die Handgri e 26 wieder vom G...

Page 13: ...le Glutzustand ist nun erreicht Verteilen Sie die Holzkohle mit einem geeigneten Metallwerkzeug gleichm ig in der Kohlesch ssel 7 Setzen Sie den Grillrost 27 ein und beginnen Sie mit dem Grillen Direk...

Page 14: ...zum anderen kann der Bratensaft f r eine So e verwendet werden Geben Sie etwas Wasser in die Tropf schale um ein Anbrennen zu verhindern Bef llen Sie die Zonen 1 und 3 mit Kohle und entz nden Sie sie...

Page 15: ...ieleistung gilt nur f r Material oder Fabrikationsfehler nicht aber f r Transportsch den Verschlei teile oder f r Besch digungen an zerbrechlichen Teilen z B Schalter Das Produkt ist lediglich f r den...

Page 16: ...nded use 14 Safety 14 Basic safety instructions 14 Scope of delivery 15 Connection elements 15 Assembly 16 Preparing for assembly 16 Required assembly material 16 Using the device 22 Direct grilling 2...

Page 17: ...proper usage the application of force or unauthorised modi cations Claims of any kind for damage resulting from unintended use incompetent repairs unauthorised modi cation or the use of unauthorised s...

Page 18: ...19 2 x Wheel braces 20 2 x Connecting braces short 21 Cross brace 22 Left side table 23 Perforated plate 24 Charcoal grid 25 Charcoal divider 26 2 x Handles 27 Cooking grill Connection elements A B C...

Page 19: ...ded spanners WAF 8 mm WAF 10 mm WAF 17 mm WARNING To avoid possible injury the screw heads should always face outwards First tighten all screw connec tions down when the assembly is complete this will...

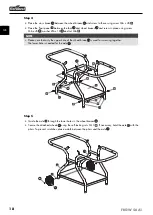
Page 20: ...o the rebowl 7 with a heat resistant washer 6 x 18 F washer 6 x 18 D and screw M6 x 16 B Step 3 Insert the two foot braces 15 into one of the side table braces 10 and screw in place using screw M6 x 4...

Page 21: ...ut M6 H NOTE Please note that only the upper hole of the wheel brace 19 is used for screwing together The lower hole is needed for the axle 17 Step 5 Guide the axle 17 through the lower holes in the w...

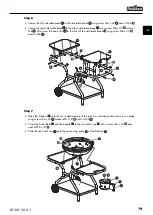
Page 22: ...front of the side table brace 10 using screw M6 x 45 A and nut M6 H Step 7 Place the rebowl 7 onto the four holding points of the rack in a central position and screw in place using screw M6 x 16 B w...

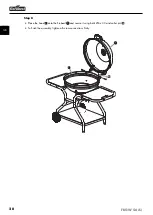
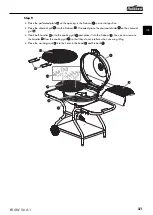
Page 23: ...20 FKGW 56 A1 GB Step 8 Place the hood 2 onto the rebowl 7 and secure it using bolts 6 x 30 and cotter pin K To nish the assembly tighten all screw connections rmly 2 7 K...

Page 24: ...wl 7 If needed place the charcoal divider 25 on the charcoal grill 24 Hook both handles 26 onto the cooking grill 27 and place it into the rebowl 7 You can now remove the handles 26 from the cooking g...

Page 25: ...been reached Use a suitable metal tool to distribute the charcoal evenly in the rebowl 7 Insert the cooking grill 27 and start grilling Direct grilling Direct grilling is similar to frying The food is...

Page 26: ...eaning of the grill on the other the meat juices can be used for a sauce gravy Put some water into the drip tray so the juices do not burn Fill zones 1 and 3 with charcoal and ignite it For slow and g...

Page 27: ...ranty claim please contact Customer Service by telephone This is the only way to guarantee free dispatch of your goods NOTE This warranty is valid only for material or manufacturing faults not for tra...

Page 28: ...1 IAN 85798 KOMPERNASS GMBH BURGSTRASSE 21 44867 BOCHUM GERMANY www kompernass com Stand der Informationen Last Information Update 12 2012 Ident No FKGW56A1102012 2...

Reviews: