


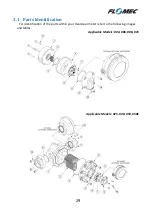
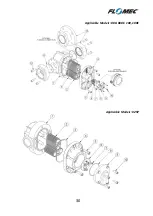


32
3.4
Re-assembly of Flowmeter
When
r
e-installing the rotors the magnets MUST be correctly positioned so that they are
facing the sensors located in the meter cap, for meters ranging from 004 to 015 sizes the
magnets are inserted from the underside of the rotor so will not be visible when the rotors
are installed. Meters from 025 size and larger will have the magnets visible from the top; if
you are unsure of magnet location it is easiest to test using a small steel object such as a
steel ruler or small screw driver.
Both rotors will only engage correctly if fitted precisely at an orientation of 90 degrees to
each other. Rotate the rotors slowly by hand to ensure they are correctly fitted, at the same
time check the rotor shafts & rotor bearings for wear. If you are able to rotate the engaged
rotors through a complete 360, then you have installed them at the correct 90 degree
angle.
Fit the O-ring into the groove and assemble the meter cap onto the meter body; small
meters are visibly aligned using a small dimple on the top face of the meter cap and the
underside of the meter cap. Larger meters are aligned using a location pin or a pair of
dowel pins.
Fit the body cap screws (5) and tighten in a star sequence, then carryout a final tighten in
the same sequence to a firm torque. This sequence and procedure ensures the meter
bodies are assembled correctly and evenly. Fit the pulse output board, terminal cover or
instrument as appropriate.


