background image

14

SiriusXM SR200 InfoLINK Receiver Installation Guide

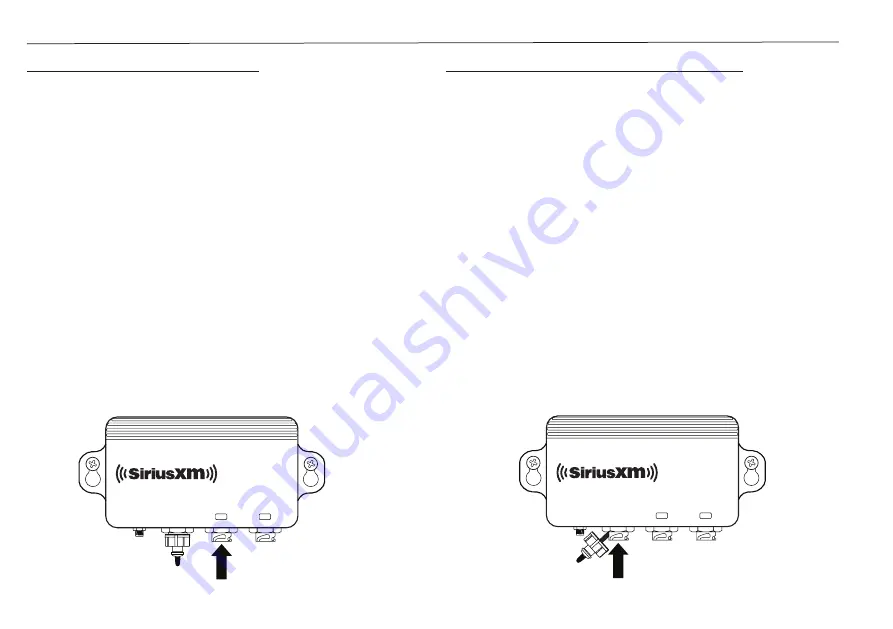
Connect the Network Cable

The Network Cable should be connected to your 

Raymarine system. This cable has two different 

connectors - one end connects to the Raymarine 

system and the other to the InfoLINK Receiver. The 

cable is marked near each end to distinguish the 

connectors.

If your Raymarine system does not utilize a Network 

Switch, connect the Raymarine end of the cable to 

the Raymarine MFD’s RayNet (Ethernet) port.

If your Raymarine system utilizes a an HS-5 or 

equivalent Network Switch, connect the Raymarine 

end of the cable to the Network Switch. If there are 

no available connections on the existing Network 

Switch, you will need to purchase another Network 

Switch to accommodate the InfoLINK Receiver.

Connect the SiriusXM end of the cable to the 

NETWORK

 connection of the receiver.

Connect the Audio Cable

 (optional)

The audio connection is optional and is used if you 

subscribe to a SiriusXM music and entertainment 

package in addition to the SiriusXM Marine 

subscription package.

If you are not installing an audio connection, do not 

remove the water resistant cap that is installed on 

the InfoLINK Receiver’s 

AUDIO

 connector.

The Audio Cable provides an RCA-style Left and 

Right audio connection. Connect these to the 

auxiliary (AUX) input on your audio device.

If your audio system does not have RCA connectors 

they will need an adapter cable, available from the 

local dealer or an electronics retailer.

Remove the water resistant cap that is installed 

on the InfoLINK Receiver’s 

AUDIO

 connector, and 

connect the Audio Cable.

ANTENNA

AUDIO

M A R I N E

NETWORK

R E C E I V E R

POWER

InfoLINK

AUDIO

ANTENNA

AUDIO

M A R I N E

NETWORK

R E C E I V E R

POWER

InfoLINK

NETWORK

Summary of Contents for Raymarine SiriusXM SR200

Page 1: ...Document number 87320 3 2019 Raymarine UK Limited Sirius XM Radio Inc Date 06 2019 English en US Installation instructions SR200 SiriusXM InfoLINK Weather Audio Receiver...

Page 2: ...arately The SiriusXM InfoLINK Receiver also provides access to over 150 channels of SiriusXM satellite radio service which can be added at a discounted rate to the Marine subscription For more informa...

Page 3: ...e Warning Maintain a permanent watch Always maintain a permanent watch this will allow you to respond to situations as they develop Failure to maintain a permanent watch puts yourself your vessel and...

Page 4: ...bles carrying radio signals e g VHF radios cables and antennas In the case of SSB radios the distance should be increased to 7 ft 2 m More than 2 m 7 ft from the path of a radar beam A radar beam can...

Page 5: ...to dispose of this product Warranty registration To register your Raymarine product ownership please visit www raymarine com and register online It is important that you register your product to recei...

Page 6: ...M Marine InfoLINK Receiver Shakespeare SRA 50 Antenna Includes 25 Cable Mounting Accessories NOT included with E70499 RCV SMA to SMB Adapter Mounting Screws 2 SiriusXM to Raymarine Network Cable Siriu...

Page 7: ...rine components are installed the InfoLINK Receiver can be connected to a Raymarine Network Switch as shown The audio connection is optional and is used if you subscribe to a SiriusXM music and entert...

Page 8: ...unction display GPS receiver provides position information for your vessel in the weather chart and radar applications Some multifunction displays have an internal GPS receiver If your display does no...

Page 9: ...SiriusXM Connector Pin Description Raymarine Connector Pin Description 5 6 7 1 2 3 4 1 Ethernet RX White Green 8 7 9 2 6 10 3 1 5 4 1 Ethernet TX White Orange 2 Ethernet RX Green 2 Ethernet TX Orange...

Page 10: ...s at both ends required for all extensions A80161 400mm 1 3ft RayNet female to female cable A62361 2m 6 56ft RayNet female to female cable A80005 5m 16 4ft RayNet female to female cable A62362 10m 32...

Page 11: ...Description 1 2 3 1 Battery Switched Red Battery Switched 2 Ground Black Ground 3 RF Shield Ground White RF Shield Ground The following is the pin and connector identification for the Audio Cable pro...

Page 12: ...Connect the Power Cable The InfoLINK Receiver should be connected to a 12 or 24 volt power source negative ground Caution Some vessels may have a positive ground system DO NOT connect to positive gro...

Page 13: ...16 15 20 m 49 2 65 5 ft 12 V 12 24V 14 Note These distances are for a 2 wire power cable run from the battery to the product approximate distance To calculate the round trip length double the figure...

Page 14: ...Connect the SiriusXM end of the cable to the NETWORK connection of the receiver Connect the Audio Cable optional The audio connection is optional and is used if you subscribe to a SiriusXM music and e...

Page 15: ...surface If the distance between the antenna and the InfoLINK Receiver is more than 25 feet special Shakespeare cable kits are available Plan and purchase the appropriate kit before proceeding page 17...

Page 16: ...through the mounting surface to the underside Secure to the surface using 4 screws Pedestal Mount Antenna secured topside above the mounting surface Route antenna cable either through or above the mo...

Page 17: ...rom the antenna to each receiver SRC 35 35 Marine SiriusXM Replacement Cable SRC 50 50 Marine SiriusXM Replacement Cable SRC 90 90 Marine SiriusXM Replacement Cable Follow the instructions in the next...

Page 18: ...splintering Use caution to avoid drilling through or near fuel lines fuel tanks hydraulic lines or electrical wiring 2 Attach the antenna onto the base by using the lock washer and retaining nut 3 Ori...

Page 19: ...e to the SMA to SMB Adapter Connect the adapter to the Antenna connection of the InfoLINK Receiver Pedestal Mount 1 If you are going to route the antenna cable through the mounting surface drill a 9 1...

Page 20: ...the rest of the antenna assembly keeping the rubber o ring in place 7 If you are not routing the 6 antenna lead out through the side of the pedestal bottom continue with step 9 Use a needle nose plie...

Page 21: ...to the extension mast 3 Route the antenna cable to the InfoLINK Receiver and connect the antenna cable to the SMA to SMB Adapter Connect the adapter to the Antenna connection of the InfoLINK Receiver...

Page 22: ...ke sure the Raymarine system is turned on Verify that you are receiving the SiriusXM signal by entering the SiriusXM menu in your MFD 2 Make a note of the Radio ID You can find it on a label on the In...

Page 23: ...rk Cable is not connected or not secured Make sure the cable is connected and secured to the InfoLINK Receiver On Neither Red or Green not blinking Bad or incorrect Network Cable connected Make sure y...

Page 24: ...nna and antenna cable Check Tuner Chek Tuner Chk Tunr Network Cable is not connected to the MFD or network switch Confirm that the cable is connected to an MFD or network switch MFD Message Reason Cha...

Page 25: ...technology incorporated in this product Furthermore the AMBE voice compression software included in this product is protected by intellectual property rights including patent rights copyrights and tra...

Page 26: ...are trademarks of Sirius XM Radio Inc All other marks and logos are the property of their respective owners All rights reserved Important Legal Notice About Your SiriusXM Subscription Hardware and sub...

Page 27: ...all products are installed in adherence with local laws and regulations and in such a manner as to allow a vehicle to be operated safely and without distraction SiriusXM product warranties do not cov...

Page 28: ...Raymarine Inc 9 Townsend West Nashua NH 03063 United States Tel 1 603 324 7900 www raymarine com a brand by...

Reviews: