


FLIR
CM275
–
QUICK
START
Document
Identifier:
CM275
‐
QS
‐
en
‐
US_AB
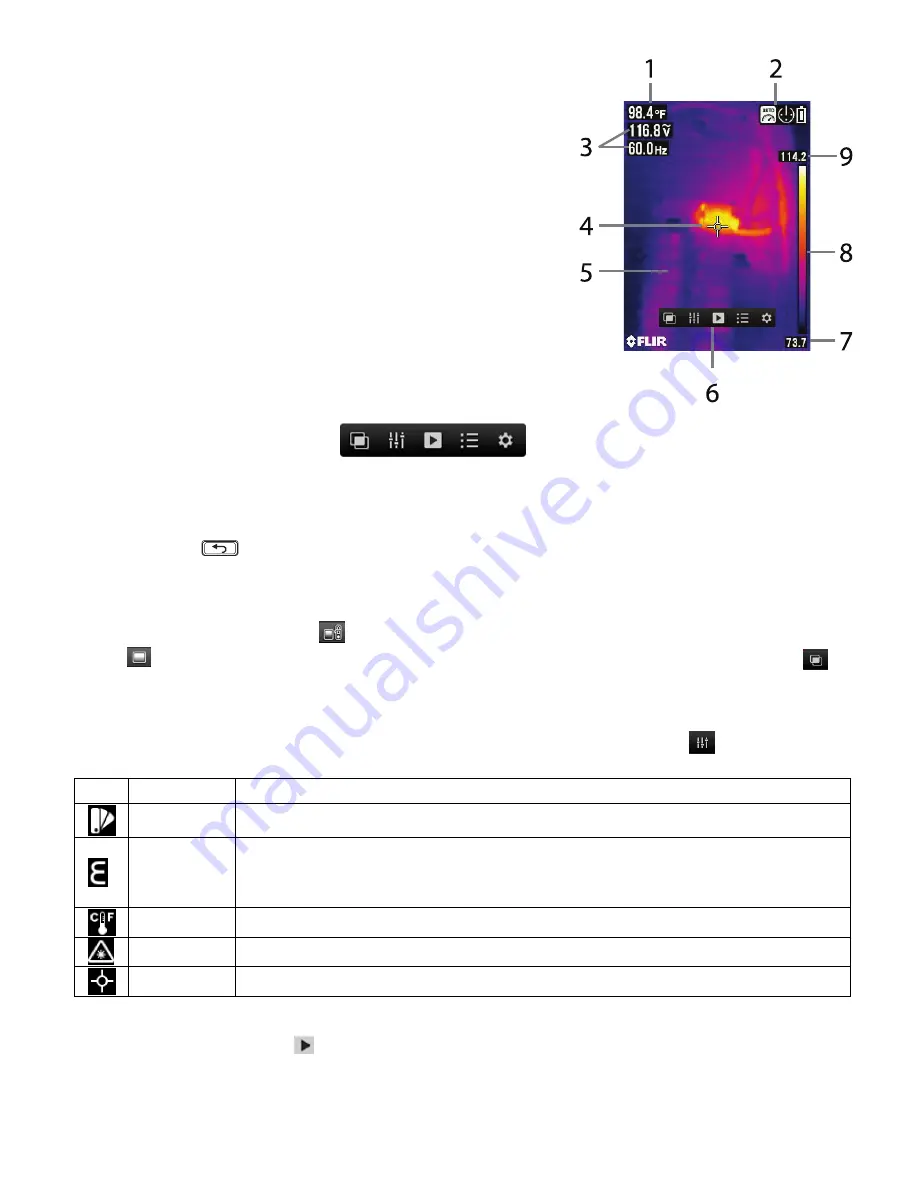
THERMAL
IMAGE
DESCRIPTION
1.
IR
Temperature
measurement
of
targeted
spot
2.
Status
Icon
Bar
3.
Clamp
Meter
Measurements
4.
Cross
hairs
for
targeting
5.
Thermal
image
6.
Main
Menu
7.
Lowest
reading
measured
in
the
current
frame
8.
Thermal
scale
range
of
colors
for
the
thermal
image
9.
Highest
reading
measured
in
the
current
frame.
Notes
the
Distance
‐
to
‐
Spot
ratio
for
the
imager
is
30:1
meaning
that
the
spot
is
30
times
smaller
than
the
meter
‐
to
‐
spot
distance.
The
thermal
imager’s
Field
of
View
(FOV)
is
50
o
by
38.6
o
.
MENU
SYSTEM
Press
OK
to
show
the
Main
menu:
Use
Navigation
Pad
arrows
to
highlight
icons
and
the
OK
button
to
open
them.
Left
to
right
the
icons
are
Image
Mode,
Thermal
Settings,
Image/Data
Log
Gallery,
Advanced
Function
Menu,
and
General
Settings.
Press
OK
to
set
an
option
ON
or
OFF.
When
an
option
is
ON,
a
blue
dot
will
appear
next
its
icon.
Use
the
Return
button
to
exit
menu
levels
and
to
return
to
the
normal
display
mode.
The
selected
function
or
mode
determines
which
icons
are
available
for
use.
IMAGE
MODE
MENU
The
Image
mode
has
two
options:
Image
+
Clamp
:
Display
shows
Clamp
meter
data
on
the
thermal
images.
Image
‐
only
:
Display
does
not
show
clamp
meter
data.
Press
OK
on
the
Image
mode
icon
and
use
the
arrow
buttons
to
select
the
desired
option.
This
menu
is
only
available
in
the
thermal
image
mode.
THERMAL
SETTINGS
MENU
Press
OK
to
open
the
main
menu.
Press
OK
again
on
the
Thermal
Settings
menu
icon
.
This
menu
is
only
available
in
the
thermal
image
mode.
Refer
to
the
table
below.
Icon
Description
Operation
Palette
Press
OK
to
select
a
color
palette
(Iron,
Rainbow,
or
Gray)
Emissivity
Press
OK
and
use
arrows
to
scroll
to
a
preset
(0.95,
0.85,
0.75,
or
0.65)
or
to
the
fine
tuning
Ԑ
icon.
To
fine
tune,
press
OK
at
the
fine
‐
tune
icon
and
use
the
arrows
to
set;
press
OK
to
confirm.
(Range:
0.10
to
0.99
in
0.01
steps)
Units
Press
OK
to
toggle
the
temperature
units
(
o
C/
o
F)
Laser
Press
OK
to
toggle
the
laser
pointer
ON
or
OFF
Cross
hairs
Press
OK
to
switch
the
cross
hairs
ON
or
OFF
GALLERY
MENU
1.
Press
OK
at
the
Gallery
icon
to
view
the
saved
images
and
data
log
sets.
2.
Use
the
arrows
to
scroll
through
data
logs
(upper
area)
and
images
(lower
area).
3.
Press
OK
to
open
a
log
or
an
image.


