


XFE 7-15 125 / XFE 7-15 150
20
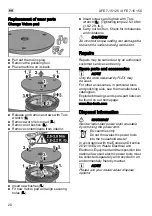
Replacement of wear parts
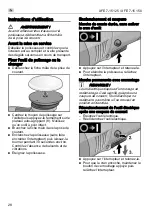
Change Velcro pad
Pull out the mains plug.
Remove the polishing tool.
Place machine on its back.
Release and remove screws with Torx
wrench (1.).
Remove worn Velcro pad (2.).
Remove old bushes (3.).
Remove contaminants from interior.
Insert new bushes (1.).
Fit new Velcro pad and align securing
holes (2.).
Insert screws and tighten with Torx
wrench (3.). (Tightening torque 2.5-3.0 Nm
(1.8-2.2 ft. lb.))
Carry out test run. Check for imbalances
and vibrations.
CAUTION!
An incorrect torque setting can damage the
tool and the surfaces being worked on.
Repairs
Repairs may be carried out by an authorised
customer service centre only.
Spare parts and accessories
NOTE
Only the tools released by FLEX may
be used.
For other accessories, in particular tools
and polishing aids, see the manufacturer’s
catalogues.
Exploded drawings and spare-part lists can
be found on our homepage:
www.flex-tools.com
Disposal information
WARNING!
Render redundant power tools unusable
by removing the power cord.
EU countries only
Do not throw electric power tools
into the household waste!
In accordance with the European Directive
2012/19/EU on Waste Electrical and
Electronic Equipment and transposition into
national law used electric power tools must
be collected separately and recycled in an
environmentally friendly manner.
NOTE
Please ask your dealer about disposal
options!
Summary of Contents for XFE 7-15 125
Page 1: ...XFE 7 15 125 XFE 7 15 150 ...
Page 236: ...236 ...
Page 237: ...237 ...
Page 238: ...238 ...
Page 239: ...239 ...
Page 240: ...240 ...
Page 241: ...241 ...
Page 242: ...242 ...
Page 243: ...243 ...
Page 244: ...439 592 06 2018 Für Druckfehler keine Gewähr Technische Änderungen vorbehalten ...


