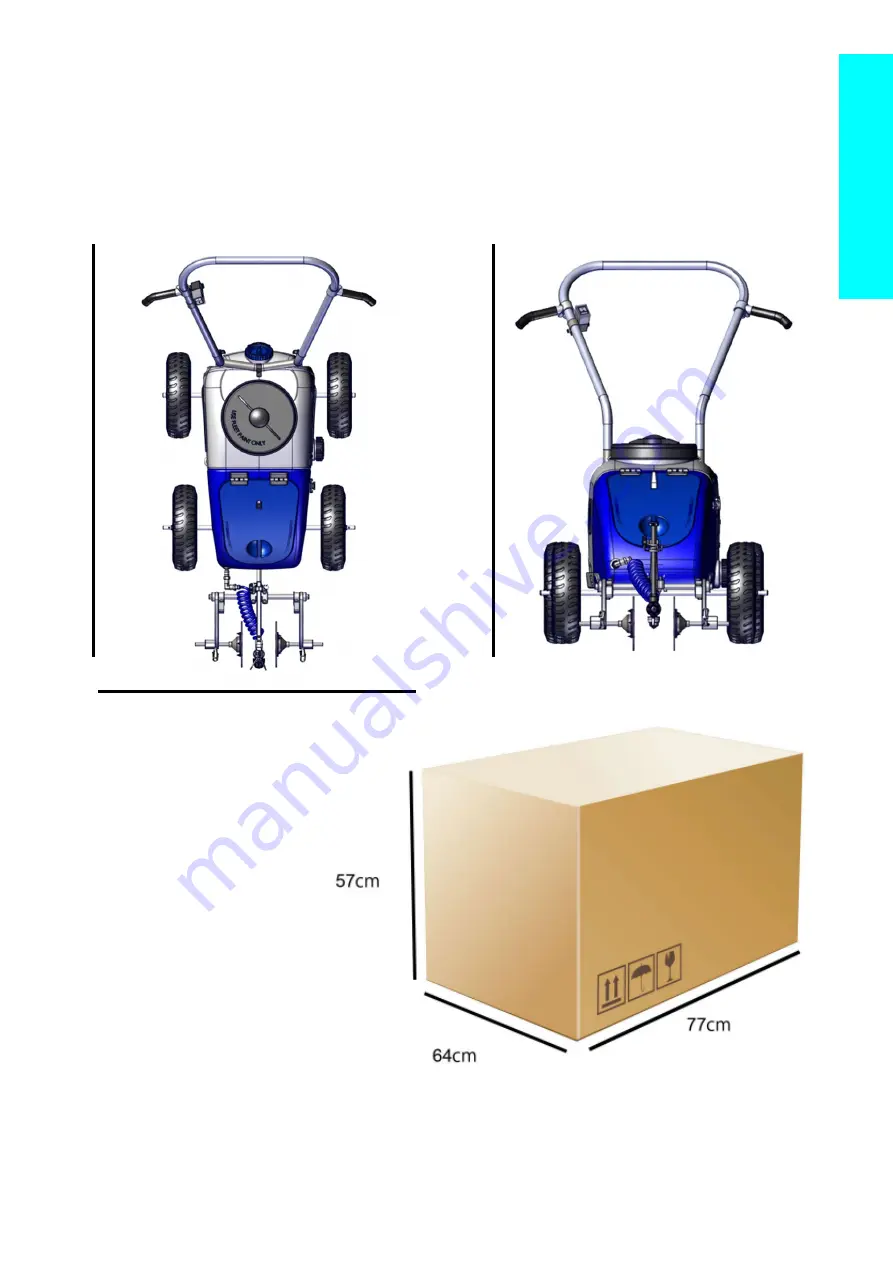
Specification
Machine Length: 127cm Width: 74cm
Height: 109cm
Net Weight: 27kg
Package
Length: 77cm
Width: 64cm Height: 57cm
Net Weight: 29kg
127cm
74cm
109c
m
Par
ts L
is
t
22
Page 1: ...User Manual Fleet Line Markers Limited Fleet House Spring Lane Malvern Worcestershire WR14 1AT Tel 01684 573535 sales flmuk com www fleetlinemarkers co uk...
Page 2: ...ert in the field of line marking Of course its not just the machines that Fleet are famous for our range of line marking paints are used around the world wherever the pitch whatever the occasion Form...
Page 3: ...ey 4 Connect switch using the coiled power cable Fig 1 5 Position machine near a 230 240V AC power supply connect charger to charge socket and switch on Fig 2 CAUTION Only use the supplied charger Use...
Page 4: ...ssembly before use Refer to the diagram below and follow these steps 1 Remove packaging from tank 2 Place arms A B over the pivot bar C 3 Fit a washer D on each end of the pivot bar shaft secure using...
Page 5: ...the flat of the support pillar 3 Hinge the nozzle assembly to the vertical position 4 Ensure that the nozzle is centered between the line forming disks adjust if necessary using the thumb screw 5 Conn...
Page 6: ...post to the vertical position and ensure that the nozzle is centered between the line forming discs Adjust if necessary Note Further adjustment of the nozzle position can be achieved by adjusting the...
Page 7: ...ck of the paint tank ALWAYS use the basket filter to eliminate debris from entering the tank Concentrated paints A Fill the paint tank with water to correct dilution rate tank markings are provided as...
Page 8: ...n system proceed as follows 1 Ensure the paint water changeover valve is in the paint position lever pointing forward Fig 11 2 Turn the flow return tap through 90 degrees in line with hose See Fig 12...
Page 9: ...line forming discs must be adjusted so that the nozzle is central between them Setting the nozzle height 1 Hinge the nozzle post to the vertical position Adjust the nozzle height by squeezing the spr...
Page 10: ...e top of the grass height For hard surfaces the spray fan should just reach the line forming disc at the ground surface If necessary adjust the nozzle height Turn off the pump 4 Close the bonnet Ensur...
Page 11: ...arked line string or chalk line 6 At the end of the line switch the pump OFF and stop walking 7 Lift the line forming discs from the surface and position the machine at the start of the next line 8 If...
Page 12: ...used before breaks in operation or at the end of a line marking day 1 Ensure that the water tank has sufficient water for the cleaning operation 2 Position the machine where the contents of the pipewo...
Page 13: ...ove any excess paint from the bottom and sides 6 Replace drain cap and fill with 5 litres of clean water and optional Kombi Klean 7 Position the nozzle assembly over a drain or suitable container 8 Wi...
Page 14: ...ns in the fluid providing an effective solution for the removal of paint dirt and grime which would normally require tedious manual cleaning by hand The cleaner can be used with a wide variety of Flee...
Page 15: ...adjustment spring collar and slide the nozzle post down to the minimum height 2 Using the spring collars slide the line guide discs in so that they support the nozzle assembly centrally 3 Loosen knib...
Page 16: ...ried paint particles Note These procedures presume that there is sufficient Fleet paint in the paint tank No Issue Cause Remedy 1 Intermittent line Airlock in paint sys tem Bleed paint system as follo...
Page 17: ...pipe into a quick connector simply push in the pipe The pipe should be inserted 15mm to ensure a good connection Compression fittings Removal 1 To release a pipe from a compression fitting use a 12mm...
Page 18: ...106 Steel P Clip 22mm KOMBCONS1003 M6 x 25 Socket Cap Head Screw UNIVCOMP9009 M6 Thumb Screw UNIVCOMP9013 Rubber Handle Grips UNIVCOMP9038 Bar Ends Pair UNIVCONS9058 M6 x 20 Flat Repair Washer KOMBCOM...
Page 19: ...7 Tank Filter KOMCOMP1033 Bonnet KOMBCOMP1036 Plastic Drain Cap KOMBCOMP1037 2 Inch vented water cap KOMBCONS1017 15mm Retaining Clip for Knib UNIVCONS9058 M6 x 20 Flat Repair Washer UNIVCONS9113 M6 x...
Page 20: ...9056 Quick Release Compression fit Bulkhead UNIVCOMP9112 3 8 Elbow Connector UNIVCOMP9113 1 4 Male Male Elbow UNIVCOMP9115 Female Pipe Elbow UNIVCONS9086 6mm Male Bullet Red Terminal Connector Not ill...
Page 21: ...hown UNIVFINPUMP5 Diaphragm Pump KOMBCOMP1226 Charge Socket UNIVCONS9058 M6 x 20 Flat Repair Washer UNIVCONS9067 M6 SS Hex Nyloc Nut UNIVCONS9106 M6 x 40 Socket Cap Head Screw KOMBCOMP1229 Battery Ret...
Page 22: ...205 Wheeled Knib Standard KOMBCOMP1210 Extruded Tube Assembly KOMBCONS1004 M6 Form A Flat Washer KOMBCONS1013 17 1mm ID x 30mm x 0 9mm Washer KOMBCONS1015 M6 U Bolt inc nuts UNIVCOMP9007 1m Coiled Blu...
Page 23: ...Specification Machine Length 127cm Width 74cm Height 109cm Net Weight 27kg Package Length 77cm Width 64cm Height 57cm Net Weight 29kg 127cm 74cm 109cm Parts List 22...
Page 24: ...defects will be corrected replaced as soon as possible The Kombi is not guaranteed against normal wear and tear This guarantee does not interfere with the customer s statutory rights The pump is guar...