background image

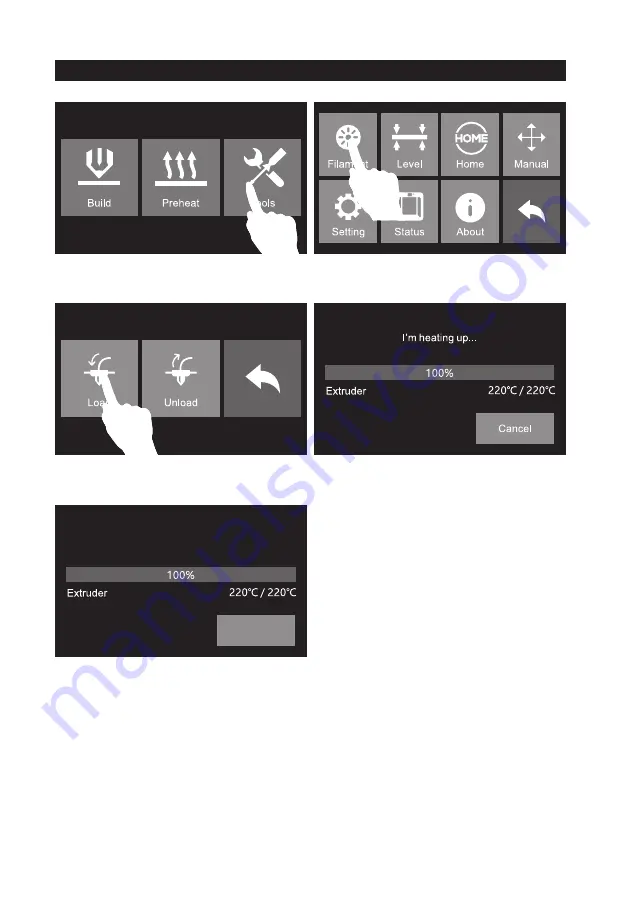
Loading Filament

1. Tap [Tools].

2. Tap [Filament].

3. Tap [Load], extruder starts to heat. 

4. Once heated, filament will be drawn through the extruder. Continue extruding until the extruder

    provides a steady flow of filament. Tap touch screen button, go back to home screen.

Done

Loading started, push filament vertically

into extruder and press [Done] when you see

filament come out of the extruder

10

Attetion: If extruder can not unload in a long time, please check if you have inserted filament 

                into the bottom of extruder.

Summary of Contents for Guider 2

Page 1: ...SZ11S ZN EN A02 Guider 2 Guider 2s 2 2s This guide is only applicable to FLASHFORGE Guider 2 Guider 2s 3D printer P14 2 2s 3D...

Page 2: ...ament a spool holder a solid glue a USB cable a filament guide tube and a accessories bag 5 Remove the top PE foam piece which contains one power cable one USB Stick one Quick start guide and a After...

Page 3: ...y elevate the build plate Tap touch screen button on the right side of touch screen go back to home screen 7 Tear off tape and the stretch wrap of front door Squeeze top lid slightly from both sides t...

Page 4: ...03...

Page 5: ...ment Intake 7 Build Plate 8 Nut 5 Touch Screen 6 Touch Screen Button 11 Nozzle 12 Turbo Fan Baffle 9 Servo 10 Turbo Fan 15 USB Cable Input 16 Spool Holder Slot 13 Network Interface 14 USB Stick Input...

Page 6: ...utton 8 Build Plate 5 X Axis Guide Rod 6 Touch Screen 11 Servo 12 Turbo Fan 9 Nut 10 Camera Inside the printer 15 Network Interface 16 USB Stick Input 13 Nozzle 14 Turbo Fan Baffle 17 USB Cable Input...

Page 7: ...extruder and insert filament vertically into filament intake 1 Locate the spool holder Install the spool holder into the left quadrangular opening on the back 6 After inserting into filament intake in...

Page 8: ...e nozzle and build plate Lower the build plate to increase the distance between the nozzle and build plate Rotate the nuts Anticlockwise Build plate goes up Build plate goes down Leveling Build Plate...

Page 9: ...e nuts under the platform anticlockwise then tap OK button Attention three nuts may be tightened up before going out please skip this step if you find three nuts have been tightened up and continue to...

Page 10: ...ockwise until you hear the beep Distance Too Small Turn the corresponding nut under the platform anticlockwise until you hear the beep 10 If the distance is appropriate tap ok to next step If the dias...

Page 11: ...ing until the extruder provides a steady flow of filament Tap touch screen button go back to home screen Done Loading started push filament vertically into extruder and press Done when you see filamen...

Page 12: ...4 Tap 40mm_Box PLA gx Quick Start Guide Test Files User Guide Flashprint PLA PLA 11 1 Ensure that the build plate has been leveled before printing 2 Ensure that the filament has been loaded in an appr...

Page 13: ...ent in daily use 3 Tap Filament 4 Tap Unload Unloading Filament 12 1 Pull filament guide tube out of filament intake leave filament 10cm to pull filament easily Press here Push filament down through f...

Page 14: ...13 Press here Withdraw Filament 6 Then pull out vertically quickly and release spring presser Tap Done go back Tap return arrow to go back to home screen...

Page 15: ...14 3 USB 2 5 U...

Page 16: ...7 8 9 Tools 12 11 Z Build 15...

Page 17: ...16...

Page 18: ...1 Z 2 3 Y 4 X 5 6 7 8 9 10 11 12 13 14 U 15 USB 16 17 18 2 17...

Page 19: ...1 Z 2 3 4 Y 5 X 6 7 8 9 10 11 12 13 14 15 16 U 17 USB 18 19 20 2s 18...

Page 20: ...2 5 6 19...

Page 21: ...1 Tools Setting Language 2 1 2 20 04 02 03 01 Tools...

Page 22: ...3 5 6 4 7 21...

Page 23: ...22 8 9 10 11...

Page 24: ...3 4 1 2 23...

Page 25: ...1 U U 2 U 3 4 Test Files User Guide Quick Start Guide FlashPrint 5 PLA 6 PLA 24 1 2 3 4 5 3D...

Page 26: ...3 2 4 3 3 25 1 10 5 3...

Page 27: ...26 6...

Page 28: ...4008866023 www sz3dp com 518...

Reviews: