background image

LED PAR AURA 64 7x10W RGBW 4in1 ABS F7100307


www.flash-butrym.pl 

3


4


INSTALLATION 

After removing the packaging, check if the device was not damaged during transport. Before connecting to 
the mains, make sure that the device is securely mounted. The manufacturer is not responsible for damage 
caused by unstable mounting.  

Ensure proper connection to the mains and proper grounding. Make sure that the electrical parameters are 
consistent with device requirements. All activities, including connecting the device to the mains must be 
performed by qualified personnel. 

5


CONNECTIONS 

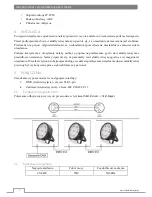
The device is equipped with the following interfaces: 

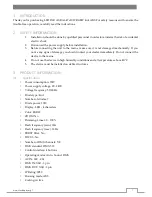
1.


DMX (in/out): XLR 3-pin socket 

2.


Power (in/out): IEC C14/IEC C13 

5.1


Connecting DMX signal 

The connection is performed using cable with XLR-female -> XLR-Male plugs. 


5.2


Voltage specification 


Input Voltage 

Total Power 

Frequency 

90~240V 

70W 

50/60Hz 

5.3


Connecting power  supply 

The connection is performed using power cable with IEC C14 connector (included).  

The device must be operated by qualified personnel. Make sure that the power grid supply parameters are 
consistent with device parameters and limitations are not exceeded. 

Summary of Contents for F7100307

Page 1: ...USER MANUAL INSTRUKCJA OBSŁUGI LED PAR AURA 64 7x10W RGBW 4in1 ABS F7100307 ...

Page 2: ...2 Voltage specification 3 5 3 Connecting power supply 3 6 Operation manual 4 6 1 Control panel 4 6 2 Menu 4 6 3 DMX channel list 5 Spis treści 1 Wprowadzenie 6 2 Zasady bezpieczeństwa 6 3 Informacje o produkcie 6 3 1 Specyfikacja 6 4 Instalacja 7 5 Połączenia 7 5 1 Podłączenie sygnału DMX 7 5 2 Specyfikacja zasilania 7 5 3 Podłączanie zasilania 8 6 Instrukcja użytkowania 8 6 1 Panel sterowania 8 6...

Page 3: ...t your dealer immediately Do not connect the device to the mains 4 Do not use the device in high humidity conditions and at temperatures above 40 C 5 The device must be installed on stable structures 3 PRODUCT INFORMATION 3 1 Specification Power consumption 70W Power supply voltage 90 240V Voltage frequency 50 60Hz Diode type 4in1 Number of diodes 7 Diode power 10W Display LED 4 characters Color R...

Page 4: ...s including connecting the device to the mains must be performed by qualified personnel 5 CONNECTIONS The device is equipped with the following interfaces 1 DMX in out XLR 3 pin socket 2 Power in out IEC C14 IEC C13 5 1 Connecting DMX signal The connection is performed using cable with XLR female XLR Male plugs 5 2 Voltage specification Input Voltage Total Power Frequency 90 240V 70W 50 60Hz 5 3 C...

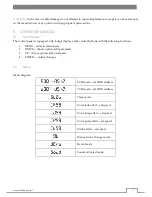
Page 5: ...quipped with 4 digit display and 4 control buttons with the following functions 1 MENU enter to main menu 2 DOWN choose option edit parameter 3 UP choose option edit parameter 4 ENTER confirm changes 6 2 Menu Menu diagram 8CH mode set DMX address 5CH mode set DMX address Slave mode Color fade effect set speed Color jump effect set speed Color pulse effect set speed Strobe effect set speed Manual c...

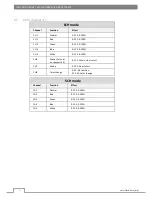
Page 6: ... 100 CH 3 Green 0 255 0 100 CH 4 Blue 0 255 0 100 CH 5 White 0 255 0 100 CH6 Macro Set color on channels 2 4 0 255 Macro slow to fast CH7 Strobe 0 255 Slow to fast CH8 Color change 0 50 No function 51 255 Color change 5CH mode Channel Function Effect CH 1 Dimmer 0 255 0 100 CH 2 Red 0 255 0 100 CH 3 Green 0 255 0 100 CH 4 Blue 0 255 0 100 CH 5 White 0 255 0 100 ...

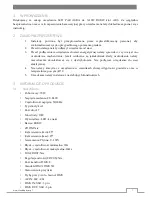
Page 7: ...enia należy niezwłocznie skontaktować się z dystrybutorem Nie podłączać urządzenia do sieci elektrycznej 4 Nie należy korzystać z urządzenia w warunkach dużej wilgotności powietrza oraz w temperaturze powyżej 40 C 5 Urządzenie należy instalować na stabilnych konstrukcjach 3 INFORMACJE O PRODUKCIE 3 1 Specyfikacja Pobór mocy 70W Napięcie zasilania 90 240V Częstotliwość napięcia 50 60Hz Typ diody 4w...

Page 8: ...należy zadbać o poprawne podłączenie go do sieci elektrycznej oraz prawidłowe uziemienie Należy upewnić się że parametry sieci elektrycznej są zgodne z wymaganiami urządzenia Wszelkie czynności obejmujące obsługę w zakresie podłączania urządzenia do sieci elektrycznej powinny być wykonywane przez wykwalifikowany personel 5 POŁĄCZENIA Urządzenie wyposażone jest w następujące interfejsy 3 DMX wejści...

Page 9: ...prawy Wymiana lub naprawa może być wykonana jedynie w serwisie producenta lub przez osobę z odpowiednimi uprawnieniami 6 INSTRUKCJA UŻYTKOWANIA 6 1 Panel sterowania Panel sterowania wyposażony jest w wyświetlacz oraz w 4 przyciski sterujące o następujących funkcjach 5 MENU wejście do menu głównego 6 DOWN wybór opcji edycja parametru 7 UP wybór opcji edycja parametru 8 ENTER zatwierdzenie zmian 6 2...

Page 10: ... Zielony 0 255 0 100 CH 4 Niebieski 0 255 0 100 CH 5 Biały 0 255 0 100 CH6 Macro Ustaw kolor na kanałach 2 4 0 255 Macro wolno szybko CH7 Strobo 0 255 Wolno szybko CH8 Zmiana koloru 0 50 Brak funkcji 51 255 Zmiana koloru Tryb 5CH Kanał Funkcja Efekt CH 1 Dimmer 0 255 0 100 CH 2 Czerwony 0 255 0 100 CH 3 Zielony 0 255 0 100 CH 4 Niebieski 0 255 0 100 CH 5 Biały 0 255 0 100 ...

Reviews: