Flash-e-Vapor V4.5/V4.5L
—
Instruction
manual
english
6
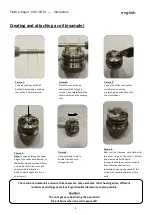
Creating and attaching a coil (example)
Picture 1:
Coil up 6 windings with 0.32
Kanthal A wire using a winding
tool with a 2.5mm diameter.
Picture 4:
Note:
The gap between the upper
edge of the coil and the bottom of
the socket may not exceed 8.5mm
as it would otherwise come into
contact with the chamber
bottom, which might result in a
short circuit.
Picture 2:
Place the wire as shown
underneath the two pole
screws. Then carefully tighten
them and remove the winding
tool.
Picture 5:
Use a wire loop to pull a
double Ortmann cord
through the coil.
Picture 3:
Use a wire cutter or any other
suitable tool to cut the
projecting wire ends flush with
the screw heads.
Picture 6:
Now cut the Ortmann cord flush with
the outer edge of the socket bottom
and moisten well with liquid.
In order to absorb any excessive liquid
from the socket bottom, we
recommend placing one strand of the
cord on the socket bottom to act as a
wick
.
The mentioned materials and wire thicknesses are only examples; other heating wires, different
numbers of windings as well as larger/smaller diameters are also possible.
Caution!
The coils get very hot during the operation!
Risk of burns when the coil is exposed!!


