background image


4.


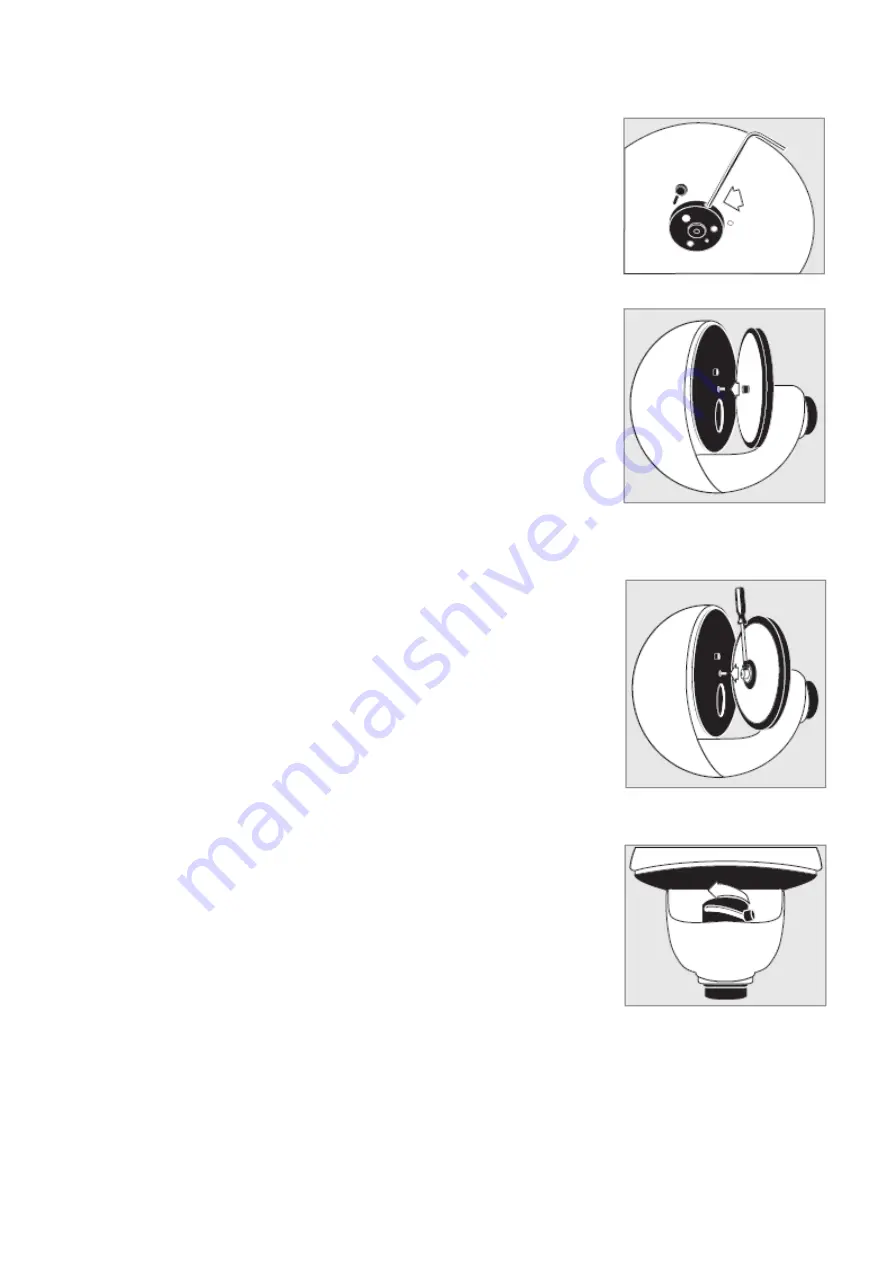
To use standard ROMPA® effect wheels with this projector, 
first remove the magnetic adapter from this projector.  To do 
this,  use  the  small  allen  key  provided  and  place  this  in  the 
hole on the top of the magnetic adapter.  Twist the allen key 
anti-clockwise and the adapter will loosen and detach from 
the projector. 
Please note: You may have to turn on the projector to move 
the  rotator.    The  hole  on  the  top  of  the  magnetic  adapter 
must face the top of the projector. 
To reattach the magnetic adapter, make sure that the flat of 
the  shaft  is  facing  the  top  of  the  projector.    Place  the 
magnetic  adapter  onto  the  shaft  and  twist  the  allen  key 
clockwise in the hole on the magnetic adapter.  The adapter 
will subsequently tighten and attach to the projector.


Once  the  magnetic  adapter  has  been  removed,  push  the 
wheel onto the shaft of the wheel rotator as shown.  A slight 
twist when attaching the plastic-bossed push on effect wheel 
will help. 


To  attach  glass-bossed  effect  wheels  (e.g.  liquid  wheels), 


tighten  the  cross-head  screw  on  the  shaft  of  the  wheel 


rotator as shown. 


The screw needs to be aligned to the flat of the shaft. 


To detach a bossed push on effect wheel, unscrew the wheel 


if it has a screw (e.g. a liquid wheel), and make sure the wheel 


is vertical and straight.  Then use both hands to pull the wheel 


off the shaft. 


5.


Connect  the  power  supply  to  the  inlet  socket  on  the  right 
hand side of the projector.  The projector will turn on as you power up the projector.   

 
6.


To  focus  the  projected  effect,  twist  the  slide  on  the  lens 
forward and backwards until your desired focus is achieved.


7.


The maximum projected image size should be no bigger than 4m in diameter.   

Summary of Contents for 22662

Page 1: ...ief Description The perfect projector for the home High quality and an appropriate brightness for bedrooms 5 Contents 1 x Aura Projector 1 x Power Supply 1 x Effect Wheel design may vary 1 x Table Sta...

Page 2: ...Projector Attach the effect wheel removing the magnetic adapter as necessary for your own wheel Connect the power supply 10 Detailed Description The perfect projector for the home High quality and an...

Page 3: ...should be used Cords rated for less amperage than the appliance may overheat 2 Mount the projector using the table stand foam ring provided or wall mount The wall mount should be screwed to a wall in...

Page 4: ...tach to the projector Once the magnetic adapter has been removed push the wheel onto the shaft of the wheel rotator as shown A slight twist when attaching the plastic bossed push on effect wheel will...

Page 5: ...after a certain time Turn on the projector and wait 10 seconds To start the timer double click the DIM OFF TIMER button To indicate the timer starting the projected light will flicker The timer autom...

Page 6: ......

Page 7: ......

Page 8: ...o and you are working under the direction of the manufacturer Pull the plug to disconnect from the mains do not pull the cord to unplug the projector 15 Troubleshooting Should you need to contact us a...

Page 9: ...waliteit en met een geschikte helderheid voor slaapkamers LED 100 and LED Projectors geven meer licht voor in de multi sensorische snoezelruimte Niet te gebruiken in combinatie met de Panorama rotator...

Page 10: ...informatie De projector is voorzien van de volgende kenmerken Timer Dimmer LED lamp geen vervanging nodig geen hitte Toepasbaar met de bestaande serie effectwielen Inclusief een vloeistofwiel Ingebouw...

Page 11: ...ord moet worden gemonteerd op de projector Om dit te doen bevestigt u de veerklem over het veiligheidskoord op de zijkant van de projector 3 Installeer het meegeleverde effectwiel Dit werkt met een ma...

Page 12: ...iteit van het geprojecteerde effect te veranderen draait u de schuif op de lens naar voren en naar achteren totdat de gewenste scherpstelling is bereikt 7 De maximale beeldgrootte mag niet groter zijn...

Page 13: ...ekoppeld wordt Probeer de projector niet uit elkaar te halen Voor het reinigen van de lens een tissue of lenzendoek gebruiken met een kleine hoeveelheid pure alcohol Probeer niet zomaar om deze projec...

Page 14: ...projecteur parfait pour la maison Qualit sup rieure et clart adapt e la chambre coucher 5 Contenu 1 x Projecteur Aura 1 x Bo te d alimentation 1 x Roue effets l effet peut varier 1 x Support de Table...

Page 15: ...rfait pour la maison Qualit sup rieure et clart adapt e la chambre coucher les LED 100 et Projecteurs LED mettent plus de lumi re et conviennent l espace multi sensoriel Pr sente les caract ristiques...

Page 16: ...ecteur Les vis sont fournies Pri re de noter en attachant le projecteur au mur attachez une corde de s curit au projecteur Attachez la pince de la corde au c t du projecteur 3 Installez la Roue fourni...

Page 17: ...la vis et la partie plate de la hampe Pour d tacher une roue desserrez la vis si la roue soit une Roue Liquide et v rifiez que la roue soit verticale et tout droit Servez vous de les deux mains pour t...

Page 18: ...configurer une seule fois 1 V rifiez que le Projecteur soit allum 2 En vous servant de l App r seautage sur votre appareil mobile connectez au Wi Fi hotspot du Projecteur Le nom du r seau pour ce Proj...

Page 19: ...ge et l entreposage dans un lieu sec et d une temp rature mod r e vitez la chaleur excessive aussi que l humidit la poussi re et la vibration D branchez avant de nettoyage et entretien Ne pas essayer...

Reviews: