FITLIGHT TRAINER FLB10002DC User Manual Download Page 39

39

SYSTEM OPERATION

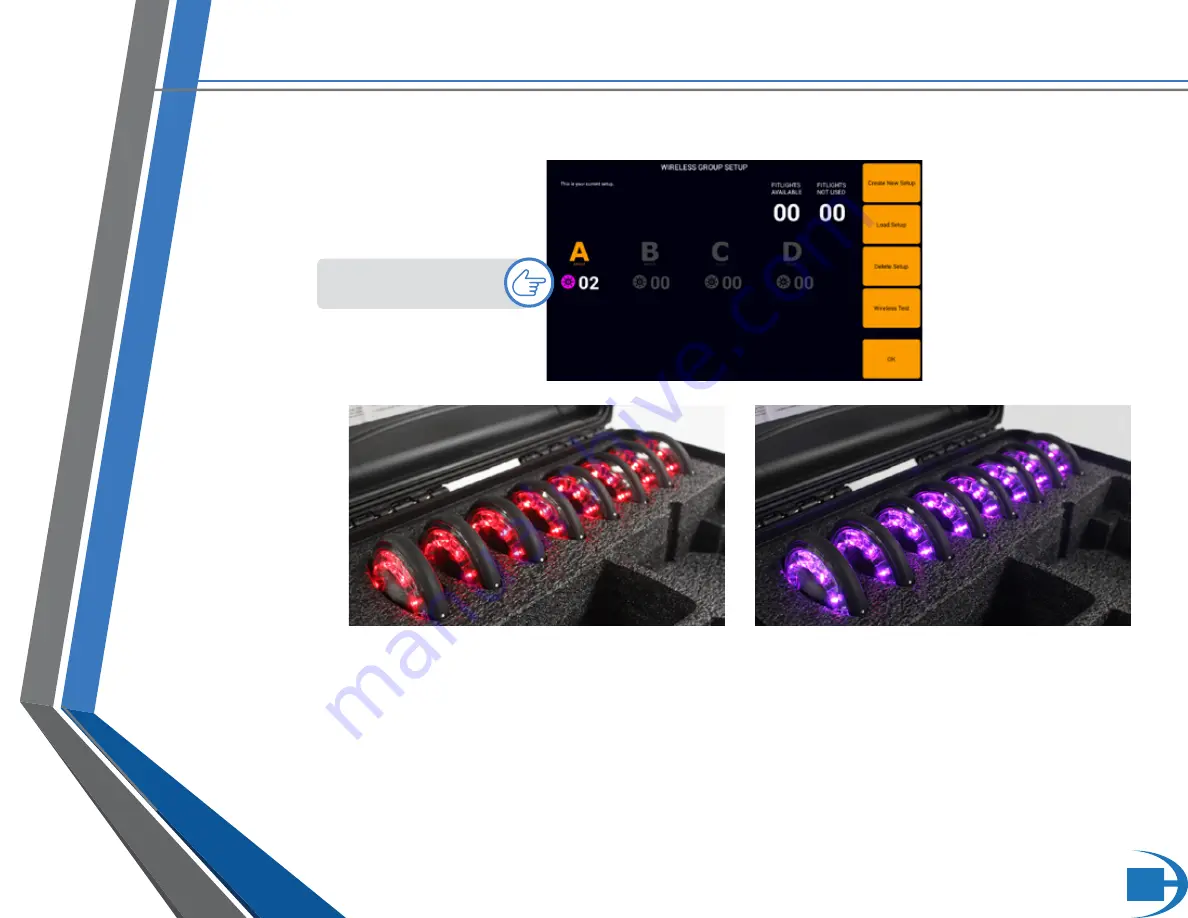
Select the number of groups. In this example, shows 1 group (A) of 2 

FITLIGHTS™.

 Group A is automatically selected.

FITLIGHTS™ will turn RED

Tap each FITLIGHTS™ until they turn purple

Select

The number of groups

Once the FITLIGHTS™ have been assigned to the group, select Ok. 

The FITLIGHT Trainer™ will then ask if you would like to 

“switch to new setup”

. If you select yes, then this current setup 

will become your new set-up. If you select No the FITLIGHT Trainer™ will then save this set-up for you to use another time 

(where you can load it be selecting Load Setup).

Name the setup and select Ok. 

Summary of Contents for TRAINER FLB10002DC

Page 1: ...USER MANUAL FITLIGHT Trainer User Manual...

Page 2: ...15 SYSTEM OPERATION 17 QUICK GUIDE MAIN MENU 17 PARAMETER EXPLANATIONS 18 RANDOM TRAINING SET UP 20 PROGRAM OR EDIT SEQUENCE 22 MULTIPLE FITLIGHT ACTIVATIONS PROGRAM EXAMPLE 25 SAVE NAME A PROGRAM 25...

Page 3: ...Corp reserves the right to make changes and additions deletions without notice This publication cannot be copied without the prior written consent of FITLIGHT Sports Corp SUPPORT 41 TROUBLE SHOOTING...

Page 4: ...d on the user is encouraged to try to correct the interference by one or more of the following measures I I Re orient or relocate the receiving antenna I I Increase the separation between the equipmen...

Page 5: ...Case Failure to register your FITLIGHT Trainer may void your WARRANTY Registration allows the user to be notified of new protocols the ability to download software updates and access to the Dashboard...

Page 6: ...rcise routine trouble free I I It is recommended that you keep all of the information included with your FITLIGHT Trainer in a safe place in the event you need to reference it again Should you lose it...

Page 7: ...n any way that can lead to damage to the FITLIGHT Trainer or personal injury r r The FITLIGHT Trainer has been designed to withstand a high degree of force but it should not be subjected to possible p...

Page 8: ...LIABILITY SHALL BE LIMITED TO COSTS OF REPLACEMENT REPAIR OR REFUND OF THE PURCHASE PRICE PAID AT THE SOLE OPTION OF THE COMPANY THE FOREGOING WARRANTIES AND REMEDIES ARE EXCLUSIVE AND IN LIEU OF ALL...

Page 9: ...original warranty period or thirty 30 days whichever is longer or for any additional period of time that may be applicable in your jurisdiction This warranty does not cover problems or damage resulti...

Page 10: ...RATION TO THE DURATION OF THE APPLICABLE LIMITED WARRANTY PERIOD FOR YOUR PRODUCT Some jurisdictions do not allow limitations on how long an implied warranty lasts so the above limitation may not appl...

Page 11: ...11 SYSTEM INFORMATION The following items are included with each FITLIGHT Trainer system WHAT S INCLUDED FITLIGHTS CHARGER CASE TABLET CONTROLLER TABLET POWER SUPPLY CHARGER POWER SUPPLY VELCRO PADS...

Page 12: ...i Directional Accelerometer 2g 4g 8g Sensitivity Sound Yes Multi Tone buzzer Maximum FITLIGHTS per TabletController 32 Data Capture Yes Impact Resistant Yes Size FITLIGHTS 10 cms Weight FITLIGHTS 0 3...

Page 13: ...them into the charging case and connect the power supply adaptor to the charging case Connect to a 110 220V outlet Charge the Tablet Controller with the supplied Power Supply plug into120 220 V elect...

Page 14: ...Reposition the FITLIGHTS in the Charger Case until they are illuminated QUICK TIPS TO ENSURE THE FITLIGHTS ARE PLACED CORRECTLY 1 Make sure the FITLIGHTS are properly centered onto the contacts of th...

Page 15: ...ectly in the case and the White Dots on the FITLIGHTS are visible above the foam insert and that the Tablet Controller is off 5 The system should be charged for 3 hours for the first time before use 6...

Page 16: ...let Controller looks like this Use the following instructions if your Tablet Controller looks like this Identify which type of Tablet Controller that you have Power on the Tablet Controller by depress...

Page 17: ...for the FITLIGHT Games Menu for the Training Programs Settings Menu Indicates the status of the Dashboard Indicates the status of the dongle Indicates the status of the FITLIGHT set up Indicates the...

Page 18: ...buttons STANDARD FITLIGHT does not flash when it activates FLASH FITLIGHT flashes initially when it activates SLOW BLINK FITLIGHT flashes slowly when it activates FAST BLINK FITLIGHT flashes rapidly w...

Page 19: ...f hits per colour The number of hits per colour will be illustrated and the total hits will be deducted from the original set up 3 Select Done once all hits are selected BEEP MODE DEFINE HITS PER COLO...

Page 20: ...he less sensitive the deactivation requires i e the more force that is required for the FITLIGHT to be deactivated upon impact 5 DELAY Select the Delay for the interval between FITLIGHTS coming on in...

Page 21: ...by Light Manual for more information 14 LOAD PRESET Select Load Preset if the set up has been saved before 15 SAVE PRESET Select Save Preset to save the current set up 16 DELETE PRESET If the set up h...

Page 22: ...rop down menu will appear to enable you to select the FITLIGHT number 1 Select the FITLIGHT number by scrolling down 2 Once the number appears in the window touch OK In this example FITLIGHT 1 is sele...

Page 23: ...oing past 120 seconds 3 COLOUR Select FITLIGHT colour as required by selecting the colour box 4 SENSORE MODE There are 3 deactivation modes to select from a Distance only b Impact only c Both meaning...

Page 24: ...ll if you require the FITLIGHTS to have all of the same parameters 11 IMPACT SENSITIVITY Select the sensitivity of Impact as required The higher the value the less sensitive the deactivation requires...

Page 25: ...r recall It will also indicate the profile of the Sequence date number of steps etc To generate a new sequence select New or select Ok to return to the Main Menu DELETE A STEP Press and hold to a numb...

Page 26: ...26 SYSTEM OPERATION RUN PROGRAMMED SEQUENCE Select Performance Training Select Run Programmed Sequences...

Page 27: ...on 3 SINGULAR This will select one FITLIGHT in a row of FITLIGHTS This option is used when there are more than 2 FITLIGHTS in a row 4 GLOBAL DELAY This enables the system to follow the users hit rate...

Page 28: ...28 SYSTEM OPERATION Select Performance Training Select Split Time Test SPLIT TIME SET UP This set up allows the user to track and measure the time between each deactivated FITLIGHT...

Page 29: ...LIGHT Please refer to the Start by Light Manual for more information 6 RETRIGGER This feature will automatically restart the routine 7 SAVE DATA Allows the user to save the split times to the Dashboa...

Page 30: ...to 8 in the split segments It can be checked by cycling the FITLIGHTS and observing the sequence in which they activate Once the FITLIGHTS are set up continue to the training menu 1 The results are s...

Page 31: ...31 SYSTEM OPERATION Select Performance Training Select Hand Eye Coordination HAND EYE COORDINATION SET UP...

Page 32: ...Distance only Impact only or both which means the FITLIGHT can be deactivated by motion or Impact Please refer to Parameter Explanations for more information 4 Select if sound Beep is required 5 IMPAC...

Page 33: ...t this to save the current set up 13 DELETE PRESET If the set up has been saved before select Delete preset to remove it 14 DYNAMIC DELAY This enables the system to follow the users hit rate as the us...

Page 34: ...triggered on the opponents side E E The opponent is required to deactivate the red FITLIGHT at the same time trying to activate a red FITLIGHT on their opponents side E E As the red FITLIGHTS are miss...

Page 35: ...rmed in the routine 3 Indicates the numbers of misses from the routine 4 Indicates the average time per hit deactivation 5 Indicates the total time used to complete the routine 6 Stop can be used at a...

Page 36: ...Select New Athlete ATHLETE DATABASE SET UP To learn more about the features Import Export and New Group please refer to the Saving Searching and Grouping Manual Ensure that the Save Data box is selec...

Page 37: ...ING DATA SET UP We recommend that you select unexported data only when prompted This will export only the data that was recently recorded since the last time an export data was performed Please note t...

Page 38: ...38 SYSTEM OPERATION WIRELESS GROUP SET UP A video of this set up is also available on the online portal under Tutorials HOW TO CREATE 1 GROUP Select Connect Fitlights Select Create New Set up...

Page 39: ...ct The number of groups Once the FITLIGHTS have been assigned to the group select Ok The FITLIGHT Trainer will then ask if you would like to switch to new setup If you select yes then this current set...

Page 40: ...S to change from RED to PURPLE E E Select B and tap 2 FITLIGHTS to change from RED to GREEN E E Select C and tap 2 FITLIGHTS to change from RED to BLUE E E Select D and tap 2 FITLIGHTS to change from...

Page 41: ...Touch Screen does not function i i Turn off the Tablet Controller and Reboot i i Reload Firmware The FITLIGHTS do not change colour i i Check that the program is set to change colour as defined i i R...

Page 42: ...ou are using rechargeable batteries i i Make sure that all of the batteries are fully charged and that there is not a weak charge battery within the group i i Check that you have a good wireless conne...

Page 43: ...been depleted and the batteries should be discarded according to your local disposal regulations for batteries i i Make sure that the correct voltage batteries are inserted into the FITLIGHTS They sh...

Page 44: ...44 SUPPORT WIRELESS TEST Select Connect Fitlights Select Wireless Test When prompted if you would like to perform a network test select Yes...

Page 45: ...Should there be poor wireless connectivity then Manual Channel selection is recommended You can locate this by selecting the Settings menu item in the main screen and then selecting Settings again He...

Page 46: ...gative is correctly oriented Step 1 Step 2 Remove the Rubber Guard Rubber Guard removed and 4 screws exposed Reverse the process to close the FITLIGHT It is important that the contacts on the bottom c...

Page 47: ...ious steps in reverse An instructional video of this is also available in the online portal under Tutorials Using light pressure with either a flat screw driver or pliers gently remove the plug from t...

Page 48: ...e FITLIGHT Training System with a damp cloth only for optimum visual performance i i Do keep your FITLIGHT Trainer properly charged at all times The FITLIGHT Trainer is never off and so it should be l...

Page 49: ...e battery i i DO NOT place or leave the battery in a damp or wet environment i i DO NOT allow water to touch the battery i i DO NOT wrap the batteries with conductive material i i DO NOT incinerate or...

Page 50: ...5 Subpart B EN 300328V1 7 1 2006 EN 301489 1V1 8 1 2008 RSS 210 RSS102 RSS Gen EN 60950 1 2006 EN 62471 2008 EN 62311 2008 FCC CFR 47 Part 15 Subpart C FCC CFR 47 Part 15 Subpart B EN 300328V1 7 1 200...

Page 51: ...51 SUPPORT SETTINGS Select Settings And then select Settings again...

Page 52: ...htness of the FITLIGHTS Sun Filter Preset Use in the event that bright direct sunlight is triggering the FITLIGHTS Level 1 being the lowest level of filter and 4 the highest Dongle RF Channel The wire...

Page 53: ...data from the Tablet Controller to the Dashboard Backup all athletes and all programmed sequences to file Create a backup file for all entered names in the Athletes Database and program sequences Res...

Page 54: ...w version is available please follow the onscreen instructions and select OK Once the update is complete the software will shut down and the home screen of the Tablet Controller will be shown Here sim...

Reviews: