background image

26

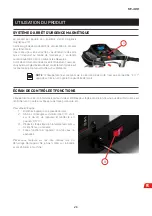
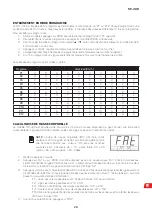
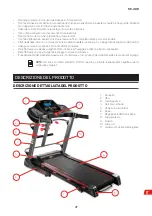
ÉCRAN

Montre l’information actuelle, comme la vitesse actuelle, le temps parcouru ou restant, les calories utilisées, le pouls, 
etc… La fourchette de valeurs pour chacun est:

 •

TIME


– Temps 5:00 a 99:59 minutos / secondes.

 •

DISTANCE

 – Distance: 1,0 a 99,9 kilomètres.

 •

SPEED


– Vitesse: de 0,8 a 20 km/h.

 •

CALORIES


– Calories 20 a 999 calories.

 •

PULSE

 – Pouls- 50 a 200 pulsations  / minute (BPM).

NOTE

Lorsque vous visualisez le pouls, vous devez avoir les deux mains sur les capteurs 

métalliques de chaque poignée. Pour convertir approximativement les calories en kilojoules, il 
faut multiplier le nombre de calories par 4.

MC-400

Summary of Contents for MC-400

Page 1: ...ES FR IT EN DE Manual usuario Manuel d instructions Manuale dell utente Instruction manual Betriebsanleitung MC 400 ...

Page 2: ...as que hayan tenido problemas de salud anteriormente Este aparato no está previsto para ser utilizado por personas incluidos niños con capacidades físicas sensoriales o mentales reducidas o personas sin experiencia ni conocimientos salvo vigilancia o previo instrucción de parte de una persona responsable de su seguridad Este aparato está destinado al uso doméstico Sólo puede utilizar el aparato un...

Page 3: ...un lugar fuera del alcance de los niños Pare siempre la máquina con el interruptor principal Para realizar una salida urgente agarre las barras de sujeción y coloque los pies en los reposapiés Para realizar una parada urgente extraiga la llave de seguridad Es responsabilidad del propietario asegurarse de informaratodo usuario del producto sobre las precauciones de empleo NOTA Ante una utilización ...

Page 4: ...5 2x Tornillo M8x45 2x Tornillo M8x40 4x Tornillo M8x20 6x Arandela M8 8x Tuerca M8 8x Llave inglesa Llave Allen de 5mm y 6mm CARACTERÍSTICAS TÉCNICAS CONTENIDO DE LA CAJA Cinta de correr Modelo MC 400 Potencia 240 V 50 Hz Potencia del motor 2000 W Rango de velocidad 0 8 20 Km h Superficie de carrera 1200 x 420 mm Peso máximo del usuario 100 Kg Tipo de pantalla Pantalla LCD Funciones Calorías Puls...

Page 5: ...las columnas Apriete firmemente gire a la derecha todos los fijadores con la llave Allen o la llave inglesa PASO 3 Coloque cada cubierta de plástico 7 en su posición y fíjela al equipo usando los tornillos previamente retirados 8 gire a la derecha PASO 4 Gire la consola 9 para que quede casi horizontal y luego fíjela a las columnas del mango con 2 tornillos M8x20 6 y arandelas 4 Apriete los tornil...

Page 6: ...sorios PASO 9 Fije la barra de accesorios a los rieles superior e inferior de la barra de accesorios con 2 tornillos M8x55 15 y tuercas 5 Apriete los tornillos gire hacia la derecha con la llave Allen PASO 10 Deslice las 2 piezas restantes del acolchado de tubo 11 sobre los tubos horizontales de la barra de accesorios La máquina ya está lista para su uso Después del montaje de esta cinta de correr...

Page 7: ...en la parte interna de su pierna derecha Acérquese lo más que pueda a la punta de su pie Cuente hasta 15 Relaje y repita con la pierna izquierda extendida ROTE SU CUELLO Rote la cabeza hacia la derecha sintiendo que la parte izquierda se estira Luego tire la cabeza hacia atrás apuntando la barbilla hacia el techo dejando su boca abierta Rote la cabeza hacia la izquierda y finalmente dirija la barb...

Page 8: ...quipo está encendido pero la llave de seguridad no está conectada E7 aparece en la pantalla y el equipo no se puede encender CONSOLA Y FUNCIONES El equipo cuenta con una pantalla computarizada que le proporciona controles para el funcionamiento de la unidad así como la información de entrenamiento la duración la velocidad la distancia recorrida etc Para utilizar el equipo 1 Enchufe el equipo en el...

Page 9: ...no es TIME Tiempo 5 00 a 99 59 minutos segundos DISTANCE Distancia 1 0 a 99 9 kilómetros SPEED Velocidad de 0 8 a 20 km h CALORIES Calorías 20 a 999 calorías PULSE Pulso 50 a 200 pulsaciones minuto BPM NOTA Al mostrar el pulso debe tener ambas manos en los sensores de metal en cada asa Para convertir aproximadamente calorías en kilojulios multiplique el número de calorías por 4 MC 400 ...

Page 10: ...cia o calorías Cuando esté en modo Programa y el equipo no esté funcionando presione o para ajustar el valor del tiempo del programa SELECCIÓN DE VELOCIDAD RÁPIDA En el modo Manual pulse un botón de selección de velocidad rápida para cambiar a la velocidad aplicable La velocidad permanecerá seleccionada hasta que se cambie o el equipo se detenga 1 0 km h 7 0 km h 3 0 km h 9 0 km h 5 0 km h 11 0 km...

Page 11: ...ar 1 Encienda el equipo 2 Presione START El equipo cuenta 5 segundos y luego comienza a funcionar a la velocidad más lenta 3 Ajuste la velocidad utilizando según sea necesario 4 Cuando termine presione STOP CONFIGURACIÓNDEUNADURACIÓNPREVISTADELASESIÓN Cuandoseentrenaaunaduraciónpreestablecida de la sesión el equipo se detiene automáticamente una vez que el temporizador cuenta a 0 00 1 Encienda el ...

Page 12: ...oral IMC debe utilizarse únicamente como guía y no debe considerarse datos médicos Los valores de IMC en los siguientes rangos son indicadores de 19 bajo peso 20 a 25 normal 26 a 29 sobrepeso 30 obeso 1 Encienda el equipo 2 Pulse FAT o pulse PROG repetidamente hasta que aparezca FAT en la pantalla Debajo de este mostrará el tipo de datos de entrada descrito a continuación a la izquierda y el valor...

Page 13: ...ctividad física más intensa Para aumentar la tonicidad de las piernas elija una pendiente mayor y aumente el tiempo de ejercicio ENTRENAMIENTO AERÓBICO PARA PERDER PESO ESFUERZO INTENSO ENTRE 35 Y 60 MINUTOS Este tipo de entrenamiento permite quemar calorías de forma eficaz Es inútil que se esfuerce por encima de sus límites la frecuencia como mínimo 3 veces a la semana y la duración de las sesion...

Page 14: ... se requiere lubricación si está seco lubrique Para aplicar lubricante 1 Levante el borde de la cinta de correr para que la cubierta de rodadura quede expuesta 2 Coloque varias gotas de lubricante a lo largo del centro de la plataforma de rodadura 3 Haga funcionar el equipo a una velocidad lenta de 3 a 5 minutos para distribuir el lubricante NOTA No lubrique en exceso Limpie el exceso de lubricant...

Page 15: ...las conexiones de la unidad motriz y del motor Si el motor está dañado cámbielo La pantalla muestra E05 Protección eléctrica disparada Compruebe que la alimentación eléctrica de la red esté conforme según las especificaciones Asegúrese de que la correa de transmisión no esté enganchada o no pueda girar debido a una obstrucción Compruebe todas las conexiones Compruebe si hay un fallo del circuito d...

Page 16: ...incipal esté apagado OFF O y de que el cable de alimentación esté desconectado de la toma de corriente B TRANSPORTE PARA MOVER LA CINTA DE CORRER La unidad se puede inclinar sobre sus ruedas para facilitar su movimiento y almacenamiento Con el equipo en la posición plegada y bloqueada sujete firmemente el manillar con ambas manos A continuación incline cuidadosamente el equipo hasta que ruede libr...

Page 17: ...antía de 2 años a partir de la fecha de compra La garantía cubre las averías y el mal funcionamiento del aparato siempre y cuando sea utilizado de acuerdo a los usos indicados y según las instrucciones del manual Para hacer valer la garantía es necesario el comprobante de compra ticket o factura y el producto debe estar completo y con todos sus accesorios La cláusula de garantía no cubre el deteri...

Page 18: ...lamento Europeo y del Consejo aplicables Directiva 2014 35 UE del Parlamento Europeo y del Consejo de 26 de febrero de 2014 sobre la armonización de las legislaciones de los Estados miembros en materia de comercialización de material eléctrico destinado a utilizarse con determinados límites de tensión refundición El producto entregado coincide con el ejemplar que fue sometido al examen CE de tipo ...

Page 19: ...sé par des personnes y compris les enfants dont les capacités physiques sensorielles ou mentales sont atteintes ou dans le cas d un manque d expérience ou de connaissances à moins qu il y ait une surveillance préalable ou l instruction d une personne responsable de la sécurité de ces personnes Cet appareil est destiné à un usage domestique N utilisez pas cet article à l extérieur Une unique person...

Page 20: ...droit hors de portée des enfants Arrêtez toujours la machine à l aide de l interrupteur principal Pour une sortie urgente saisissez les barres d appui et placez vos pieds sur les repose pieds Pour faire un arrêt urgent retirez la clé de sécurité Ilestdelaresponsabilitédupropriétairedes assurerd informertouslesutilisateursduproduitdesprécautionsd utilisation NOTE Face à une utilisation incorrecte F...

Page 21: ... M8x55 2x Boulon M8x45 2x Boulon M8x40 4x Boulon M8x20 6x Rondelle M8 8x Écrou M8 8x Clé anglaise Clé Allen de 5mm et 6mm CARACTÉRISTIQUES TECHNIQUES CONTENU DE LA BOÎTE Tapis de course Modèle MC 400 Puissance 240 V 50 Hz Puissance du moteur 2000 W Fourchette de vitesse 0 8 20 Km h Parcours de course 1200 x 420 mm Poids max de l utilisateur 100 Kg Type d écran Écran LCD Fonctions Calories Pulsatio...

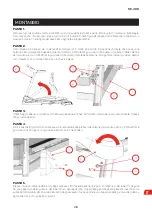
Page 22: ...fort tour sur la droite tous les points de fixation avec la clé Allen ou la clé anglaise ÉTAPE 3 Mettez chaque cache de plastique 7 en position et fixez le à l appareil en utilisant les boulons retirés au préalable 8 tour sur la droite ÉTAPE 4 Tournez la console 9 de manière à ce qu elle soit pratiquement à l horizontale et fixez la ensuite aux axes du manche à l aide de 2 boulons M8x20 6 et des r...

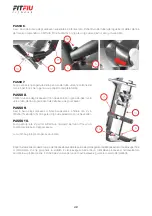
Page 23: ...ires ÉTAPE 9 Fixez la barre d accessoires aux rails supérieur et inférieur de la barre avec 2 boulons M8x55 15 et des écrous 5 Serrez les boulons tour vers la droite à l aide de la clé Allen ÉTAPE 10 Faites glisser les 2 pièces restantes du rembourrage de tube 11 sur les tubes horizontaux de la barre d accessoires La machine est prête à l emploi Après l installation de cetapis roulant il est possi...

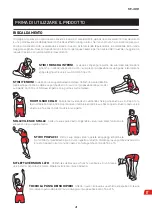
Page 24: ...s possible du bout de votre pied Comptez jusqu à 15 Détendez vous et répétez avec la jambe gauche étendue FAITES TOURNER VOTRE COU Tournez la tête vers la droite en laissant la partie gauche s étirer Ensuite laissez la tête en arrière pointant votre menton vers le plafond bouche ouverte Faites un mouvement de rotation sur votre gauche et pointez votre menton vers votre poitrine ÉLEVEZ VOS EPAULES ...

Page 25: ...mé mais la ceinture de sécurité n est pas connectée E 0 7 apparaît sur l écran et l appareil ne peut être démarré ÉCRAN DE CONTRÔLE ET FONCTIONS L équipement a un écran informatisé qui fournit des contrôles pour l opération de l unité ainsi que des informations sur l entraînement la durée la vitesse la distance parcourue etc Pour utiliser l équipe 1 Branchez l appareil à une prise de courant 2 All...

Page 26: ...minutos secondes DISTANCE Distance 1 0 a 99 9 kilomètres SPEED Vitesse de 0 8 a 20 km h CALORIES Calories 20 a 999 calories PULSE Pouls 50 a 200 pulsations minute BPM NOTE Lorsque vous visualisez le pouls vous devez avoir les deux mains sur les capteurs métalliques de chaque poignée Pour convertir approximativement les calories en kilojoules il faut multiplier le nombre de calories par 4 MC 400 ...

Page 27: ...z sur ou pour ajuster les valeurs detemps distance ou calories Lorsque l appareil sera en mode Programme et pas en marche appuyez sur ou pourajuster le temps du programme SÉLECTION VITESSE RAPIDE Sur le mode Manuel appuyez sur le bouton de sélection de vitesse rapide pour changer la vitesse voulue La vitesse restera sélectionnée jusqu à ce que l appareil s arrête 1 0 km h 7 0 km h 3 0 km h 9 0 km ...

Page 28: ...a machine sur ON 2 Appuyez sur START L appareil compte 5 secondes et il se met ensuite à fonctionner à vitesse plus lente 3 Ajustez la vitesse en utilisant selon votre besoin 4 Lorsque vous aurez terminé appuyez sur STOP CONFIGURATION D UNE DURÉE PRÉCISE DE SESSION Lorsqu on s entraîne en session prédéterminée l appareil s arrête automatiquement une fois que la distance à parcourir arrive à 0 00 1...

Page 29: ...e doit pas être considéré comme une donnée médicale Les valeurs IMC dans les tranches suivantes sont indicateurs de 19 poids faible 20 a 25 normal 26 a 29 surpoids 30 obèse 1 Mettez l appareil en marche 2 Appuyez sur FAT ou sur PROG à maintes reprises jusqu à ce qu apparaisse FAT à l écran Au dessous seront mentionnés le type d informations voir ci après comme données d entrée sur la gauche et la ...

Page 30: ...s jambes choisissez une résistance supérieure et augmentez le temps d exercice ENTRAÎNEMENT AÉROBIC POUR PERDRE DU POIDS EFFORT INTENSE ENTRE 35 ET 60 MINUTES Cetype d entraînement permet brûlerdes calories de manière efficace Il est inutile devous efforcerau delà devos limites la fréquence au moins 3 fois par semaine et la durée des sessions entre 35 et 60 minutes sont les facteurs qui permettent...

Page 31: ...face est sèche appliquez du lubrifiant Comment l appliquer 1 Soulevez le bord du tapis pour que la plateforme de roulement soit à la vue 2 Mettez quelques gouttes de lubrifiant tout au long du centre de la plateforme de roulement 3 Faites marcher la machine à une vitesse lente de 3 à 5 minutes afin de bien répartir le lubrifiant NOTE Ne lubrifiez pas de trop Nettoyez l excès de lubrifiant du tapis...

Page 32: ...le moteur est endommagé changez le L écran affiche E05 Protection électrique déclenchée Vérifiez que l alimentation électrique du réseau soit conforme aux spécifications Assurez vous que la courroie de transmission ne soit pas entravée ou qu elle ne puisse pas tourner à cause d une obstruction Vérifiez toutes les connexions Vérifiez qu il n y ait pas de problème de circuit du moteur ou du circuit ...

Page 33: ...que l interrupteur d alimentation principal est éteint OFF O et que le cordon d alimentation est débranché de la prise de courant TRANSPORT POUR DÉPLACER LA BANDE L unité peut être inclinée sur ses roues pour faciliter son mouvement et son rangement En ayant la machine en position pliée et verrouillée tenez fermement le guidon avec les deux mains Ensuite inclinez soigneusement l appareil jusqu à c...

Page 34: ...garantie de 2 ans à compter de la date d achat La garantie couvre les défauts et les dysfonctionnements de l appareil à condition qu il ait été utilisé selon les indications données et conformément aux instructions du manuel Pour faire valoir la garantie un justificatif d achat sera nécessaire ticket ou facture et l article devra être remis complet avec tous ses accessoires La clause de garantie n...

Page 35: ...xigences des directives applicables du Parlement européen et du Conseil Directive 2014 35 UE du Parlement européen et du Conseil du 26 février 2014 concernant l harmonisation des législations des États membres en matière de la mise sur le marché de matériel électrique destiné à être utilisé dans certaines limites de tension refonte Le produit livré coïncide avec l échantillon qui a été soumis à l ...

Page 36: ... e quelle che abbiano avuto problemi di salute anteriormente Questo apparato non è previsto per essere utilizzato da persone inclusi bambini con capacità fisiche sensoriali o mentali ridotte o persone senza esperienza nè conoscenze salvo vengano sorvegliate o precedentemente istruite da parte di una persona responsabile per la sua sicurezza Questo apparato è destinato all uso domestico Può utilizz...

Page 37: ...ervi in un luogo fuori dalla portata dei bambini Spenga sempre la macchina con l interruttore principale Per effettuare una discesa urgente afferri le barre di fissaggio e collochi i piedi sui riposapiedi Per effettuare un arresto urgente estragga la chiave di sicurezza È responsabilità del proprietario assicurarsi di informare a tutti gli utenti del prodotto sulle precauzioni di impiego NOTA Nel ...

Page 38: ...55 2x Vite M8x45 2x Vite M8x40 4x Vite M8x20 6x Guarnizione M8 8x Bullone M8 8x Chiave inglese Chiave allen da 5mm y 6mm CARATTERISTICHE TECNICHE CONTENUTO DELLA SCATOLA Tapis roulant Modello MC 400 Potenza 240 V 50 Hz Potenza del motore 2000 W Intervallo della velocità 0 8 20 Km h Superficie di corsa 1200 x 420 mm Peso massimo dell utente 100 Kg Tipo di schermo Schermo LCD Funzioni Calorie Pulsaz...

Page 39: ...e Stringa firmemente giri verso destra tutti i fissatori con la chiave Allen o con la chiave inglese PASSO 3 Collochi ogni copertura di plastica 7 nella sua posizione e la fissi all impianto utilizzando le viti anteriormente rimosse 8 giri verso destra PASSO 4 Giri la consolle 9 per farla rimanere quasi in orizzontale e dopo la fissi alle colonne del manubrio con 2 viti M8x20 6 e guarnizioni 4 Str...

Page 40: ...a barra degli accessori PASSO 9 Fissi la barra degli accessori al binario superiore e inferiore con 2 viti M8x55 15 e bulloni 5 Stringa le viti giri verso destra con la chiave Allen PASSO 10 Faccia scorrere le 2 parti di imbottitura rimanenti del tubo 11 sui tubi orizzontali della barra degli accessori La macchina già è pronta per il suo utilizzo Dopol installazionediquestotapisroulantèpossibileve...

Page 41: ...ella sua gamba destra Si avvicini il più possibile alla punta del suo piede Conti fino a 15 Rilassi e ripeta con la gamba sinistra distesa RUOTI IL SUO COLLO Ruoti la testa verso destra sentendo che la parte sinistra si stiri Dopo tiri la testa all indietro orientando il mento verso il tetto e lasciando la sua bocca aperta Ruoti la testa verso sinistra e infine orienti il mento verso il suo petto ...

Page 42: ...stiti NOTA Se l impianto è acceso ma la cinghia di sicurezza non è collegata E7 appare sullo schermo e non può essere avviato l impianto CONSOLLE E FUNZIONI L impianto dispone di uno schermo computerizzato che fornisce i controlli per far funzionare l impianto così come informazione sull allenamento il tempo velocità distanza percorsa ecc Per utilizzare l impianto 1 Colleghi l impianto ad una pres...

Page 43: ...per ognuno è TIME Tempo 5 00 a 99 59 minuti secondi DISTANCE Distanza 1 0 a 99 9 chilometri SPEED Velocità da 0 8 a 20 km h CALORIES Calorie 20 a 999 calorie PULSE Battito 50 a 200 battiti minuto BPM NOTA Al visualizzare il battito deve tenere entrambe le mani sui sensori di metallo di ogni asse Per convertire le calorie in chilojoule moltiplichi il numero delle calorie per 4 MC 400 ...

Page 44: ...mpo distanza o calorie Quando è in modalità Programma e l impianto non è in funzione prema o per regolari il valore del tempo del programma SELEZIONE RAPIDA DELLAVELOCITÀ In modalità Manuale prema un bottone di selezione della velocità rapida Quick Speed Select per cambiare alla velocità applicabile La velocità rimarrá selezionata fino a che non venga cambiata o fino a che l impianto non venga spe...

Page 45: ...ol obiettivodelnumerodicaloriechedesiderabruciare 1 Accenda l impianto 2 Prema START L impianto conta 5 secondi e dopo comincia a funzionare a velocità più lenta 3 Regoli la velocità utilizzando come desidera 4 Quando termina prema STOP CONFIGURAZIONE DI UNA DURATA PREVISTA DELLA SESSIONE Quando si allena con una durata predefinita della sessione l impianto si arresta automaticamente una volta che...

Page 46: ...ice di massa corporea IMC si deve utilizzare solamente come guida e non deve essere considerato come un dato medico I valori IMC nei seguenti intervalli sono indicatori di 19 sottopeso 20 a 25 normale 26 a 29 sovrappeso 30 obeso 1 Accenda l impianto 2 Prema FAT o prema ripetutamente PROG fino a che FAT compaia sullo schermo Sotto di esso troverà il tipo di dati d ingresso descritto a continuazione...

Page 47: ...lizzare un attività fisica più intensa Per aumentare la tonicità delle gambe scelga una pendenza maggiore e aumenti il tempo di esercizio ALLENAMENTO AEROBICO PER PERDERE PESO SFORZO INTENSO TRA 35 E 60 Questo tipo di allenamento permette bruciare calorie in modo efficace È inutile che si sforzi al di sopra dei suoi limiti la frequenza comeminimo3volteallasettimana eladuratadellesessioni tra35e60m...

Page 48: ...protezione è liscia al tatto non richiede lubrificazione se è secca lubrifichi Per applicare il lubrificante 1 Sollevi i bordi del tapis roulant per far si che la copertura del movimento rimanga esposta 2 Collochi varie gocce di lubrificante nella parte centrale della piattaforma di movimento 3 Faccia funzionare l impianto ad una velocità lenta da 3 a 5 minuti per distribuire il lubrificante NOTA ...

Page 49: ...ontrolli le connessioni dell unità motrice e del motore Se il motore è danneggiato lo cambi Lo schermo mostra E05 Protezione elettrica fuori uso Controlli che l alimentazione elettrica della rete sia conforme alle specifiche Si assicuri che la cinghia di trasmissione non sia bloccata o non possa girare a causa di un ostruzione Controlli tutte le connessioni Controlli se c è un errore nel circuito ...

Page 50: ...rincipale sia spento OFF O e che il cavo dell alimentazione sia scollegato dalla rete elettrica TRASPORTO PER MUOVERE IL TAPIS ROULANT L unità si può inclinare sulle sue ruote per facilitare il movimento e lo stoccaggio Con l impianto nella posizione di chiusura e bloccato afferri con forza il manubrio con entrambe le mani A continuazione inclini con attenzione l impianto fino a che ruoti liberame...

Page 51: ...pre le avarie e il mal funzionamento dell apparecchio sempre e quando sia utilizzato in accordo agli utilizzi indicati e secondo le istruzioni del manuale Per far valera la garanzia è necessario la ricevuta di acquisto ticket o fattura e il prodotto deve essere completo e con tutti i suoi accessori La clausola di garanzia non copre il deterioramento prodotto dall usura la mancanza di manutenzione ...

Page 52: ...tive del Parlamento Europeo e del Consiglio applicabil i Direttiva 2014 35 UE del Parlamento Europeo e del Consiglio del 26 febbraio del 2014 sulla armonizzazione delle normative degli Stati membri in materia di commercializzazione di materiale elettrico destinato ad utilizzarsi applicando determinati limiti di tensione riformulazione Il prodotto consegnato corrisponde al modello che fu sottoposto...

Page 53: ... especially people over 35 years old that might have had health problems previously The equipment is designed for adult use only keep children away from the equipment Also those with reduced mental sensory or physical capabilities except express preceding instruction from a person responsible fortheir safety This device has been designed for home use only This machine can only be used by one perso...

Page 54: ...ter use remove the safety key from the console and store it in a place which is inaccessible to children Always stop the machine using the master switch If you want to get off urgently grab the support rails and place your feet on the foot rails To perform an emergency stop remove the safety key It s the owner s responsibility to ensure that all other users are well informed about all safety and u...

Page 55: ...0 Kg Display Type LCD display Display Readout Calories Heart Rate Speed Time Distance N W G W 58 63 Kg 1 Treadmill 2 Accessory Bar 1x 3 Accessory Bar Rail 2x 4 Tube Joint Cover 4x 5 Tube Padding 4x 6 Accessory Dumbell 2x 7 Safety Tether 1x 8 Belt Lubricant 1x 9 Auxiliary Input Cable 1x 10 Fasteners Tools M8x55 Screw 2x M8x45 Screw 2x M8x40 Screw 4x M8x20 Screw 6x M8 Washer 8x M8 Nut 8x Spanner 5mm...

Page 56: ...M8x20 screws 6 and washers 4 on the front side of the columns Firmly tighten rotate right all fasteners using the Allen key spanner STEP 3 Place each plastic cover 7 in position and secure it to the equipment using the previously removed screws 8 rotate right STEP 4 Rotate the console 9 so it is almost horizontal then secure it to the handle columns using 2 M8x20 screws 6 and washers 4 Tighten the...

Page 57: ...ry bar to the upper and lower accessory bar rails using 2 M8x55 screws 15 and nuts 5 Tighten the screws rotate right using the Allen key STEP 10 Slide the 2 remaining pieces of tube padding 11 over the horizontal accessory bar tubes The machine should resemble the image below and is ready for use After the installation of this treadmill it is possible to see the two connecting lines of the two end...

Page 58: ...ead to the right for one count feeling the stretch up the left side of your neck Next rotate your head back for one count stretching your chin to the ceiling and letting your mouth open Rotate your head to the left for one count and finally drop your head to your chest for one count SHOULDER LIFT Lift your right shoulder up toward your ear for one count Then lift your left shoulder up for one coun...

Page 59: ...ng NOTE If the equipment is on but the safety tether is not attached E07 shows on the display and the equipment cannot be started CONSOLE AND FUNCTIONS The equipment features a computerized display that provides you with controls for operating the unit as well as workout information such as duration speed distance travelled etc To use the equipment 1 Plug the equipment into the electrical supply 2...

Page 60: ...LORIES 20 to 999 calories PULSE 50 to 200 beats minute BPM NOTE When displaying pulse you must have both hands on the metal sensors on each handle To approximately convert calories to kilojoules multiply the number of calories by 4 START Press to start the equipment Start can also be selected using the left hand handle mounted Start button STOP Press to stop the equipment Stop can also be selected...

Page 61: ...ress or to adjust the program time value QUICK SPEED SELECTION In Manual mode press a quick speed select button to change to the applicable speed The speed will remain as selected until changed or the equipment stopped 1 0 km h 7 0 km h 3 0 km h 9 0 km h 5 0 km h 11 0 km h AUDIO SYSTEM CONTROLS AUX Allows connection of an audio playing device via a 3 5mm cable supplied Note that some audio system ...

Page 62: ...quipment 2 Press START The equipment counts down 5 seconds then starts running at the slowest speed 3 Adjust speed using as required 4 When finished press STOP SETTING A PRE SET SESSION DURATION When training to a pre set session duration the equipment stops automatically once the timer counts down to 0 00 1 Turn on the equipment 2 Press MODE so that the H 1 shows on the display 3 Adjust the sessi...

Page 63: ...ed as a guide only and should not be considered medical data BMI values in the following ranges are indicators of 19 underweight 20 to 25 normal 26 to 29 overweight 30 obese 1 Turn on the equipment 2 Press FAT or press PROG repeatedly until FAT shows on the display Beneath this will be the input data type described below on the left and the data value on the right The example image shows and age v...

Page 64: ...f the exercise AEROBIC EXERCISE FOR WEIGHT LOSS MODERATE E ORT FOR 35 TO 60 MINUTES This type of training is an e ective way of burning calories There is no point in pushing yourself unduly for the best results the most important thing is frequency of exercise at least 3 times a week and the duration of the session 35 to 60 minutes Exercise at average intensity moderate e ort so you are not out of...

Page 65: ...the top surface of the running deck If the surface is slick to the touch then no lubrication is required If the surface is dry to the touch apply some lubricant How to apply lubricant 1 Lift one side of running belt 2 Pour several drops of the supplied lubricant to the top surface of the running deck under the centre of the running belt 3 Run the equipment at a slow speed for 3 to 5 minutes to eve...

Page 66: ...em between drive unit and console detected Check connections between console and drive unit If the connectors or wiring is damaged replace it Display shows E2 Drive unit motor problem detected Check drive unit and motor connections if the motor is damaged replace it Display shows E3 Electrical protection tripped Check mains electrical supply is to specifications Ensure that drive belt is not caugh...

Page 67: ...sure the master power switch is OFF O and the power cord is un plugged from wall outlet B TRANSPORT MOVING The unit can be tilted onto its wheels for easy moving and storage With the equipment in the folded and locked position firmly grasp the handlebar with both hands Next carefully tilt the equipment back until it rolls freely on the transport wheels WARNING Do not attempt to move the equipment ...

Page 68: ...s a 2 years guarantee This guarantee covers damages and bad function only if the product has not been misused and all the instructions have been correctly followed In order to claim your guarantee you must present your receipt of purchase The product has to be complete and have all its parts The guarantee does not cover wear and tear lack of maintenance negligence incorrect assembly and inappropri...

Page 69: ...pean Parliament Directives and of the Council Directive 2014 35 EU of the European Parliament and of the Council of 26 February 2014 on the harmonisation of the laws of the Member States relating to the making available on the market of electrical equipment designed for use within certain voltage limits recast The product delivered coincides with the prototype that was submitted for CE exam Valls ...

Page 70: ...sichtigt oder angewiesen Dieses Gerät ist für den Hausgebrauch bestimmt Nur eine Person darf das Gerät gleichzeitig benutzen Das maximale Gewicht des Benutzers beträgt 120 kg Tragen Sie geeignete Kleidung und Schuhe für den Sport Tragen Sie keine lose Kleidung die sich an irgendeinem Teil des Produkts verfangen könnte Achten Sie darauf sich vor körperlicher Aktivität aufzuwärmen um Muskelverletzun...

Page 71: ...e abziehen und an einem Ort außerhalb der Reichweite von Kindern aufbewahren Die Maschine immer mit dem Hauptschalter anhalten Für einen Notausgang nehmen Sie die Haltegriffe und stellen Sie Ihre Füße auf die Fußstützen Um eine Notabschaltung vorzunehmen ziehen Sie den Sicherheitsschlüssel ab Es liegt in der Verantwortung des Eigentümers sicherzustellen dass alle Benutzer des Produkts über die Vor...

Page 72: ...hraube M8x40 4x Schraube M8x20 6x Unterlegscheibe M8 8x Mutter M8 8x Schraubenschlüssel 5mm und 6mm Inbusschlüssel TECHNISCHE DATEN INHALT DER BOX Laufband Modell Nummer MC 400 Leistungsabgabe 240 V 50 Hz Motorleistung 2000 W Drehzahlbereich 0 8 20 Km h Rennbelag 1200 x 420 mm Maximales Benutzergewicht 100 Kg Bildschirmtyp LCD Anzeige Funktionen Kalorien Herzfrequenz Geschwindigkeit Zeit Entfernun...

Page 73: ...t 3 an jeder Seite der Maschine befestigen SCHRITT 3 Jede Kunststoffabdeckung 7 aufsetzen und mit den zuvor entfernten Schrauben 8 an der Maschine befestigen im Uhrzeigersinn drehen SCHRITT 4 Konsole 9 fast waagerecht drehen und mit 2 Schrauben M8x20 6 und Unterlegscheiben 4 an den Griffsäulen befestigen Ziehen Sie die Schrauben im Uhrzeigersinn drehen mit dem Inbusschlüssel fest SCHRITT 5 Bereite...

Page 74: ...iene mit 2 Schrauben M8x55 15 und Muttern 5 an der oberen und unteren Schiene der Zubehörschiene Ziehen Sie die Schrauben im Uhrzeigersinn drehen mit dem Inbusschlüssel fest SCHRITT 10 Schieben Sie die restlichen 2 Stück der Rohrpolsterung 11 über die horizontalen Rohre der Zubehörstange Die Maschine ist nun betriebsbereit Nach der Installation dieses Laufbandes ist es möglich die beiden Verbindun...

Page 75: ...möglich an die Fußspitze Entspannen und mit gestrecktem linken Bein wiederholen DREHEN SIE IHREN HALS Drehen Sie Ihren Kopf nach rechts und spüren Sie die Dehnung der linken Seite Ziehen Sie dann den Kopf nach hinten zeigen Sie Ihr Kinn zur Decke und lassen Sie den Mund offen Drehen Sie Ihren Kopf nach links und richten Sie schließlich Ihr Kinn auf Ihre Brust DIE SCHULTERN HEBEN Heben Sie die rech...

Page 76: ...TIZ Ist das Gerät eingeschaltet aber der Sicherheitsschlüssel nicht angeschlossen erscheint im Display E 0 7 und das Gerät startet nicht KONSOLE UND FUNKTIONEN Das Gerät verfügt über ein computergesteuertes Display das Ihnen die Bedienung des Geräts sowie Trainingsinformationen wie Dauer Geschwindigkeit zurückgelegte Wegstrecke usw ermöglicht Um das Gerät zu benutzen 1 Schließen Sie das Gerät an d...

Page 77: ...IME Zeit 5 00 bis 99 59 Minuten Sekunden DISTANCE Reichweite 1 0 bis 99 9 Kilometer SPEED Geschwindigkeit 0 8 bis 20 km h CALORIES Kalorien 20 bis 999 Kalorien PULSE Puls 50 bis 200 Schläge Minute BPM NOTIZ Bei der Anzeige des Impulses müssen Sie beide Hände an den Metallsensoren an jedem Griff haben Um ungefähr Kalorien in Kilojoule umzurechnen multiplizieren Sie die Anzahl der Kalorien mit 4 MC ...

Page 78: ...dus befinden und die Maschine nicht läuft drücken Sie oder um den Programmzeitwert einzustellen SCHNELLE GESCHWINDIGKEITSAUSWAHL Drücken Sie im Handbetrieb die Taste Schnellwahl um auf die gewünschte Geschwindigkeit umzuschalten Die Geschwindigkeit bleibt so lange gewählt bis sie geändert oder die Maschine gestoppt wird 1 0 km h 7 0 km h 3 0 km h 9 0 km h 5 0 km h 11 0 km h AUDIOSYSTEM STEUERUNG A...

Page 79: ...Entfernung oder die Anzahl der zu verwendenden Kalorien voreingestellt werden 1 Schalten Sie den Strom ein 2 Drücken Sie START Der Computer zählt 5 Sekunden und beginnt dann mit der langsamsten Geschwindigkeit zu laufen 3 Passen Sie die Geschwindigkeit bei Bedarf über an 4 Wenn Sie fertig sind drücken Sie STOP KONFIGURATION EINER ERWARTETEN DAUER DER SITZUNG Wenn Sie für eine voreingestellte Train...

Page 80: ...Benutzers ermöglicht Um den Body Mass Index zu berechnen NOTIZ Der Body Mass Index BMI sollte nur als Anhaltspunkt dienen und nicht als medizinische Daten betrachtet werden BMI Werte in den folgenden Bereichen sind Indikatoren für 19 geringes Gewicht 20 bis 25 normal 26 bis 29 Übergewicht fettleibig 1 Schalten Sie den Strom ein 2 Drücken Sie FAT oder drücken Sie wiederholt PROG bis FAT auf dem Dis...

Page 81: ...en Um den Tonus Ihrer Beine zu erhöhen wählen Sie eine steilere Steigung und erhöhen Sie Ihre Trainingszeit AEROBES ABNEHMTRAINING INTENSIVE ÜBUNG 35 BIS 60 MINUTEN DieseArtdesTrainingsermöglichtesIhnen Kalorieneffektivzuverbrennen EsistsinnlosfürSie überIhreGrenzenzuarbeiten die Häufigkeit mindestens 3 mal pro Woche und die Dauer der Sitzungen zwischen 35 und 60 Minuten sind die Faktoren die es I...

Page 82: ...ie die Oberfläche der Lauffläche Wenn die Abdeckung glatt ist ist keine Schmierung erforderlich Wenn es trocken ist schmieren Zum Auftragen von Schmiermittel 1 Heben Sie die Kante des Laufbandes an so dass das Laufband frei liegt 2 Mehrere Tropfen Schmiermittel in die Mitte der Lauffläche geben 3 DasGerätmiteinerlangsamenGeschwindigkeitvon3bis5Minutenlaufenlassen umdasSchmiermittelzuverteilen NOTI...

Page 83: ...nnt Überprüfen Sie die Verbindungen zwischen der Konsole und der Antriebseinheit Wenn die Stecker oder die Verdrahtung beschädigt sind ersetzen Sie diese In der Anzeige erscheint E05 Elektrischer Schutz ausgelöst Überprüfen Sie ob die Netzspannung den Spezifikationen entspricht Vergewissern Sie sich dass der Antriebsriemen nicht eingeklemmt ist oder sich aufgrund eines Hindernisses nicht drehen ka...

Page 84: ...Hauptschalter auf OFF O steht und dass das Netzkabel aus der Steckdose gezogen ist B TRANSPORT SO BEWEGEN SIE DAS LAUFBAND Das Gerät kann auf den Rädern gekippt werden so dass es sich leicht bewegen und verstauen lässt Halten Sie den Lenker in zusammengeklappter und verriegelter Position mit beiden Händen fest Anschließend das Gerät vorsichtig kippen bis es auf den Transportrollen frei rollt ACHTU...

Page 85: ... Jahren ab Kaufdatum Die Garantie erstreckt sich auf Ausfälle und Fehlfunktionen des Gerätes solange es entsprechend den angegebenen Verwendungszwecken und den Anweisungen in der Bedienungsanleitung verwendet wird Um die Garantie in Anspruch nehmen zu können ist ein Kaufnachweis Ticket oder Rechnung erforderlich und das Produkt muss vollständig sein und das gesamte Zubehör enthalten Die Garantiekl...

Page 86: ...des Europäischen Parlaments und des Rates entspricht Richtlinie 2014 35 EU des Europäischen Parlaments und des Rates vom 26 Februar 2014 zur Harmonisierung der Rechtsvorschriften der Mitgliedstaaten über die Bereitstellung elektrischer Betriebsmittel zur Verwendung innerhalb bestimmter Spannungsgrenzen auf dem Markt Das gelieferte Produkt entspricht dem Muster das zur EG Baumusterprüfung eingereic...

Page 87: ......

Page 88: ...fit your needs cardio Manual revisado en marzo de 2021 www fitfiu fitness com ...

Reviews: