background image

Please note that once installation is complete a few drips may appear out of the dispenser over the
next few days as the remaining trapped air is cleared.

Installation (all models)

Your Fisher & Paykel ActiveSmartTM
refrigerator is fitted with front and rear rollers,
designed for moving the product in the
forwards and backwards direction.

Avoid moving the product in a sideways
direction as this may damage the rollers or the
floor covering/surface.

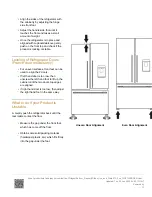
A. Your refrigerator will arrive with the

front feet wound up making moving
the product into its final location a
simple task.

B. Roll the refrigerator into its final

position making sure there is the
correct air gap between the product
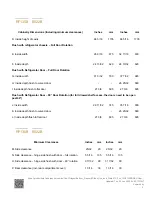
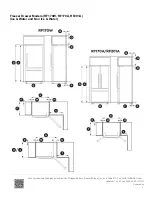
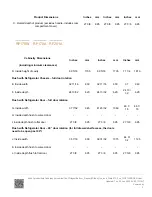
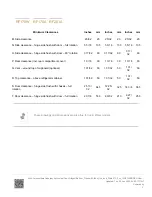
and surrounding cabinetry. See
minimum clearance in cabinetry
dimensions table.

C. Adjust the front feet down until the

refrigerator
is leaning backward with the front
approximately 1⁄2” (10 mm) higher
than the back. This will ensure a good
door closing action.

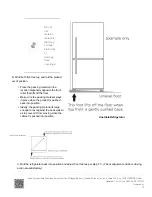
Non French door models

only

D. Aligning your refrigerator with

cabinetry.

Refrigerator Feet

https://producthelp.fisherpaykel.com/us/Cool/Fridges/Bottom_Freezer/Without_Ice_and_Water/13.5_cu_ft/RF135BDRX4/User…

Updated: Tue, 02 Jun 2020 23:55:17 GMT

Powered by

18

Summary of Contents for RF135BDRX4

Page 1: ...nce is properly grounded earthed Location Your refrigerator should not be located in direct sunlight or next to any heat generating appliance such as a cooktop oven or dishwasher Ice Water Ice Water M...

Page 2: ...efrigerator chassis full door rotation Flush with refrigerator door full door rotation https producthelp fisherpaykel com us Cool Fridges Bottom_Freezer Without_Ice_and_Water 13 5_cu_ft RF135BDRX4 Use...

Page 3: ...door product 67 1 8 1705 B Overall width of product 25 635 31 3 32 790 C Overall depth of flat door product excludes handle includes rear compartment cover 27 3 8 695 27 3 8 695 C Overall depth of cu...

Page 4: ...r Rotation for full drawer shelf access the doors need to be open past 90 J Inside width 29 11 32 745 35 7 16 900 K Inside depth flush to curved door 26 25 32 680 L Inside depth flush to flat door 27...

Page 5: ...15 15 16 405 20 7 8 530 RF135B E522B 110VAC and Water Inlet Dimensions Inches mm Inches mm U Power cord 40 1016 40 1016 V Water inlet to bottom 5 127 5 127 W 110VAC to bottom 3 76 3 76 X 110VAC to edg...

Page 6: ...els RF170W RF170A RF201A Ice Water and Non Ice Water https producthelp fisherpaykel com us Cool Fridges Bottom_Freezer Without_Ice_and_Water 13 5_cu_ft RF135BDRX4 User Updated Tue 02 Jun 2020 23 55 17...

Page 7: ...oor rotation RF170W RF170A RF201A Product Dimensions Inches mm Inches mm Inches mm A Overall height of product 67 17 32 1715 67 17 32 1715 70 15 32 1790 B Overall width of product 31 3 32 790 31 3 32...

Page 8: ...620 24 13 32 620 Flush with Refrigerator Door full door rotation G Inside width 37 7 32 945 41 23 32 1060 46 1 16 46 1 16 H Inside depth flush to curved door I Inside depth flush to flat door 27 3 8...

Page 9: ...Q Vent around top of cupboard optional 1 31 32 50 1 31 32 50 1 31 32 50 R Top clearance above refrigerator cabinet 1 31 32 50 1 31 32 50 1 31 32 50 S Door clearance hinge side flush with chassis full...

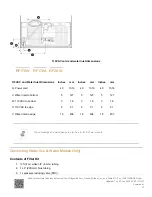
Page 10: ...dge 2 51 2 51 2 51 Y Water inlet to edge 16 406 16 406 18 457 These drawings and dimensions are also true for Ice Water models Connecting Water Ice Water Models Only Contents of Filter Kit 1 13 ft 4 m...

Page 11: ...water connection to your Ice Water refrigerator must be installed by an authorized plumber or Fisher Paykel Authorized Service Agent The water connection instructions below are intended only for the p...

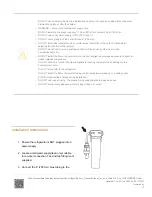
Page 12: ...sure to light can weaken plastic components DO NOT install in a location that is susceptible to freezing temperatures as damage to the housing could occur DO NOT screw filter to the refrigerator DO NO...

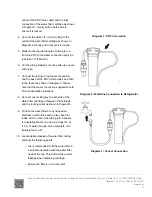
Page 13: ...o each side of the water filter cartridge in between the cartridge and the locking collet as shown in Diagram 4 9 To flush the water filter of any trapped air harmless carbon fines and to also check f...

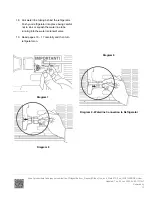
Page 14: ...Run the 1 4 6 mm tubing to the back of the refrigerator ensuring there is enough tubing to pull the refrigerator out for service 13 Using the measurement guide located on the rear compartment cover as...

Page 15: ...running into the water solenoid valve 19 Read pages 16 17 carefully and then turn refrigerator on Diagram 7 Diagram 8 Diagram 6 Diagram 9 Waterline Connection to Refrigerator https producthelp fisherp...

Page 16: ...the same time as shown in Diagram 10 Connection to water supply System tested and certified by NSF International against NSF ANSI Standard 53 for the reduction of Asbestos Atrazine Benzene Cyst Carbof...

Page 17: ...aker cycle The ice tray will flip twice and spill water into the ice bin Empty the water dry and replace the bin Note that the ice tray will not flip until the refrigerator compartment door is closed...

Page 18: ...t wound up making moving the product into its final location a simple task B Roll the refrigerator into its final position making sure there is the correct air gap between the product and surrounding...

Page 19: ...low then unscrew the left hand foot to lift up the cabinet until the two doors top edges are aligned If right hand door is too low then adjust the right hand foot in the same way What to do if your P...

Page 20: ...oduct is pushed back into position Ideally the packing material is large enough to rest against the back wall so as to prevent it from moving when the cabinet is pushed into position Unstable Refriger...

Page 21: ...ufficiently Energy Efficiency For the Most Energy Efficient use of Your Appliance Ensure your refrigerator has adequate ventilation Do not cover your appliance with any material that will prevent air...

Reviews: