background image

12

US 

CA

2.  Turn unit off, (see page 10)

3.  Remove all contents.

4.  If necessary, move the unit so you can gain access to 

the rear of the product.

5.  Unplug the unit from the power outlet.

6.  It is also recommended that the power to the outlet be 

turned-off if the circuit is not required for other items 

during the Winter season.

7.  When cleaning unit pay particular attention to any 

cracks and crevices that may have accumulated dirt 

and debris.

8.  Remove the front toe-grille, (see Figure 12), and use a 

brush and vacuum to clean dirt and debris from be-

neath the unit.

9.  Thoroughly clean the toe-grille and re-install on the 

unit. (See Figure 12).

10. Remove the rear access cover, (see Figure 13), and 

use a brush and vacuum to clean dirt and debris from 

the machine compartment.

11.  Thoroughly clean the rear access cover and re-install 

on the unit.

12. Wipe down all interior surfaces with anti-bacterial 

cleaner to be followed with clean rinse water to remove 

any residual chemicals which could cause staining. Do 

not use any abrasive cleaners or scouring pads.

13. Leave the drawers open and allow to completely dry 

out before closing the drawers.

14. Thoroughly clean the drawer gaskets with anti-bacterial 

cleaner to be followed with clean rinse water to remove 

any residual chemicals.

15. Thoroughly clean the exterior with a cleaner approved 

for stainless steel. Do not use any abrasive cleaners or 

scouring pads. See "Stainless Steel Maintenance" on 

page 13.

16. Any mounting hardware / fasteners that are showing 

signs of corrosion should be replaced.

17. Once the exterior has been thoroughly cleaned, you 

may want to apply a coating of car wax to help protect 

against spotting from moisture, dirt, and debris that 

may accumulate on the surfaces during the Winteriza-

tion period.

•  If the plastic defrost drain pan located under the 

compressor contains water, use a sponge to 

remove as much water as possible.

Start-Up After Long-Term Storage:

1.  If stored outside, it is recommended that the unit again 

be thoroughly inspected per the storage instructions 

above to address any dirt or debris from the weather 

and/or animals/insects.

2.  Connect the unit to electrical power.

3.  Turn unit on and confirm your desired control settings.

4.  Allow 24-hrs for the unit to stabilize before loading 

contents.

Remove the power cord 

from the grommet in the 

access cover.

Figure 13

Soak up 

water from 

plastic drain 

pan if 

necessary

Clean out

debris

CARE AND CLEANING

Clean out 

behind grille

Grille

Spacer

Figure 12

Outdoor Product Long-Term Storage /  

Winterization:

1.  Time to Winterize, when the daily low ambient tempera-

ture is at or below 38°F (3.3°C).

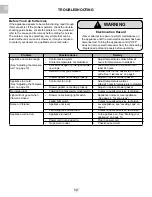
!

CAUTION

Operation of the unit at ambient temperatures below the 

recommended Winterization temperature will void your war-

ranty.

Remove screw from 

each end of grille

After completion of the above, you may choose to store the 

unit indoors, although this is not required.

Remove screws 

around perimeter 

of access cover.

Summary of Contents for DCS RF24DE3

Page 1: ...OUTDOOR REFRIGERATED DRAWERS Installation Operation and Maintenance Instructions MODELS MOD LES RF24DE3 TIROIRS R FRIG R S D EXT RIEUR Instructions d installation d utilisation et d entretien...

Page 2: ...tant Safety Instructions Warnings and safety instructions appearing in this guide are not meant to cover all possible conditions and situa tions that may occur Common sense caution and care must be ex...

Page 3: ...re plugging in This will assure oil returns to the compressor Plugging the appliance in immediately may cause damage to internal parts A Message To Our Customers Thank you for selecting this DCS Outdo...

Page 4: ...is area to not be obstructed and the grille openings kept clean See Figure 1 The use of a custom made grille is not recommended as it may restrict air flow Leveling Legs Adjustable legs at the front a...

Page 5: ...s are generally not used on circuits with power equip ment that must run unattended for long periods of time un less required to meet local building codes and ordinances Electrical Connection A ground...

Page 6: ...ip bracket line up with the end of the 211 2 54 6 cm line Rear of cabinet line 5 Fasten the anti tip bracket to the floor using the supplied screw See Figure 7 6 Slide the cabinet back into position m...

Page 7: ...rcuit Not shared with other appliances 5 When initially loading your new product or whenever large quantities of warm contents are placed within refrigerated storage compartment minimize drawer openin...

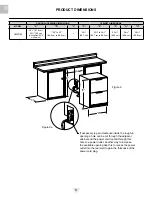
Page 8: ...cm to 88 3 cm 2323 32 60 2 cm 267 32 66 6 cm 395 32 99 5 cm Figure 8 Figure 8a PRODUCT DIMENSIONS If necessary to gain clearance inside the rough in opening a hole can be cut through the adjacent cabi...

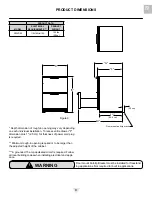
Page 9: ...equired for built in applications Figure 9 Depth dimension of rough in opening may vary depending on each individual installation To recess entire drawer F dimension plus 1 2 5 cm for thickness of pow...

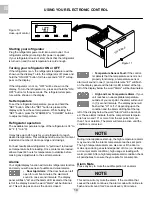
Page 10: ...open for over five minutes the alarm will sound in one second intervals The display panel will flash do and the Alarm LED located at the top left of the display below the word Alarm will be illuminat...

Page 11: ...acuuming or mop ping near the front of the appliance Damage to the grille can occur 3 Periodically clean the interior of the appliance as needed Front Grille Be sure that nothing obstructs the require...

Page 12: ...abrasive cleaners or scouring pads See Stainless Steel Maintenance on page 13 16 Any mounting hardware fasteners that are showing signs of corrosion should be replaced 17 Once the exterior has been t...

Page 13: ...most stainless steel products is to give the sur faces a brisk rubbing with a soft cloth soaked in warm water and a gentle detergent or mild mixture of ammonia Rub bing should to the extent possible...

Page 14: ...el appliance See page 4 leveling legs Contact a qualified service technician Noise or Vibration Appliance not level Fan hitting tube obstruction Level appliance see Leveling Legs on page 4 Contact a q...

Page 15: ...rchaser and any suc ceeding owner of the Product during the term of warranty for products purchased for ordinary single family home use All service under this Limited Warranty shall be provided by Fis...

Page 16: ...incurred when the product is installed in a location with limited or restricted access i e airplane flights ferry charges isolated geographic areas Normal recommended maintenance as set forth in the P...

Page 17: ......

Page 18: ...es Les consignes de s curit et avertissements contenus dans ce guide ne couvrent pas de fa on exhaustive toutes les conditions et situations possibles Soyez prudents et agissez avec pr caution et atte...

Page 19: ...imm diatement pourrait endommager les pi ces internes Un message l intention de nos clients Nous vous remercions d avoir choisi ce r frig rateur d ext rieur DCS Nous avons labor ce Guide d installatio...

Page 20: ...e ne soit pas obstru e et que les ouvertures de la grille demeurent propres voir Figure 1 L utilisation d une grille fabriqu e sur mesure n est pas recommand e car cela pourrait limiter la circulation...

Page 21: ...tilis s sur les circuits avec des quipements devant fonc tionner sans surveillance pendant de longues p riodes moins que cela ne soit n cessaire pour assurer la conformit aux codes de construction et...

Page 22: ...ce de fixation antibasculement soient align es avec l extr mit de la ligne de 211 2 po 54 6 cm ligne correspon dant l arri re de l appareil 5 Fixez la pi ce de fixation antibasculement au plancher en...

Page 23: ...alimentation d di non partag avec d autres appareils 5 Lors du chargement initial de votre nouveau produit ou lorsque vous placez de grandes quantit s de contenus ti des dans le compartiment de range...

Page 24: ...0 2 cm 267 32 po 66 6 cm 395 32 po 99 5 cm Figure 8 Figure 8a DIMENSIONS DU PRODUIT S il est n cessaire de gagner de l espace l int rieur de l ouverture vous pouvez d couper un trou dans l armoire adj...

Page 25: ...equis pour les applications encastr es Figure 9 La profondeur de l ouverture peut varier selon chaque installation Pour encastrer la totalit du tiroir la dimension F avec 1 po 2 5 cm suppl mentaire es...

Page 26: ...e pendant plus de cinq minutes l alarme retentit des intervalles d une seconde Le panneau d affichage clignotera en indiquant do et le voyant DEL situ dans le coin sup rieur gauche de l afficheur s al...

Page 27: ...le nettoyer avec de l eau et du savon B ti Le b ti en acier inoxydable peut tre lav avec de l eau et un savon doux puis bien rinc avec de l eau propre N utilisez JAMAIS de nettoyants r curer abrasifs...

Page 28: ...curer Voir Entre tien de l acier inoxydable la page 29 16 Les pi ces de montage fixation pr sentant des signes de corrosion doivent tre remplac es 17 Une fois l ext rieur bien nettoy vous pouvez appl...

Page 29: ...iste les frotter vigoureusement l aide d un chiffon doux imbib d eau ti de et d un d tergent doux ou encore d un m lange faible teneur en ammoniaque Les frottements doivent tre dans le sens des lignes...

Page 30: ...il n est pas de niveau Mettez l appa reil de niveau voir Pattes de nivellement la page 20 Contactez un technicien d entretien qualifi Bruit ou vibration L appareil n est pas de niveau Tube causant de...

Page 31: ...dur e de la garantie s il est achet pour une utilisation normale dans un domicile familial simple Toutes les r parations couvertes par cette garantie limit e doivent tre effectu es par Fisher Paykel...

Page 32: ...sque le produit est install dans un endroit o l ac c s est limit ou restreint par exemple frais d avion et de traversier r gions g ographiques isol es L entretien normal recommand dans le guide d util...

Page 33: ......

Page 34: ......

Page 35: ......

Page 36: ...s an ongoing process we reserve the right to change specifications or design without notice Fisher Paykel and DCS Appliances Inc 695 Town Centre Drive Suite 180 Costa Mesa CA 92626 1902 USA Service la...

Reviews: