background image

1

Thank you for selecting this DCS Outdoor Refrigerated Drawer. Because of these appliances’ unique features we
have developed this Use and Care and Installation Guide.  It contains valuable information on how to properly
install, operate and maintain your new appliance for years of safe and enjoyable operation.

To help serve you better, please

fill out and submit your Product Registration by visiting our website at 

www.dcsappliances.com

and selecting “Customer Care” on the home page and then select “Product

Registration”.  In addition, keep this guide handy, as it will help answer questions that may arise as you use your
new appliance.

For your convenience, product questions can be answered by a DCS Customer Care Representative at 
1-888-936-7872, or email: [email protected].

PLEASE RETAIN THIS MANUAL FOR FUTURE REFERENCE.

A MESSAGE TO OUR CUSTOMERS

NOTE:

Please write the Model, Code, and Serial Numbers on this page for references (the serial plate is located on

the upper left side, inner wall).

MODEL NUMBER

CODE

SERIAL NUMBER

SERIAL PLATE LOCATION

NOTE

: Inspect the product to verify that there is no shipping damage. If any damage is detected, call the shipper

and initiate a damage claim. DCS by Fisher & Paykel is not responsible for shipping damage.

DO NOT discard any packing material (box, pallet, straps) until the unit has been inspected.

Summary of Contents for DCS RF24-D

Page 1: ...THE OUTDOOR REFRIGERATED DRAWER Use and Care and Installation Guide MODELS RF24 D...

Page 2: ......

Page 3: ...nswer questions that may arise as you use your new appliance For your convenience product questions can be answered by a DCS Customer Care Representative at 1 888 936 7872 or email customer care fishe...

Page 4: ...artup 9 Set temperature 9 Set controls 9 Adjust temperature control 9 Interior light 9 Warning alarm 9 Door ajar alarm 9 High and low temperature 9 Power failure 10 Reset alarm 10 Holiday mode 10 Defr...

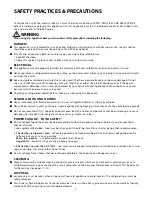
Page 5: ...olatile or flammable materials in your refrigerated drawer as they may explode Never freeze liquids in glass containers Liquid expands during freezing which may cause the container to explode Do not c...

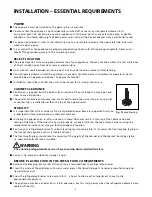
Page 6: ...s and counter top can be built around the unit as long as no top trim or counter top is installed lower than the top of the upper drawer STABILITY It is important that all four corners of the refriger...

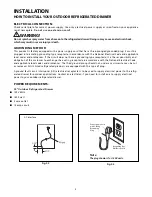
Page 7: ...with the National Electrical Code and applicable local codes and ordinances If the circuit does not have a grounding type receptacle it is the responsibility and obligation of the customer to exchange...

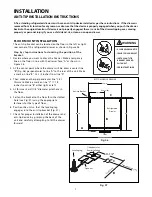
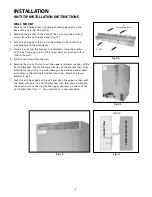
Page 8: ...o that the trim faces outward away from the appliance s door and fasten with appropriate screws suitable for the type of cabinet material Fig 05 INSTALLING DRAWERS Place the unit in front of the count...

Page 9: ...w a center line B Fig 06 perpendicular to line A to the rear of the unit Make a mark on line B 24 1 2 inches from line A 3 Then make another perpendicular line C at this mark Make a mark on line C 11...

Page 10: ...the wall 5 Pull the unit away from the wall 6 Remove the screws that connect the upper and lower sections of the Anti Tip Bracket Mount the lower section of the bracket that is not attached to the un...

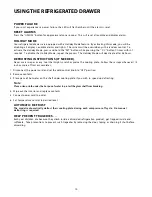
Page 11: ...buttons located on the display pad will raise or lower the set temperature by one degree F or C depending on your setting Fig 12 As with any refrigeration product there is a slight temperature varian...

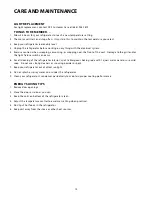
Page 12: ...ight scratch or pierce the cooling plate Follow these steps whenever 1 4 inch or more of frost accumulates 1 Disconnect the power cord and set the cold control knob to OFF position 2 Remove contents 3...

Page 13: ...when viewed from the front Always transport in its upright position only Relocate and install If the appliance has been left on its side for any length of time leave it standing upright for at least 1...

Page 14: ...ill and or the light fixture switch can occur 6 For all cleaning of the refrigerator interior mix 2 tablespoons baking soda with 1 quart warm water or use mild soap Do not use strong cleaners or scour...

Page 15: ...n warm water add 1 teaspoon of baking soda to each 1 pint 500 ml of water Do not use an abrasive powder solvent polish cleaner abrasive cloths highly perfumed strong smelling cleaners or undiluted det...

Page 16: ...Hot humid weather increases condensation Control improperly set Moisture collects on outside surface Hot humid weather increases condensation As humidity decreases moisture will disappear Control impr...

Page 17: ...located on the upper left side inner wall Code the serial plate is located on the upper left side inner wall Date of installation A brief description of the problem Your satisfaction is of the utmost...

Page 18: ...uct not including installation or other charges This warranty extends to the original purchaser and any succeeding owner of the Product for products purchased for ordinary single family home use All s...

Page 19: ...imitation or exclusion may not apply to you HOW TO GET SERVICE Please read this Use and Care Guide If you then have any questions about operating the Product need the name of your local DCS Authorized...

Page 20: ...18 NOTES...

Page 21: ...19 LE TIROIR FRIGORIFIQUE D EXT RIEUR Manuel d utilisation d entretien et d installation MOD LES RF24 D...

Page 22: ...on de votre nouvel appareil Si vous avez des questions au sujet de notre produit communiquez avec un repr sentant du centre de service la client le DCS par t l phone 1 888 936 7872 ou par courriel cus...

Page 23: ...e 9 R glage des commandes 9 Commande de temp rature r glable 9 clairage int rieur 9 Alarmes d avertissement 9 Alarme de porte entreb ill e 9 Temp ratures haute et basse 9 Panne de courant 9 R initiali...

Page 24: ...congeler de liquides dans des conteneurs en verre Le liquide qui s expanse pendant la cong lation risque de faire exploser le conteneur Ne pas consommer d aliments trop froids Les aliments retir s du...

Page 25: ...utour de l unit condition de ne pas installer de baguette sup rieure ou de plan de travail en dessous du haut du tiroir sup rieur STABILIT Il est important de supporter les quatre coins de la base du...

Page 26: ...ec mise la terre correspondante conform ment au Code national de l lectricit et aux codes et r glemen tations en vigueur Si le circuit ne poss de pas ce genre de prise le client a la responsabilit et...

Page 27: ...de l appareil et fixer avec les vis appropri es convenant au type de mat riau de l l ment INSTALLATION DES TIROIRS Placer l unit devant l ouverture du comptoir Veiller prot ger le sol avant de faire...

Page 28: ...le tiroir faire un trait central B Fig 06 perpendiculaire au trait A sur l arri re de l unit Faire une marque sur le trait B 24 1 2 pouces du trait A 3 Ensuite faire un autre trait perpendiculaire C c...

Page 29: ...u mural 5 D gager l unit du mur 6 Retirer les vis connectant les sections sup rieure et inf rieure du support antibasculement Fixer la section inf rieure du support qui n est pas attach e l unit sur l...

Page 30: ...ou COOLER plus froid situ sur le pav d affichage pour augmenter ou abaisser la temp rature r gl e de un degr F ou C en fonction de la configuration choisie Fig 12 Comme avec tout produit frigorifique...

Page 31: ...oins 1 4 pouce de givre 1 D connecter le cordon d alimentation et r gler le bouton de commande de froid en position OFF 2 Retirer le contenu 3 Mettre des bacs d eau chaude sur la clayette sous la plaq...

Page 32: ...orter en position verticale uniquement Mettre dans son nouvel emplacement et installer Si l appareil est rest sur son c t pendant une dur e quelconque le laisser en position verticale pendant au moins...

Page 33: ...mpe pourraient tre endommag s 6 Pour nettoyer l int rieur du r frig rateur m langez deux cuill res soupe de bicarbonate de soude avec 1 litre d eau chaude ou bien utilisez un savon doux N utilisez pas...

Page 34: ...te de soude pour 500 ml d eau Ne pas utiliser de poudre abrasive de solvant de nettoyant de vernis de chiffons abrasifs de nettoyants au parfum et l odeurs forts ni de d tergent dilu sur aucune partie...

Page 35: ...ongtemps Un temps chaud et humide augmente l effet de condensation Commande mal r gl e Accumulation de vapeur d eau sur la surface ext rieure Un temps chaud et humide augmente l effet de condensation...

Page 36: ...interne sup rieure gauche Code la plaque du num ro de s rie se trouve sur la paroi interne sup rieure gauche Date d installation Br ve description du probl me Votre satisfaction rev t la plus grande i...

Page 37: ...res successifs du produit dans la mesure o il s agit d un produit achet pour une utilisation domicile normale Tout service couvert par cette garantie limit e sera assur par Fisher Paykel Appliances In...

Page 38: ...cas particulier POUR OBTENIR DES R PARATIONS Veuillez consulter le manuel d utilisation et d entretien Si vous avez des questions concernant l utilisation du produit que vous cherchez le nom de l agen...

Page 39: ......

Page 40: ...ecifications or design without notice Fisher Paykel Appliances Inc 5900 Skylab Road Huntington Beach CA 92647 Customer Care 888 936 7872 Fax 714 372 7003 www dcsappliances com Nous am liorons constamm...

Reviews: