12
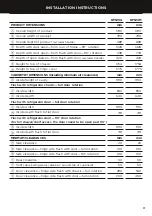
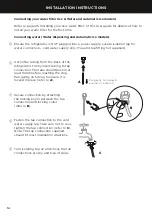
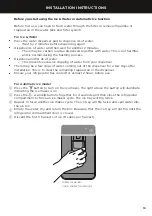
INSTALLATION INSTRUCTIONS
Installing your anti tip bracket
CAUTION!
Failure to install the anti-tip bracket as per below instructions can result in serious
injury or death.
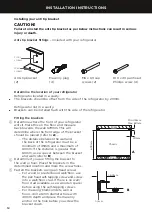
Anti-tip bracket fittings
– Included with your refrigerator.
Determine the location of your refrigerator
Refrigerator located in a cavity:
●
●
The brackets should be offset from the side of the refrigerator by 20mm.
Refrigerator not in a cavity:
●
●
Brackets can be installed flush with the side of the refrigerator.
M6 x 60 cap
screws (2)
#10 x 40 pan head
Phillips screw (4)
Anti-tip bracket
(2)
Masonry plug
(4)
Wall
screws
Floor
screws
Fitting the brackets
1
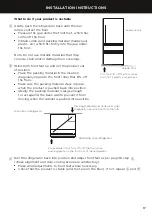
Determine where the front of your refrigerator
will sit. Mark this on the floor and measure
back towards the wall 678mm. This will
determine where the front edge of the bracket
should be placed (refer to
A
).
– The distance between the wall and
the back of the refrigerator must be a
minimum of 45mm and a maximum of
60mm. If the distance is greater than
60mm, use a spacer between the bracket
and wall (refer to
B
).
2
Determine if you are fitting the bracket to
the wall or floor. Place the brackets in the
determined location and mark the screw holes.
3
Fasten the brackets using pan head screws
– For wood or plasterboard wall/floor, use
the pan head self-tapping screw and screw
into a wall/floor stud. If there is no wall/
floor stud available, use a wooden spacer
before using the self-tapping screws.
– For masonry/tiled/concrete wall or
floors, drill a 6mm diameter hole with
40mm depth and place the masonry
anchor in the hole before you screw the
bracket down.
6
78mm
Min. 45mm
Max. 60mm
20mm
Chassis
Door
Wall
A
> 60mm
B
Spacer

