

split ring also works well for connecting to a downrigger weight. Attach the top
snap swivel to the stamped stainless-steel loop on the bottom of the Fish Hawk
Probe, and the bottom snap swivel to the downrigger ball.
Using the trolling rod and reel method, we recommend attaching a one-pound
ball weight to the probe on a “dropper line.” Make a dropper line by tying two
light-duty snap swivels to each end to a 12” length of 12 to 20lb monofilament
line (vary the length of line to your preference). Once tied, attach one of the snap
swivels to the stamped stainless-steel loop on the bottom of the Fish Hawk Probe
and the other to the one-pound ball weight. Should the weight become snagged
on the bottom, the lighter weight monofilament line will break before the heavy
probe line, saving the Fish Hawk Probe from being lost.
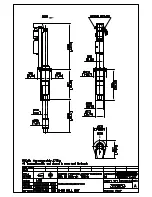
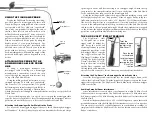
the sLiP-dUCer™ (Patent PendinG)
The Slip-Ducer™ rides
on the probe line or down-
rigger cable. Its unique de-
sign keeps the probe and
receiving element in perfect
alignment, regardless of the
downrigger cable’s or probe
line’s angle in the water. The
Slip-Ducer™ includes 10-feet
of cable. The body of the Slip-
Ducer™ should be 12” to 24”
deep in the water at trolling
speeds. Wave conditions and
trolling speed will dictate the
amount of cable you need to let out. Secure any unused cable inside the boat.
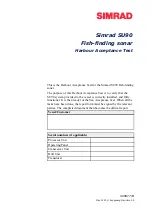
Attaching the Slip-Ducer™ to a Downrigger Cable or Probe Line
Insert the dowrigger cable or probe line into the slotted stopper found in the
tube on the Slip-Ducer™ body. Twist the stopper 180-degrees to capture the down-
rigger cable or probe line. The Slip-Ducer™ should slide freely on the downrigger
cable or probe line.
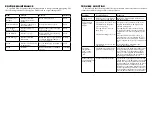
Avoiding Potential Sonar Interference
Sonar interference is caused when sonar frequencies within 20 kHz of each
other are used in close proximity. The Fish Hawk operates at 70 kHz while most
fish finders operate at 200 kHz. Meaning most fish finders will not interfere with
the Fish Hawk.
Some dual frequency finders have a 50 or 83 kHz frequency option that could
potentially interfere with the Fish Hawk if the transducers are too close together.
You can opt not to use the 50 or 83 kHz frequency in your fish finder’s settings, or
simply use the Fish Hawk’s Slip-Ducer™ in a location further away from your fish
finder’s transducer.
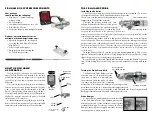
UsinG the fish haWk Probe
Deploy the Fish Hawk Probe using a downrig-
ger. Or, in place of a downrigger; use a short, stiff
action trolling rod equipped with a line-counter
reel spooled with 50 to 80lb. test “super-braid”
line, with a one-pound ball weight on the end of
the line. Place this rod and reel combo in a rod
holder. We have designed a 35” heavy action troll-
ing rod for use with the probe that is available for
purchase at fishhawkelectronics.com. Or you can
fashion a suitable rod for the probe by using the
handle section of a two-piece fishing rod. Spe-
cialty rods known as “kite rods” are readily avail-
able and also work well. The rod you use for the
probe need not be fancy or expensive. You just
need something that will handle the weight of the
probe and ball weight and can be placed in a rod
holder.
attaChinG the Probe to the
doWnriGGer CabLe or Probe
Line
If using a downrigger, terminate your
downrigger cable following your downrigger
manufacturer’s instructions. Attach the snap
swivel through the stamped stainless-steel loop
on top of the Fish Hawk Probe.
Using the trolling rod and reel method, we rec-
ommend choosing 50 to 80lb. test “super-braid”
like Power Pro™ as your probe line. Tie a quality
ball bearing snap swivel testing at least 100lbs. to
the end of your probe line using a Palomar Knot.
Attach the snap swivel through the stamped stainless-steel loop on top of the Fish
Hawk Probe.
Prior to attaching the probe, it is a good idea to inspect the downrigger cable
or probe line or for any kinks or frays that might weaken the downrigger cable or
probe line, which could cause you to lose your valuable Fish Hawk Probe.
Attaching the Downrigger Ball or Weight to the Probe
For use with a downrigger we suggest the use of shock absorbing downrigger
ball “snubbers.” Two heavy-duty snap swivels connected back to back with a large
Slip-Ducer
™
Weight
Line or
Cable
Cable to X2
Display
Leader to
Weight
Probe
Twist the
stopper to open
the slot in the
Slip-Ducer™
Place the line
in the slot and
twist the stopper
180° to close,
securing the Slip-
Ducer™ on
the line.
Summary of Contents for X2
Page 1: ...User Guide ...