background image

6

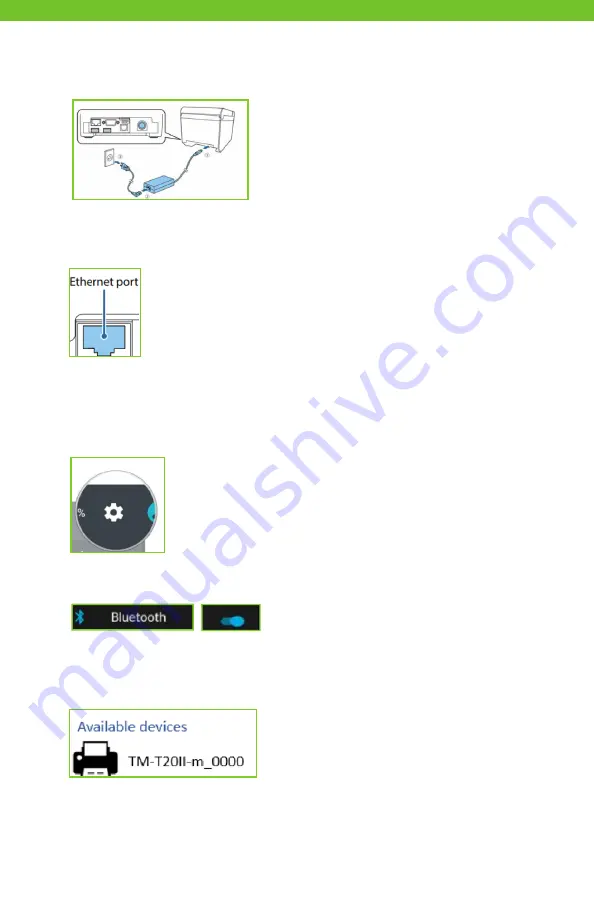
4.  Connect the power cord into the round port on the printer and the other end into the
  wall outlet..

5.  Connect the ethernet cable to the back of the printer into the ethernet port and the other
  end into your network jack or router.

6.  If using the Bluetooth model, follow these steps to connect the Epson Bluetooth
  printer to the Kineticpay register.
  Swipe down from the top of the screen and tap gear icon for settings. Pairing is
  necessary to connect the Bluetooth printer to the Kineticpay register.

7.  Tap Bluetooth and turn on.

8.  Tap the Printer name “TM_T20II-m” from the list and wait for the device to complete
 pairing.


Summary of Contents for Kineticpay

Page 1: ...Get Started Guide for POS FIS Merchant Solutions 2018 FIS and or its subsidiaries All Rights Reserved kineticpayTM FIS Merchant Solutions...

Page 2: ......

Page 3: ...genico Terminal Installation page 4 Epson Printer installation page 5 7 Ethernet IP model page 5 6 Bluetooth model page 6 7 iSeries installation page 7 8 Configure Register Settings page 9 Logging int...

Page 4: ...lation 1 Connect power and ethernet cable Connections are underneath the register near the back 2 Install the receipt paper by pressing the lid release button and lifting up the printer lid NOTE The c...

Page 5: ...e still needs to be adjusted 7 Tap Set time 8 Tap Set Date 9 Check Automatic date and time Connect to Wi Fi optional if not using wired ethernet connection 1 Swipe down from the top of the screen and...

Page 6: ...magic box and the other end into the wall outlet 2 Connect the ethernet cord into the ETH ethernet jack on the magic box Insert the other end into network jack or router 3 Pull the printer latch up th...

Page 7: ...n 1 Pull the latch to open the cover 2 Insert the paper roll in the correct direction as shown in the picture below 3 Pull out some paper and close the cover The printer will cut the roll automaticall...

Page 8: ...network jack or router 6 If using the Bluetooth model follow these steps to connect the Epson Bluetooth printer to the Kineticpay register Swipe down from the top of the screen and tap gear icon for s...

Page 9: ...er is required for this installation 1 Locate the four screws provided in the flip stand packaging 2 Install the screws on the back of the monitor in the four corners as illustrated 3 Mount the monito...

Page 10: ...cable cover back on Cash Register installation 1 Locate your cash register and matching register cable 2 Connect one of the register cable ends to the back of the Epson Printer 3 Connect the other end...

Page 11: ...scanner or select your matching model c Cleartext Card Reader i Select Elo Paypoint d Payment Terminal i Select Ingenico ICT220 ii Tap the Address box next and enter the IP address recorded from the I...

Page 12: ...cPay After entering your temporary Password the app will prompt you to enter a new Password of your choosing Passwords should be at least eight characters and contain at least one uppercase one lowerc...

Page 13: ...word on the login screen 3 Enter your email address and temporary password on the login screen 4 After you login with your temporary password you are taken to the Profile screen where you need to ente...

Page 14: ...curred or by entering the Order Number 4 Once you have identified and located the Order you wish to refund in the Completed Orders list press on the panel that contains the Order The Order will be loa...

Page 15: ...wing reports processing transactions and more The search feature in the Kineticpay Portal allows you to easily find the information you need When it s easier for customers to pay it s easier for you t...

Page 16: ...2018 FIS and or its subsidiaries All Rights Reserved 100 599 GSG KPAY POS 03 2018 02...

Reviews: