background image

21

4

ASSEMBLY

Assembly is easy and requires no tools.

1

Loosen both Locking Collars by rotating 100%
counterclockwise

2

Insert the Upper Stem into the S-Rod and click
Silver Button into hole

3

Position the lower stem with the silver
button toward the back.
Using the bolt and knurled knob,
attach the search coil to the lower
stem.

4

Press the button on the upper end of
the lower stem, and slide the lower stem
into the upper stem.

Adjust the stem to a length that lets
you maintain a comfortable upright
posture, with your arm relaxed at
your side, and the search coil
parallel to the ground in front of you.

5

Wind the cable securely around the
stems.

6

Insert the plug into the matching
connector on the back of the detector
body.  Be sure that the key-way and
pins line up correctly.

7

Tighten both locking collars.

8

Secure the cable with the 2 velcro straps
provided, one on the lower stem close to the
coil, one on the upper stem, close to the
housing.

Caution:

Do not force the plug in. Excess force will
cause damage.
To disconnect the cable, pull on the plug.

Do not pull on the cable.

Locking
Collar

Locking
Collar

Upper
Stem

Cable

Knurled
Knob

Bolt

Coil

S-Rod

Velcro

Strap

Velcro

Strap

READING THE DISPLAY

The Liquid Crystal Display (LCD) shows the PROBABLE
identification of the targeted metal, as well as the
PROBABLE depth of the target.

The detector will register a consistent target identification,
upon each sweep of the coil, when a buried target has
been located and identified. If, upon repeated passes over
the same spot, the target identification reads
inconsistently, the target is probably a trash item, or
oxidized metal. With practice, you will learn to unearth only
the repeatable signals.

The segment identifications are highly accurate, when
detecting the objects described on the label. However, if an
object registers in a given category for an unknown buried
object, you could be detecting a metallic object other than
the object described on the label, but with the same metallic
signature. Also, the greater the distance between the target
and the coil, the less accurate the target identification.

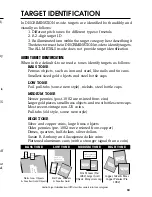
GOLD TARGETS

Gold objects will register on

the left side of the LCD scale.

Gold flakes

will register under iron.

Small gold items 

will register under foil or 5¢.

Medium-sized gold items 

will register

between nickel and or s-cap+.

Large gold items

will register under Zinc.

SILVER TARGETS:

Silver objects will register

to the right of the scale, under COINS.

IRON:

All sizes of iron objects will register on the far-

left side of the scale. This could indicate a worthless
item such as a nail, or a more valuable historic iron relic.

FOIL: 

Aluminum foil, such as a gum wrapper, will

register as foil. A small broken piece of pull tab may also
register here.

NICKEL:

Most newer pull-tabs from beverage cans,

the type intended to stay attached to the can, will
register here. Many gold rings will also register here.

PT:

Older pull tabs, which always detached completely

from the can, register here. Many medium size gold ring
also register here.

ZINC:

Newer US pennies (post-1982), and Canadian

$1 and $2 coins register here. Many non-US coins of

recent vintage will also register here.

DIME:

Dimes and older copper pennies (pre-1982)

register here.

QTR+:

Silver Dollars, Half-Dollars and Quarters, very

large iron objects, like a sewer lid, will register here.

Caution:

The target indications are visual references.

Many other types of metal can fall under any one of
these categories. While the detector will eliminate or
indicate the presence of most common trash items, it is
impossible to accurately classify ALL buried objects.

3-SEGMENT DEPTH INDICATOR:

The Depth Indicator is accurate for coin-sized objects.
It indicates the depth of the target, in inches as
follows:

Segments Illuminated
Top 

Segment 

=

0 to 3” deep,

Top & Middle 

Segment =

3” to 6” deep

All 

Segments

=

Over 6” deep.

Large and irregularly-shaped objects will yield less
reliable depth readings

When passing over an object, the indicators will light
up and stay illuminated for three seconds. If the depth
indication varies with each sweep, try sweeping at
different angles; there may be more than one target
present. With practice, you will learn the difference
between accurate readings, multiple targets, and
highly erratic readings which evidence trash or
irregularly shaped objects.

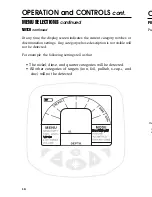
DEPTH AND TARGET DISPLAY

Summary of Contents for Cabelas Platinum

Page 1: ...ctor 2 Do not use indoors This detector is for outdoor use only Many household appliances emit electromagnetic energy which can interfere with the detector If conducting an indoor demonstration turn t...

Page 2: ...ried Objects 10 EMI 10 How To Work The Controls 11 MENU Selections Sensitivity 12 Disc Level 13 Notch 13 Of Tones 15 Volume 15 MODE Selections Discrimination 16 All Metals 16 PinPoint 17 Ground Grab 1...

Page 3: ...on objects are old cans pipes bolts and nails Sometimes the desired target is made of iron Property markers for instance contain iron Valuable relics can also be composed of iron cannon balls old arma...

Page 4: ...the ground in front of you 5 Wind the cable securely around the stems 6 Insert the plug into the matching connector on the back of the detector body Be sure that the key way and pins line up correctly...

Page 5: ...aluminum tube Arm Rest Strap The strap is provided for your convenience Some users prefer to use the strap when swing the detector vigorously in order to hold the detector secure against the arm The d...

Page 6: ...e speaker volume drop while one battery segment is illuminated With one segment flashing low speaker volume will be very apparent For loudest speaker volume select 1 or 2 tones under the OF TONES menu...

Page 7: ...sions may cause interference e Pivot the searchcoil back III Power Up Press IV Wave each object over the searchcoil a Notice a different tone for each object Bass Tone Nail Low Tone Nickel Medium Tone...

Page 8: ...over the searchcoil a Notice that motion is not required A motionless object induces a sound b Notice the single monotone hum The ALL METALS mode produces only this single sound regardless of the typ...

Page 9: ...ou therefore want to calibrate the detector to the specific ground conditions where you are hunting The detector incorporates a semi automated ground balancing feature which will eliminate false signa...

Page 10: ...n pinpointing the exact location of the object using techniques described in the pinpointing section 5 Electromagnetic Interference EMI The searchcoil produces a magnetic field and then detects change...

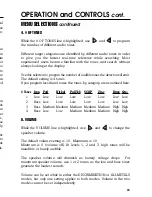
Page 11: ...WER ON OFF Press or Buttons to CHANGE THE SETTING of the active menu item The active menu item is the Highlited line on the left side of the display Press or Buttons to CHANGE THE SETTING of the activ...

Page 12: ...s etc all produce EMI which can interfere with the detector and cause it to beep when no metal is present and sometimes to beep erratically HOW DEEP WILL IT GO The Platinum Metal Detector will detect...

Page 13: ...d to notch target categories IN or OUT while the NOTCH line is highlighted Whereas the discrimination feature eliminates all categories sequentially from detection the NOTCH control allows you to sele...

Page 14: ...category whose description is not visible will not be detected For example the following settings tell us that The nickel dime and quarter categories will be detected All other categories of targets...

Page 15: ...4 tones the tones by category are as outlined here Tones Iron Foil Nickel PullTab SCAP Zinc Dime Qtr 1 Low Low Low Low Low Low Low Low 2 Bass Low Low Low Low Low Low Low 3 Bass Medium Medium Medium Me...

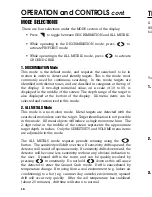
Page 16: ...LL METALS Mode This mode is a no motion mode Metal targets are detected with the searchcoil motionless over the target Target identification is not possible in this mode All metal objects will induce...

Page 17: ...the buried object is large Use Pinpoint to trace an outline of such large objects Narrow It Down To further narrow the field of detection position the searchcoil near the center of the response patter...

Page 18: ...h of ground you are standing over This process will maximize the detector s target identification accuracy and depth detection capability The Process is as follows 1 Find a patch of ground which is fr...

Page 19: ...isually as follows 1 Different pitch tones for different types of metals 2 A 2 digit target I D 3 An illuminated icon within the target category best describing it The detector must be in DISCRIMINATI...

Page 20: ...more likely to yield a different number on each pass The angle of the coil relative to an object may also influence target identification If waving coins over the searchcoil for practice wave with the...

Page 21: ...as a gum wrapper will register as foil A small broken piece of pull tab may also register here NICKEL Most newer pull tabs from beverage cans the type intended to stay attached to the can will regist...

Page 22: ...signals Environmental Reduce sensitivity electromagnetic until erratic interference signals cease Constant low tone Discharged battery Replace battery or constant repeating tones Wrong type of Use onl...

Page 23: ...tanders It also allows you to hear subtle changes in the sound more clearly particularly if searching in a noisy location For safety reasons do not use headphones near traffic or where other dangers a...

Page 24: ...tecting com Warranty coverage does not include the cost of transporting the detector back to an owner who is located outside of the continental United States of America MPLT 061509 5 YEAR LIMITED WARR...

Reviews: