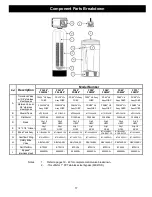
First Sales FECS Series Installation Instructions And Owner'S Manual Download Page 5


STEP 1:


Carefully remove all components from packaging.  DO NOT DISCARD PACKAGING until all 
water softener components and fittings have been located. 

STEP 2:


Use clips and screws provided and attach bypass valve to the inlet/outlet of the control valve 
(FS  Series)  or  meter  module  (FSM  Series).    Please  note  that  FSLM  units  have  the  meter 
attached  to  the  bypass  valve  rather  than  the  control  valve  for  shipping.   

IMPORTANT:    All 

metered units require the installer to insert the meter cable into the top of the meter module

.


STEP 3:


Place unit at desired installation position. 

STEP 4:


Shut off water at main supply.  Relieve pressure by opening nearest faucet.  On private well 
systems,  turn  off  power  to  pump  and  drain  pressure  tank.    SHUT  OFF  POWER  OR  FUEL 
SUPPLY TO WATER HEATER. 

STEP 5: 

Cut main supply line as required


to fit plumbing to inlet and outlet of bypass valve.  DO NOT 

PLUMB INLET AND OUTLET BACKWARDS.  Piping should be supported.  Do not apply heat 
to any fitting attached to the bypass or control valve. 

STEP 6: 

Use the provided polyethylene tubing (

NO VINYL TUBING

) to run drain line from control valve 

discharge  fitting  to  floor  drain  or  sump  pit  capable  of  handling  the  backwash  rate  of  the 
softener  (refer  to  specifications  and  flow  rate  on  page  13).   

DISCHARGE  END  OF  THE 

DRAIN  LINE  MUST  BE  FIRMLY  SECURED!   

There  must  be  an  air  gap  at  the  end  of  the 

drain line to prevent siphoning of waste water and meet plumbing code.  Total length of drain 
line should be 15’ or less.  AVOID OVERHEAD DRAINS.   

STEP 7:


Connect one end of the provided 

3/8” brine line to the control valve quick connect fitting.  Insert 

the  other  end  of  the  brine  line  through  the  hole  in  the  brine  tank  and  into  the  quick connect 
fitting on the safety brine valve.  Push both ends in firmly to ensure positive seal. 

Installation Instructions 

FIGURE 2:  Top View of FSM Series 

Metered Control Valve with Bypass 

OUTLET 
SOFT WATER 

INLET               
HARD WATER 

ADAPTER CLIPS 
& SCREWS 

ADAPTER CLIPS 
& SCREWS 

BYPASS 


METER MODULE 

METER CABLE 

INJECTOR 
ASSEMBLY 

BRINE VALVE 

DRAIN CONNECTOR 

VALVE COVER 

Summary of Contents for FECS Series

Page 1: ... 12630 US Highway 33 N Churubusco IN 46723 Phone 260 693 1972 Fax 260 693 0602 FS Series New Style Instruction Manual 170425 docx FS Series New Style Water Softening System Installation Instructions and Owner s Manual ...

Page 2: ...ing Page 10 FS FSM Adjust Time of Regeneration Page 11 Unit Model Specifications Page 13 Component Parts Breakdown List Page 17 FS Control Valve Breakdown Page 19 FS Control Valve Parts List Page 20 FSM Control Valve Breakdown Page 21 FSM Control Valve Parts List Page 22 Troubleshooting Page 23 Ten Year Limited Warranty Page 25 Table of Contents ...

Page 3: ...14 Neutral water has a pH of 7 0 lower values indicate acidic water If your pH is below 6 8 you may consider installing an acid neutralizer before the water softener to elevate the pH Iron A naturally occurring metallic element Iron levels in excess of 0 3 milligrams liter mg l combine with oxygen causing orange or red rust stains on plumbing fixtures Iron exists in some water sources in clear wat...

Page 4: ...pipe before the water heater to prevent thermal damage to the equipment An expansion tank may need to be installed in the line to the water heater in order to allow for thermal expansion and comply with local plumbing codes 4 The water softener should not be subject to freezing temperatures 5 Ensure that any cartridge or in line type filter installed prior to the water softener does not restrict t...

Page 5: ...e supported Do not apply heat to any fitting attached to the bypass or control valve STEP 6 Use the provided polyethylene tubing NO VINYL TUBING to run drain line from control valve discharge fitting to floor drain or sump pit capable of handling the backwash rate of the softener refer to specifications and flow rate on page 13 DISCHARGE END OF THE DRAIN LINE MUST BE FIRMLY SECURED There must be a...

Page 6: ...ge 7 Fig 6 page 10 to the Backwash position STEP 11 Refer to Figure 4 bypass valve operation Rotate bypass lever of stainless steel bypass of the way to Service allowing unit to fill slowly Filling the mineral tank in this position will force any trapped air to the drain When all air has been purged from the system and only water is running to the drain the tank is pressurized Fully open bypass va...

Page 7: ...ter STEP 14 Set the regeneration frequency refer to timer operation for instruction STEP 15 Set the current time of day on the timer note AM and PM STEP 16 Fill brine tank with salt and add approximately 6 gallons of water for the initial regeneration cycle ...

Page 8: ...ine how many TIMES in a 12 day cycle the softener should regenerate If the adjusted hardness falls between two numbers on the chart always use the higher number never round down Example Water Softener Model FS30 3 people in family Adjusted hardness 29 gpg Result Set softener to regenerate 4 TIMES in 12 day cycle once every 3 days 2 Rotate the skipper wheel until the number 1 is at the red pointer ...

Page 9: ...2 2 3 3 3 4 4 3 1 2 2 3 3 4 4 6 6 6 4 1 2 3 3 4 6 6 6 5 1 2 3 4 6 6 6 2 3 4 6 6 7 2 3 4 6 8 2 3 6 6 9 2 4 6 10 2 4 6 People Adjusted Hardness Grains per Gallon 5 10 15 20 25 30 35 40 45 50 1 1 1 1 1 1 1 1 1 2 2 2 1 1 1 1 2 2 2 2 3 3 3 1 1 2 2 2 3 3 3 4 4 4 1 1 2 2 3 3 4 4 6 6 5 1 2 2 3 4 4 6 6 6 6 1 2 3 3 4 6 6 6 7 1 2 3 4 6 6 8 1 2 3 4 6 6 9 2 3 4 6 6 10 2 3 4 6 TABLE 1 Model Number FS24 FSL24 TA...

Page 10: ... 8 1 2 3 3 4 6 6 6 9 1 2 3 4 6 6 6 10 1 2 3 4 6 6 People Adjusted Hardness Grains per Gallon 5 10 15 20 25 30 35 40 45 50 55 60 65 70 1 1 1 1 1 1 1 1 1 1 1 1 1 1 2 2 1 1 1 1 1 1 2 2 2 2 2 2 2 3 3 1 1 1 1 2 2 2 2 3 3 3 3 3 4 4 1 1 1 2 2 2 3 3 3 3 4 4 4 6 5 1 1 2 2 2 3 3 3 4 4 6 6 6 6 6 1 1 2 2 3 3 4 4 6 6 6 6 6 7 1 2 2 3 3 4 4 6 6 6 6 8 1 2 2 3 3 4 6 6 6 6 9 1 2 3 3 4 6 6 6 10 1 2 3 3 4 6 6 6 TABLE...

Page 11: ...million Manganese 0 2 ppm parts per million Adjusted Hardness 29 gpg 25 3 x 1 0 5 X 0 2 25 3 1 29 2 Lift the People Dial on the gallon setting wheel 3 Rotate the People Dial until the number of people in the household is aligned with the adjusted water hardness 4 Release the People Dial and ensure that it reengages the gallon wheel How to Manually Initiate a Backwash Cycle 1 Grab the manual regene...

Page 12: ... hour gear 4 Locate the regeneration time pointer on the inside of the 24 hour dial in the cut out 5 Turn the time plate so the desired regeneration time aligns next to the raised arrow 6 Push the red button in and rotate the 24 hour dial Tighten each of the three screws 7 Push the red button and locate the pointer one more time to ensure the desired regeneration time is correct 8 Reset the time o...

Page 13: ...12 This page intentionally left blank ...

Page 14: ...2 4 9 1 3 0 11 4 1 5 5 7 2 4 9 1 3 0 11 4 4 0 15 1 4 0 15 1 Brine Draw and Slow Rinse 0 46 1 74 0 46 1 74 0 46 1 74 0 46 1 74 0 46 1 74 0 92 3 48 0 92 3 48 Injector 1 white 1 white 1 white 1 white 1 white 2 blue 2 blue FACTORY REGENERATION SETTINGS Backwash minutes 4 4 4 4 4 4 4 Brine Rinse minutes 46 46 46 46 60 60 60 Rapid Rinse minutes 4 4 4 4 4 4 4 Brine Fill minutes 6 6 6 6 8 12 18 Brine Fill...

Page 15: ...Backwash Rapid Rinse 2 4 9 1 3 11 4 1 5 5 7 2 4 9 1 3 0 11 4 4 0 15 1 4 0 15 1 Brine Draw and Slow Rinse 0 46 1 74 0 46 1 74 0 46 1 74 0 46 1 74 0 46 1 74 0 92 3 48 0 92 3 48 Injector 1 white 1 white 1 white 1 white 1 white 2 blue 2 blue FACTORY REGENERATION SETTINGS Backwash minutes 4 4 4 4 4 4 4 Brine Rinse minutes 46 46 46 46 60 60 60 Rapid Rinse minutes 4 4 4 4 4 4 4 Brine Fill minutes 4 4 4 4...

Page 16: ...8 19 138 REGEN FLOW RATES gpm Lpm Backwash Rapid Rinse 1 5 5 7 2 4 9 1 3 5 13 2 Brine Draw and Slow Rinse 0 46 1 74 0 46 1 74 0 92 3 48 Injector 1 white 1 white 2 blue FACTORY REGENERATION SETTINGS Backwash minutes 4 4 4 Brine Rinse minutes 46 60 60 Rapid Rinse minutes 4 4 4 Brine Fill minutes 6 8 10 Brine Fill lbs kg of Salt 9 4 1 12 5 5 15 6 8 Total Water Used gallons liters 36 136 51 193 88 333...

Page 17: ...16 This page intentionally left blank ...

Page 18: ... 48 D100S 48 D100S 54 D100S 48 D100S 54 D Resin Qty 1 5 H05P Qty 2 H05P Qty 1 5 H05P Qty 2 H05P Qty 3 H05P Qty 4 H05P Qty 5 H05P E 1 4 X 1 8 Gravel Qty 1 QC20 Qty 1 QC20 Qty 1 QC20 Qty 1 QC20 Qty 1 QC20 Qty 1 QC20 Qty 1 5 QC20 F Brine Tank Assy BT1234ASSY FS BT1234ASSY FS BT1434ASSY FS BT1434ASSY FS BT1434ASSY 2 GRIDEXT FS BT1434ASSY 4 GRIDEXT FS BT1833ASSY G Overflow Fitting BT OVERFLO BT OVERFLO...

Page 19: ...1434ASSY 4 GRIDEXT FS BT1833ASSY G Overflow Fitting BT OVERFLO BT OVERFLO BT OVERFLO BT OVERFLO BT OVERFLO BT OVERFLO BT OVERFLO H Safety Brine Valve SBV14ASSY SBV14ASSY SBV14ASSY SBV14ASSY SBV14ASSY SBV14ASSY SBV33ASSY I Salt Platform BTSG12 BTSG12 BTSG14 BTSG14 BTSG14 BTSG14 BTSG18 J Bypass2 stainless steel 60040SS2 60040SS2 60040SS2 60040SS2 60040SS2 60040SS2 60040SS2 Ref Description Model Numb...

Page 20: ...19 FS Time Clock Control Valve Breakdown ...

Page 21: ...5 BLFC with J Tube 20 13030 Distributor Retainer 1 14105 Bypass Valve Seal Single Lever Not Shown 40027 J tube for 2510 valve Old Style 2 13305 Coupling O Ring 019 22 13911 Main Drive Gear 3 19228 01 Coupling Adapter S ASSY 23 18743 1 Timer Motor 120v 60Hz 2510 5600 Valve 4 10692 Injector cover screw 2510 valve 24 15320 Micro Switch Homing 5 11893 Injector Cover 25 10896 Micro Switch Step 6 10229 ...

Page 22: ...21 FSM Metered Control Valve Breakdown ...

Page 23: ... 121 1 14105 Bypass Valve Seal Single Lever 20 13030 Distributor Retainer 2 13305 Coupling O Ring 019 Not Shown 40027 J tube for 2510 valve Old Style 3 14613 Flow Straightener 22 13911 Main Drive Gear 4 10692 Injector cover screw 2510 valve 23 18743 1 Timer Motor 120v 60Hz 2510 5600 Valve 5 11893 Injector Cover 24 15320 Micro Switch Homing 6 10229 Injector Cover Gasket 25 10896 Micro Switch Step 7...

Page 24: ...em 7 4 Loss of water pressure A Softener too small for application A Check application requirements and resize water softener as required B Foreign material buildup in plumbing system or water softener B Clean or replace plumbing as necessary additional treatment equipment may be required 5 Loss of resin through drain line A Air in water system A1 Check for low water table conditions in well A2 Ch...

Page 25: ...then rinse cycle 9 Water leaks to drain continuously A Foreign material in control valve A Remove and inspect piston and seal kit Replace as necessary B Drive motor stopped during regeneration cycle B Check for obstruction in piston and seals Replace drive motor Inspect condition of power head gears C Control valve continuously cycling C See Problem 10 D Internal valve seal leak D Replace seals an...

Page 26: ...ld a defect or malfunction occur contact the dealer that you purchased the product from If you are unable to contact the dealer contact First Sales LLC 260 693 1972 We will require a full description of the problem model number date of purchase and selling dealer s business name and address We assume no warranty liability in connection with this water conditioner other than specified herein This w...

Reviews: