background image


16 

Firefly DE550/551 User Manual                      Version: 3.3 


Saving Images: 


There are three ways to save an image: 
 
1. Pressing the snapshot button on the Firefly device. 
2. Clicking the Camera icon in the menu bar.   
3. Pressing the center button on your mouse (middle click). 
 

Changing Image File Type: 
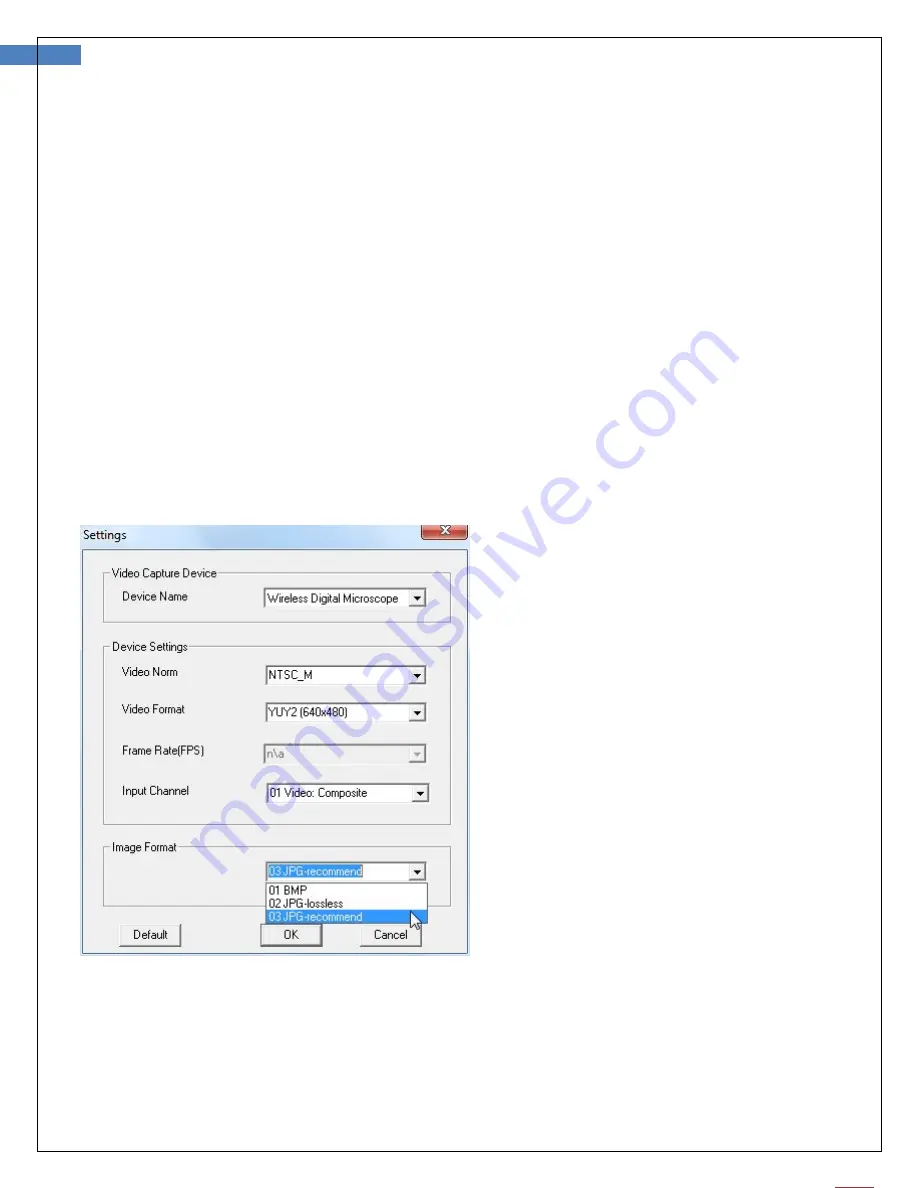
Select between BMP, JPG-lossless or JPG-recommend image file types.      There are two ways to change 
the image file type: 
 

1. Change the Default Image File Type: 

 
In the menu bar go to Device > Settings, then select the desired image file type using the Image Format 
dropdown selection.    This will set the default format for all captured images. 


Summary of Contents for DE550

Page 1: ...ion 3 3 WIRELESS OTOSCOPE THANKS FOR SELECTING A WIRELESS FIREFLY OTOSCOPE To take full advantage of this product s advanced capabilities and to properly and safely use this product please read the ma...

Page 2: ...al and its vendors All rights are reserved The software is protected by U S and international copyright laws and international treaty provisions applicable worldwide Under such laws the licensee is en...

Page 3: ...e Application for Windows 15 Viewing the Images 15 Saving Images and Changing Image File Type 16 Changing the Location where Images are Saved 17 Changing the Location of an Image Already Taken 17 Laun...

Page 4: ...d Sharpness for desired applications System Requirements The Firefly Otoscope System requires a user PC system running Windows XP Service Pack 2 or later operating system a viewing screen and a PC wit...

Page 5: ...hich if not corrected or discontinued immediately could lead to equipment failure equipment damage or data loss In order to obtain optimum performance and ensure patient safety thoroughly read this ma...

Page 6: ...quipment or be affected by other devices As a precaution avoid using this device in close proximity to other equipment Do not apply alcohol chemicals or water to the lens Any liquids entering the opti...

Page 7: ...ing items have been included with your product If anything is missing contact your dealer Otoscope x 1pc Receiver x 1 pc USB charger cable x 1 pc Software Application CD Mac version available online P...

Page 8: ...8 Firefly DE550 551 User Manual Version 3 3 NOMENCLATURE...

Page 9: ...la Only accepts original specula qualified for use with Firefly otoscopes Plug the specula into the round concave guide in front To remove Simply pull to unplug the specula Ensure a tight fit for prop...

Page 10: ...t time install the FireflyPro software application following the instructions provided with the installation CD Connect to PC Connect the compact receiver to the PC s USB port Power the Device On Push...

Page 11: ...n Power Indication The power indicator light is normally red during operation but it will turn blue when the remaining battery life is less than 30 minutes The lithium battery is a delicate and consum...

Page 12: ...control The index finger is still free to rotate and adjust the focus wheel as shown Brightness Adjustment On left rear side of the otoscope a knob allows the user to control the brightness of the LED...

Page 13: ...ject the focus wheel can be turned for a clear image When a higher magnification is required the focus wheel can be turned to the left see below If a larger field of view is required the otoscope can...

Page 14: ...Version 3 3 Standby and Remove device To temporarily turn off or remove the device push and release the power button to the OFF position Next exit the FireflyPro software application You can then rem...

Page 15: ...wing the Images FireflyPro software controls your Firefly Otoscope The Otoscope communicates with the PC through the USB compact receiver The user can configure the video properties review live images...

Page 16: ...ng the center button on your mouse middle click Changing Image File Type Select between BMP JPG lossless or JPG recommend image file types There are two ways to change the image file type 1 Change the...

Page 17: ...dy Taken Right click on the image in the Image View Bar and click Save As You can then select the saving location on your computer using the dropdown directory field at the top of the window Changing...

Page 18: ...deo Recording Video recording and settings frame period quality codec etc Undo Undo the previous Rotation Text Comment and Zoom Redo Redo the previous Rotation Text Comment and Zoom ROI Select region...

Page 19: ...working directory path Working directory path Device Tool bar Icon Icon Name Function Description Refresh Camera View Refreshes the live video connection in the camera window Select Device Select the...

Page 20: ...unicates with the Mac through the USB compact receiver The user can configure the video properties review live images capture images record video clips and perform a variety of documentation functions...

Page 21: ...on 3 3 Album Manager Feature Close Window Select Album Maximize Window Delete Album Minimize Window Create New Album Pictures taken See Photos Taken See Videos Taken Selecting correct device 1 Open se...

Page 22: ...ng when the camera icon is visible in live video monitor Saving Videos There is only one way to save a video 1 Clicking the video icon Deleting an Image or Video Already Taken 1 In album manager click...

Page 23: ...ick New Folder Name the Folder Creating a New Default Folder 1 After saving picture Select where Select location or create a new folder 2 Make the New Folder or Location the default folder by using th...

Page 24: ...ation click move Icons and Functions Determines the resolution Zoom in and out on live video from 10 to 150 Taking a photo Recording a video Rotating the image 90 180 or 270 degrees Flip the image ver...

Page 25: ...ponents Within the EU Do not dispose of this product as unsorted municipal refuse Submit for separate collection as specified by Directive 2002 96 EC of the European Parliament and the Council of the...

Page 26: ...ts orders the required spare or replacement part numbers If your product requires warranty extended warranty or non warranty repair service please contact your Firefly reseller A customer service repr...

Page 27: ...C 50 F to 104 F Relative humidity 30 to 75 noncondensing Altitude 700 to 1060 hPa Shipping storage conditions Temperature 20 C to 49 C 4 F to 120 F Relative humidity 95 noncondensing max Wireless pow...

Page 28: ...t cover Software including the operating system and software added to or bundled with the Firefly Global hardware products Problems that result from External causes such as accident abuse misuse or pr...

Page 29: ...ts are repaired or replaced Firefly Global may change the availability of limited hardware warranties at its discretion but any changes will not be retroactive What do I do if I need warranty service...

Page 30: ...epairs and in building replacement parts and systems Refurbished parts and systems are parts or systems that have been returned to Firefly Global some of which were never used by a customer All parts...

Page 31: ...Manual Version 3 3 TROUBLESHOOTING Please visit the FAQ section of our website for the latest troubleshooting information and additional support http www fireflyglobal com Thank you for choosing Fire...

Reviews: