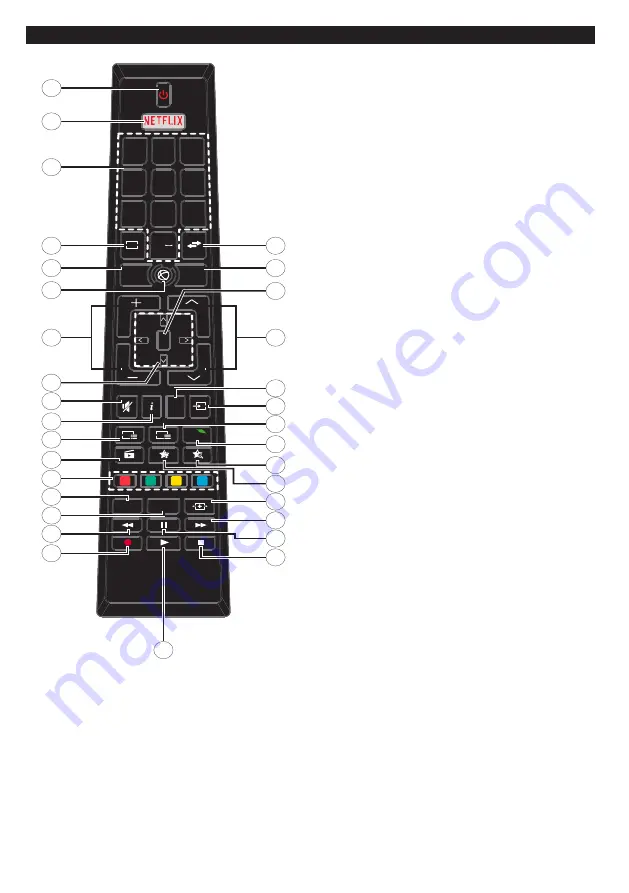
Finlux FL5030FSWK Owner'S Manual Download Page 11

English

   - 36 -

Remote Control

OK

V

V

P

P

LANG.

SUBT.

EPG

TXT

Q. 

MENU

MENU

BACK

EXIT

.,/@

2

1

ABC

3

DEF

4

GHI

5

JKL

6

MNO

7

PQRS

8

TUV

9

WXYZ

0

TV

19

20

21

22

23

24

25

26

27

28

30

29

31

8

7

6

5

4

3

2

1

9

10

11

12

13

14

15

16

17

18

32

1.  Standby:

 Switches On / Off the TV

2. 

Netflix:

 Launches the Netflix application

3.  Numeric buttons:

 Switches the channel, enters a 

number or a letter in the text box on the screen.

4.  TV:

 Displays channel list / Switches to TV Source

5.  Back/Return:

 Returns to previous screen, opens index 

page (in TXT mode)

6.  Internet:

 Opens the portal page, where you can reach 

many web based applications

7.  /-
8.  Directional buttons:

 Helps navigate menus, content 

etc. and displays the subpages in TXT mode when 

pressed Right or Left

9.  Mute:

 Completely turns off the volume of the TV

10.  Info:

 Displays information about on-screen content, 

shows hidden information (reveal - in TXT mode)

11.  EPG (Electronic programme guide):

 Displays the 

electronic programme guide

12.  Media browser:

 Opens the media browsing screen

13.  Coloured Buttons:

 Follow the on-screen instructions 

for coloured button functions

14.  Language:

 Switches among sound modes (analogue 

TV), displays and changes audio/subtitle language 

(digital TV, where available)

15.  Subtitles:

 Turns subtitles on and off (where available)

16.  Rapid reverse:

 Moves frames backwards in media 

such as movies

17.  Record: 

Records programmes

18.  Play:

 Starts to play selected media

19.  Stop:

 Stops the media being played

20.  Pause: 

Pauses the media being played, starts timeshift 

recording

21.  Rapid advance:

 Moves frames forward in media such 

as movies

22.  Screen:

 Changes the aspect ratio of the screen

23.  My button 1 (*)
24.  My button 2 (*)
25.  Quick Menu:

 Displays a list of menus for quick access

26.  Text:

 Displays teletext (where available), press again 

to superimpose the teletext over a normal broadcast 

picture (mix)

27.  Source: 

Shows all available broadcast and content 

sources

28.  Exit:

 Closes and exits from displayed menus or returns 

to previous screen

29.  Pro/-
30.  OK: 

Confirms user selections, holds the page (in TXT 

mode), views channel list (DTV mode)

31.  Menu: 

Displays TV menu

32.  Swap:

 Quickly cycles between previous and current 

channels or sources

(*) MY BUTTON 1 & MY BUTTON 2: 

These buttons may have default functions depending on 

the  model. However you can set a special function to these 

buttons  by  pressing  on  them  for  five  seconds  when  on  a 

desired source or channel. A confirmation message will be 

displayed on the screen. Now the selected MY BUTTON is 

associated with the selected function.
Note that if you perform 

First Time Installation

, MY BUTTON 

1&2 will return to their default function.

Summary of Contents for FL5030FSWK

Page 1: ...FL5030FSWK Kleurentelevisie Colour television T l vision en couleur Owner s manual Manuel d utilisateur De handleiding...

Page 2: ...inserting batteries and replace the battery cover Quick Start Guide REAR SIDE OF THE TV Aerial or Cable To switch the TV on 4 Connect the power cord to a power source such as a wall socket 220 240V AC...

Page 3: ...ect Yes and press OK to proceed To cancel operation select No and press OK You can select Network or set values such as Frequency Network ID and Search Step When finished press OK button Note Searchin...

Page 4: ...While Network Type is highlighted press Left or Right buttons to select connection type Wired connection will be established automatically If wireless connection is selected TV will search for the av...

Page 5: ...used to disconnect TV set from the mains and therefore it must remain readily operable If the TV set is not disconnected electrically from the mains the device will still draw power for all situation...

Page 6: ...rating conditions Caution See Operating Instructions The marked area s contain s user replaceable coin or button cell batteries Class 1 Laser Product This product contains Class 1 laser source that is...

Page 7: ...found in the System Picture menu Note that some picture settings will be unavailable to be changed If pressed Right button while Auto option is selected or Left button while Custom option is selected...

Page 8: ...urn into standby mode Notes If you turn the TV off this circle starts again beginning with the volume setting Main menu OSD cannot be displayed via control button Operation with the Remote Control Pre...

Page 9: ...pyrighted content This device uses PlayReady technology to access PlayReady protected content and or WMDRM protected content If the device fails to properly enforce restrictions on content usage conte...

Page 10: ...CH64 200 mW 5470 5725 MHz CH100 CH140 200 mW Country Restrictions This device is intended for home and office use in all EU countries and other countries following the relevant EU directive without a...

Page 11: ...ailable 15 Subtitles Turns subtitles on and off where available 16 Rapid reverse Moves frames backwards in media such as movies 17 Record Records programmes 18 Play Starts to play selected media 19 St...

Page 12: ...onnection If an external device is connected via the SCART socket the TV will automatically switch to AV mode When receiving DTV channels Mpeg4 H 264 or while in Media Browser mode output will not be...

Page 13: ...inished press OK to continue You can activate Store Mode option at this point This option will configure your TV s settings for store environment and depending on the TV model being used the supported...

Page 14: ...ed for the PVR ready features Some stream packets may not be recorded because of signal problems as a result sometimes videos may freeze during playback Record Play Pause Display for PlayListDialog ke...

Page 15: ...in the System Settings More menu should be set as Enabled at first Press the Source button and select the HDMI input of the connected CEC device from the Sources List menu When new CEC source device i...

Page 16: ...ess of the picture by pressing Left or Right buttons Picture Zoom Sets the desired image size format Film Mode Films are recorded at a different number of frames per second to normal television progra...

Page 17: ...ge depending on the broadcaster and the country Parental Enter correct password to change parental settings You can easily adjust Menu Lock Maturity Lock Child Lock or Guidance in this menu You can al...

Page 18: ...CEC Auto Power On This function allows the connected HDMI CEC compatible device to turn on the TV and switch to its input source automatically Press Left or Right button to enable or disable the featu...

Page 19: ...maturity level is disabled disables access to the broadcast Note If the country option in the First Time Installation is set as France Italy or Austria Maturity Lock s value will be set to 18 as defau...

Page 20: ...r channel or source while there is an active recording or timer on the current channel It is not possible to set timer or record timer for two or more individual events at the same time interval Telet...

Page 21: ...you cannot record try switching off the TV and then re inserting the USB device USB is too slow If a USB disk writing speed too slow to record message is displayed on the screen while starting a recor...

Page 22: ...0Hz O 1080i 50Hz 60Hz O HDMI 480i 480p 60Hz O 576i 576p 50Hz O 720p 50Hz 60Hz O 1080i 50Hz 60Hz O 1080p 24Hz 25Hz 30Hz 50Hz 60Hz O X Not Available O Available In some cases a signal on the TV may not...

Page 23: ...n JPEG 640x480 30fps 10 Mbps Other 1080P 30fps 40 Mbps avi MPEG1 2 MPEG4 Sorenson H 263 H 263 H 264 WMV3 Motion JPEG mkv MPEG1 2 MPEG4 H 263 H 264 WMV3 Motion JPEG asf Sorenson H 263 H 264 WMV3 Motion...

Page 24: ...8Kbps 384Kbps MPEG1 2 Layer3 8Kbps 320Kbps WMA 128bps 320Kbps 8KHz 48KHz WMA 10 Pro M0 192kbps 48KHz WMA 10 Pro M1 384kbps 48KHz WMA 10 Pro M2 768kbps 96KHz mkv mka MPEG1 2 Layer1 32Kbps 448Kbps 16KH...

Page 25: ...2Kbps 640Kbps 32KHz 44 1KHz 48KHz AAC HEAAC 8KHz 48KHz swf MPEG1 2 Layer3 8Kbps 320Kbps 16KHz 48KHz ec3 EAC3 32Kbps 6Mbps 32KHz 44 1KHz 48KHz rm rmvb ra AAC HEAAC 8KHz 48KHz LBR cook 6Kbps 128Kbps 8KH...

Page 26: ...using DVI converter cable DVI to HDMI cable not supplied you can refer to the following resolution information 56Hz 60Hz 66Hz 70Hz 72Hz 75Hz 640x400 640x480 800x600 832x624 1024x768 1152x864 1152x870...

Page 27: ...esired one and press Left or Right button to change the setting from Automatic to Manual Now you can enter the Manual IP and or Manual DNS values Select the related item in the drop down menu and ente...

Page 28: ...obile device with the router and then activate the sharing software on your mobile device Then select files that you want to share with your TV If the connection is established correctly you will be a...

Page 29: ...the server programme is not installed onto your PC or if the required media server software is not installed onto the companion device Please prepare your PC with a proper server programme 2 Connect t...

Page 30: ...and the Add to Speed Dial options To navigate the web browser use the directional buttons on the remote or a connected mouse To see the browser options bar move the cursor to the top of the page or pr...

Page 31: ...elete icon found on each row EPG You can view the broadcast schedules of selected channel lists through this tab You can also navigate through channels by pressing on the selected channel on the EPG g...

Page 32: ...n is required This function will not work if a portal page is not in use Smart Remote Feature You can use your mobile device as a remote control for your TV once it has connected to the TV To use smar...

Page 33: ...50421930 www elmarc eu...

Reviews: