


English
- 21 -
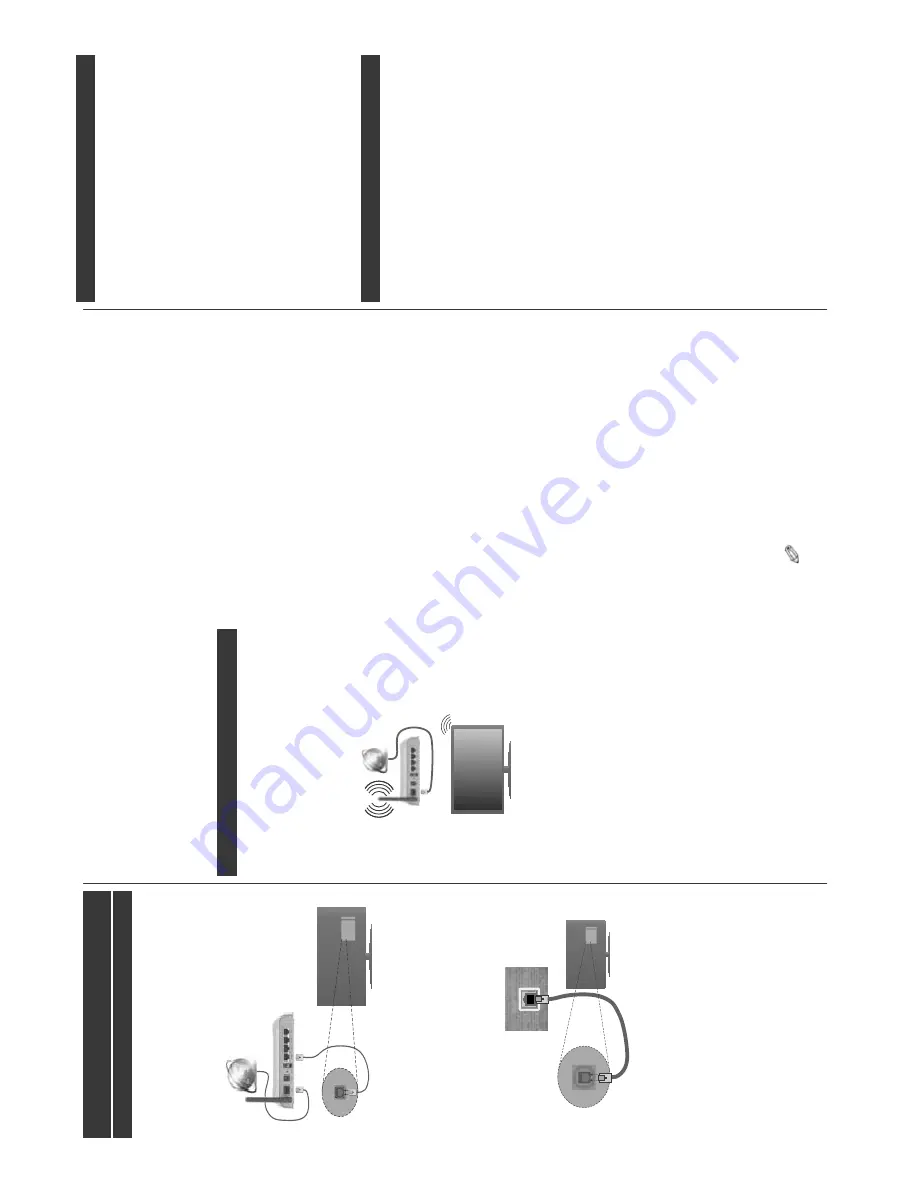
Connectivity
W
ired Connectivity
To Connect to a W
ired Network
Y
ou
must
have
a
modem/router
connected
to
an
DFWඈYHEURDGEDQGFRQQHFWඈRQ
&RQQHFW
\RXU
79
WR
\RXU
P
RGHPURXWHU
YඈD
D
Q
HWKHUQHW
FDEOH
7
KHUH
ඈV
D
/
$1
S
RUW
DW
WKH
UHDU
(back) of your
TV
.
Broadband ISP
connection
LAN
(ethernet)
cable
LAN
input
on
the
rear
side of the
TV
7
R
F
RQIඈJXUH
ZඈUHG
VHWWඈQJV
SOHDVH
UHIHU
WR
WKH
1HWZRUN,QWHUQHW
6
HWWඈQJV
VHFWඈRQ
ඈQ
WKH
System>Settings Menu.
<
RX
PඈJKW
EH
DEOH
WR
FRQQHFW
\RXU79
WR
\RXU
/$1
GHSHQGඈQJ
RQ
\RXU
QHWZRUN
V
FRQIඈJXUDWඈRQ
,Q
VXFK
a
case,
use
an
ethernet
cable
to
connect
your
T
V
GඈUHFWO\WRWKHQHWZRUNZDOORXWOHW
LAN
input
on
the
rear
side of the
TV
network
wall socket
&RQ¿JXULQJ:
LUHG'HYLFH6HWWLQJV
Network T
ype
The
Network
Ty
pe
c
an
be
selected
as
Wi
re
d
Device,
W
ireless
Device
or
Disabled
,
in
accordance
with
the
active
connection
to
the
TV
set.
Select
this
as
W
ired
Device
if you a
re
c
on
ne
ct
ing via an ethernet cable.
Internet Speed T
est
+ඈJKOඈJKW
Internet
Speed
Test
and
press
the
OK
but-
WRQ
7
9
ZඈOO
FKHFN
WKH
ඈQWHUQHW
FRQQHFWඈRQ
EDQGZඈGWK
DQGGඈVSOD\WKHUHVXOWZKHQFRPSOHWH
Advanced Settings
+ඈJKOඈJKW
Advanced
6HWWඈQJV
a
nd
p
ress
the
OK
button.
O
n
the
next
screen
you
can
change
the
IP
DQG
'16
VHWWඈQJV
RI
WKH
79
+ඈJKOඈJKW
WKH
GHVඈUHG
RQH
DQG
SUHVV
/HIW
RU
5ඈJKW
EXWWRQ
WR
FKDQJH
WKH
VHWWඈQJ
from
$XWRPDWඈF
t
o
Manual
.
Now
you
can
enter
the
Manual
IP
a
nd
/
or
Manual
DNS
v
alues.
Select
the
UHODWHG
ඈWHP
ඈQ
WKH
GURS
GRZQ
PHQX
DQG
HQWHU
WKH
QHZ
YDOXHV
XVඈQJ
WKH
QXPHUඈF
EXWWRQV
RI
WKH
UHPRWH
Press
the
OK
E
XWWRQ
WR
VDYH
VHWWඈQJV
ZKHQ
FRPSOHWH
W
ireless Connectivity
To Connect to a W
ireless Network
The
TV
cannot
connect
to
the
networks
with
a
hidden
SSID.
To
make
your
modem’
s
SSID
visible,
you
should
change
your
SSID
settings
via
the
modem’
s
software.
7
R
&
RQQHFW
WR
D
ZਟUHOHVV
/$1
\RX
VKRXOG
SHUIRUP
WKHIROORZਟQJVWHSV
1.
7R
F
RQ¿JXUH
\RXU
ZLUHOHVV
VHWWLQJV
SOHDVH
UHIHU
to
the
Network/Internet
Settings
s
ection
in
the
System>Settings
Menu
.
Broadband
ISP
connection
A
Wireless-N
router
(IEEE
802.1
1a/b/g/n)
with
simultaneous
2.4
and
5
GHz
bands
is
designed
to
increase
bandwidth.
These
are
optimized
for
smoother
DQG
IDVWHU
+'
YLGHR
VWUHDPLQJ
¿OH
WUDQVIHUV
DQG
wireless gaming.
7KH
IUHTXHQF\
DQG
FKDQQHO
GඈႇHU
GHSHQGඈQJ
RQ
WKH
DUHD
7KH
WUDQVPඈVVඈRQ
VSHHG
GඈႇHUV
GHSHQGඈQJ
RQ
WKH
GඈVWDQFH
DQG
QXPEHU
RI
REVWUXFWඈRQV
EHWZHHQ
WKH
WUDQVPඈVVඈRQ
S
URGXFWV
WKH
FRQIඈJXUDWඈRQ
RI
WKHVH
SURGXFWV
WKH
UDGඈR
ZDYH
FRQGඈWඈRQV
WKH
OඈQH
WUDႇඈF
DQG
WKH
SURGXFWV
WKDW
\RX
XVH
7
KH
WUDQVPඈVVඈRQ
PD\
DOVREHFXWRႇRUPD\JHWGඈVFRQQHFWHGGHSHQGඈQJ
RQ
WKH
UDGඈR
ZDYH
FRQGඈWඈRQV
'(&7
SKRQHV
RU
DQ\
RWKHU
:ඈ)ඈ
E
DSSOඈDQFHV7KH
VWDQGDUG
YDOXHV
RI
WKH
WUDQVPඈVVඈRQ
VSHHG
DUH
WKH
WKHRUHWඈFDO
PD[ඈPXP
YDOXHV
IRU
WKH
ZඈUHOHVV
VWDQGDUGV
7KH\
DUH
QRW
WKH
DFWXDOVSHHGVRIGDWDWUDQVPඈVVඈRQ
7KH
ORFDWඈRQ
ZKHUH
WKH
WUDQVPඈVVඈRQ
ඈV
PRVW
HႇHFWඈYH
GඈႇHUVGHSHQGඈQJRQWKHXVDJHHQYඈURQPHQW
7KH
:
ඈUHOHVV
IHDWXUH
RI
WKH
7
9
VXSSRUWV
DEJ
QW\SHPRGHPV,WඈVKඈJKO\UHFRPPHQGHGWKDW\RX
VKRXOG
XVH
WKH
,(((
Q
FRPPXQඈFDWඈRQ
SURWRFRO
ඈQ
RUGHU
WR
DYRඈG
DQ\
SRVVඈEOH
SUREOHPV
ZKඈOH
ZDWFKඈQJ
YඈGHRV
English
- 22 -
You
must
change
your
m
odem’
s
SSID
when
there
are
DQ\
RWKHU
P
RGHPV
DURXQG
ZඈWK
WKH
VDPH
66,'
<RX
FDQ
HQFRXQWHU
FRQQHFWඈRQ
SUREOHPV
RWKHUZඈVH
8
VH
D
ZඈUHG
FRQQHFWඈRQ
ඈI
\RX
H[SHUඈHQFH
SUREOHPV
ZඈWK
D
ZඈUHOHVVFRQQHFWඈRQ
&RQ¿JXULQJ:
LUHOHVV'HYLFH6HWWLQJV
Open
the
1
HW
Z
R
UN
,QWHUQHW
6
HW
Wඈ
Q
J
V
m
enu
and
select
Network
Ty
pe
a
s
:ඈUHOHVV
'HYඈFH
WR
VWDUW
FRQQHFWඈRQ
process.
7KH
79
ZඈOO
VFDQ
WKH
ZඈUHOHVV
QHWZRUNV
DXWRPDWඈFDOO\
$
OඈVW
RI
DYDඈODEOH
QHWZRUNV
ZඈOO
EH
GඈVSOD\HG
3
OH
DV
H
VHOHFW\RXUGHVඈUHGQHWZRUNIURPWKHOඈVW
Note:
,I
WKH
PRGHP
VXSSRUWV
1
P
RGH
\RX
VKRXOG
VHW
1
mode settings.
,I
WKH
VHOHFWHG
QHWZRUN
ඈV
SURWHFWHG
ZඈWK
D
SDVVZRUG
SOHDVH
H
QWHU
WKH
FRUUHFW
NH\
E
\
XVඈQJ
WKH
YඈUWXDO
NH\ERDUG
<RX
FDQ
XVH
WKඈV
NH\ERDUG
YඈD
WKH
GඈUHFWඈRQDO
buttons and the
OK
button on the remote control.
:
DඈWXQWඈOWKH,3
DGGUHVVඈVVKRZQRQWKHVFUHHQ
7KඈV
P
HDQV
WKDW
WKH
FRQQHFWඈRQ
ඈV
QRZ
HVWDEOඈVKHG
7R
G
ඈVFRQQHFW
IURP
D
ZඈUHOHVV
QHWZRUN
K
ඈJKOඈJKW
Network
Ty
pe
DQG
SU
HV
V
/H
IW
RU
5ඈJKW
EXWWRQV
WR
VHW
as
'ඈVDEOHG
.
+ඈJKOඈJKW
Internet
Speed
Test
and
press
the
OK
button
WR
FKHFN
\RXU
ඈQWHUQHW
FRQQHFWඈRQ
VSHHG
+ඈJKOඈJKW
Advanced
6HWWඈQJV
and
press
the
OK
b
utton
to
open
WKH
DGYDQFHG
VHWWඈQJ
P
HQX
8
VH
GඈUHFWඈRQDO
DQG
QXPHUඈF
bu
tto
ns
t
o
se
t.
Press
the
OK
E
XWWRQ
WR
VDYH
VHWWඈQJV
when complete.
2WKHU,QIRUPDWඈRQ
7KH
VWDWXV
R
I
WKH
FRQQHFWඈRQ
ZඈOO
EH
GඈVSOD\HG
DV
Connected
o
r
Not
Connected
and
the
current
IP
DGGUHVVඈIDFRQQHFWඈRQඈVHVWDEOඈVKHG
&RQQHFWඈQJWR\RXUPREඈOHGHYඈFHYඈD:ඈ)ඈ
,I
\RXU
P
REඈOH
GHYඈFH
KDV
:
ඈ)ඈ
IHDWXUH
\RX
FDQ
FRQQHFW
ඈW
WR
\RXU
7
9
YඈD
D
URXWHU
ඈQ
RUGHU
WR
DFFHVV
WKH
FRQWHQW
ඈQ
\RXU
GHYඈFH
)
RU
WKඈV
\RXU
P
REඈOH
GHYඈFH
P
XVW
KDYH
DQDSSURSUඈDWHVKDUඈQJVRIWZDUH
&RQQHFW
WR
\RXU
URXWHU
IROORZඈQJ
WKH
VWHSV
VWDWHG
DERYH
ඈQWKH
:ඈUHOHVV&RQQHFWඈYඈW\
VHFWඈRQ
$IWHUZDUGV
HQJDJH
\RXU
P
REඈOH
GH
Yඈ
FH
ZඈWK
WKH
URXWHU
DQG
WKHQ
DFWඈYDWH
WKH
VKDUඈQJ
VRIWZDUH
RQ
\RXU
P
REඈOH
GHYඈFH
7
KH
Q
V
HO
HF
W
IඈOHV
WKDW
\RX
Z
DQW
WR
VKDUH
ZඈWK
your
T
V.
,I
WKH
FRQQHFWඈRQ
ඈV
HVWDEOඈVKHG
FRUUHFWO\
\RX
ZඈOO
EH
DEOH
WR
DFFHVV
WKH
VKDUHG
IඈOHV
IURP
\RXU
P
REඈOH
GHYඈFH
YඈDWKH
0
HG
ඈD
%URZVHU
of your
TV
.
Enter
the
0HGඈD
%
UR
Z
VH
U
m
enu
and
the
playback
GHYඈFH
VHOHFWඈRQ
26'
ZඈOO
EH
GඈVSOD\HG
6HOHFW
\RXU
PREඈOHGHYඈFHDQGSUHVVWKH
OK
EXWWRQWRFRQWඈQXH
If
available,
you
can
download
a
virtual
remote
controller
application
from
the
server
of
your
m
obile
device application provider
.
Note:
This feature may not be supported on all mobile
devices.
W
ake ON
W
a
ke-on-LAN
(W
oL)
a
nd
W
ake-on-Wireless
LAN
(W
oWLAN)
are
standards
that
allow
a
device
to
be
turned
on
or
woken
up
by
a
network
message.
The
message
is
sent
to
the
device
by
a
program
executed
on
a
remote
device
connected
to
the
same
local
area
network, such as a smartphone.
Y
our
T
V
is
W
oL
a
nd
W
oWLAN
compatible.
To
enable
this
feature
set
the
W
ake
On
option
in
the
Network/
Internet
S
ettings
menu
as
On
.
It
is
necessary
that
both
the
device,
from
which
the
network
message
will
be
sent
to
the
TV
,
and
the
TV
are
connected
to
the
same
network.
W
ake
On
feature
is
only
supported
for
Android
OS
devices
and
can
only
be
used
via
Y
ouT
ube
DQG1HWÀL[DSSOLFDWLRQV
In
order
to
use
this
feature
the
T
V
and
the
remote
device
should
be
connected
at
least
once
while
the
79
LV
RQ
,I
WKH
79
LV
SRZHUHG
Rႇ
WKH
FRQQHFWLRQ
should
be
reestablished,
the
next
time
it
is
switched
on.
Otherwise
this
feature
will
be
unavailable.
T
his
does
n
ot
apply
,
when
the
TV
is
switched
into
the
standby mode.
Connecting Other W
ireless Devices
Y
o
ur
T
V
supports
another
short
range
wireless
connection
technology
too.
A
p
airing
is
required
before
using these kind of wireless devices with the
TV set.
Y
ou
should
do
the
followings
to
pair
your
device
with
the
TV
:
Set the device to pairing mode
Start device discovery on the
TV
Note:
Refer to the user manual of the wireless device to learn
how to set the device to pairing mode.
Y
ou
can
connect
audio
devices
or
remote
controllers
wirelessly
to
your
TV
.
Unplug
o
r
switch
o
ff
a
ny
other
connected
audio
device
in
order
for
wireless
connection
feature
to
w
ork
correctly
.
For
audio
devices
you
should
use
the
Audio
Link
option
in
the
System>Sound
m
enu,
for
remote
controllers
the
Smart
R
emote
o
ption
in
the
System>Settings>More
menu.
Select
the
menu
option
a
nd
press
the
OK
button
to
open
the
related
m
enu.
U
sing
this
m
enu
you
can
discover
and
connect
the
devices
that
use
the same wireless technology and start to use them.
Follow
the
on-screen
instructions.
S
tart
the
device
discovery
. A
list
of
available
wireless
devices
will
be
displayed.
S
elect
the
device
you
want
to
connect
from
the
list
and
press
the
OK
button
to
connect.
If
“
Device
connected
”
message
is
displayed,
the
connection
is
successfully
e
stablished.
If
the
connection
fails
try it again.
Note:
W
ireless devices may operate within the same radio
frequency range and may interfere with one another
. T
o
improve the performance of your wireless device place it at
least 1 meter away from any other wireless devices.


