


English
- 6 -
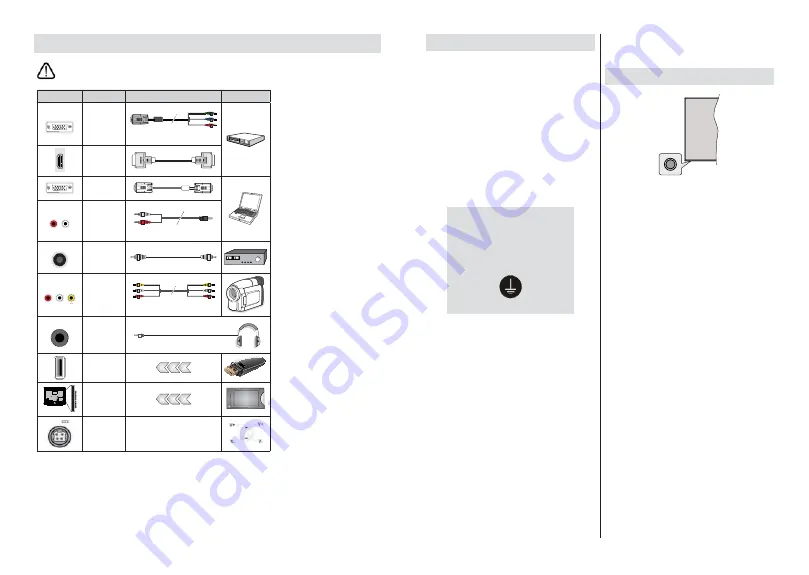
Other Connections
,I\RXZDQWWRFRQQHFWDGHYLFHWRWKH79PDNHVXUHWKDWERWKWKH79DQGWKHGHYLFHDUHWXUQHGRႇEHIRUHPDNLQJ
any connection. After the connection is done, you can turn on the units and use them.
Connector
Type
Cables
Device
COMPONENT
Component
Video
Connection
(back)
VGA to
Component Connection Cable
HDMI
Connection
(back&side)
VGA
Connection
(back)
AUDIO IN
VGA/
Component
Audio
Connection
(back)
Component/VGA
Audio Cable
SPDIF
SPDIF
(Coaxial Out)
Connection
(back)
COMPOSITE
Composite
(Audio/Video)
Connection
(back)
Audio Video Cable
HEADPHONE
Headphone
Connection
(side)
USB
Connection
(side)
CI
Connection
(side)
CAM
module
12V DC
Connection
(back)
DC 12V Input
To enable VGA/Component audio,
you will need to use the back audio
i n p u t s w i t h a VGA/Component
audio cable for audio connection.
When using the wall mounting kit
(contact your dealer to purchase one,
if not supplied), we recommend that
you plug all your cables into the back
of the TV before mounting on the
wall. Insert or remove the CI module
only when the TV is SWITCHED
OFF. You should refer to the module
instruction manual for details of the
settings. The USB inputs on the
TV support devices up to 500mA.
Connecting devices that have current
value above 500mA may damage
your TV. When connecting equip-
ment using a HDMI cable to your
79WRJXDUDQWHHVXFLHQWLPPXQLW\
against parasitic frequency radiation
and trouble-free transmission of high
GH¿QLWLRQ VLJQDOV VXFK DV . FRQ
-
tent, you have to use a high speed
shielded (high grade) HDMI cable
with ferrites.
English
- 7 -
Turning On/Off the TV
Connect power
IMPORTANT
:
The TV set is designed to operate on
a 12 V DC supply.
For this, an adaptor is used which
gives
12 V
voltage.
After unpacking, allow the TV set to reach the ambient
room temperature before you connect the set to the
mains.
Connect the supplied adaptor to a system that
supplies
100-240V AC, 50/60Hz
. The TV will switch
on automatically.
In order to supply the power via the cigarette lighter
socket of your vehicle, plug one end of the cigarette
lighter adaptor cable (car plug - can be purchased
separately if not supplied with the TV) into the vehicle
socket and plug the other end of the adaptor cable
into the DC 12V terminal on the back side of the TV.
Be sure to ground the connection
properly
Connect the ground terminal of the AC
adaptor with the ground terminal provided at
the power outlet using the enclosed power
FRUG,IWKHSURYLGHGSOXJGRHVQRW¿W\RXU
outlet, consult an electrician for replacement
of the obsolete outlet.
Surely connect the ground wire.
To switch on the TV from standby
If the TV is in
standby mode the standby LED lights
up. To switch on the TV from standby mode either:
Press the
Standby
button on the remote control.
Press the control button on the TV.
The TV will then switch on.
To switch the TV into standby
The TV cannot be switched into standby mode via
control button. Press and hold the
Standby
button on
the remote control.
3RZHURႇ
dialogue will appear on
the screen. Highlight
OK
and press the
OK
button. The
TV will switch into standby mode.
7RVZLWFKRႇWKH79
To power down the TV completely, unplug the power
adaptor from the mains socket.
Quick Standby Mode
In order to switch the TV into quick standby mode
either;
Press the
Standby
button on the remote.
Press again to go back to operating mode.
Press the control button on the TV.
Press the control button again to go back to operating
mode.
TV Control & Operation
The control button allows you to control the Quick
Standby-On functions of the TV.
Note:
7KHSRVLWLRQRIWKHFRQWUROEXWWRQPD\GL௺HUGHSHQGLQJ
on the model.
7RWXUQWKH79Rႇ4XLFN6WDQGE\
Press the control
button to turn the TV into quick standby mode.
7R WXUQ WKH 79 Rႇ 6WDQGE\
The TV cannot be
switched into standby mode via control button.
To turn on the TV:
Press the control button, the TV
will turn on.
Note: Live TV settings menu OSD in Live TV mode cannot be
displayed via the control button.
Operation with the Remote Control
Press the
Menu
button on your remote control to
display Live TV settings menu when in Live TV mode.
Press
Home
button to display or return to the Home
Screen of the Android TV. Use the directional buttons
to move the focus, proceed, adjust some settings and
press
OK
to make selections in order to make changes,
set your preferences, enter a sub-menu, launch an
application etc. Press
Return/Back
to return to the
previous menu screen.
Input Selection
Once you have connected external systems to your
79\RXFDQVZLWFKWRGLႇHUHQWLQSXWVRXUFHV3UHVVWKH
Source
button on your remote control consecutively
or use the directional buttons and then press the
OK
EXWWRQWRVZLWFKWRGLႇHUHQWVRXUFHVZKHQLQ/LYH79
mode. Or enter the
Inputs
menu on the Home Screen,
select the desired source from the list and press
OK
.
Changing Channels and Volume
You can adjust the volume by using the
Volume
+/-
buttons and change the channel in Live TV mode
by using the
Programme
+/-
buttons on the remote.
Summary of Contents for 32-FAF-9160-12
Page 1: ...32 FAF 9160 12 v ri tv f rg tv colour television k ytt ohje bruksanvisning owner s manual...
Page 2: ......
Page 53: ......
Page 54: ......
Page 55: ......
Page 56: ...50601177...


