background image

English

   - 52 -

Power Connection

IMPORTANT

: The TV set is designed to operate on 

220-240V AC, 50 Hz.

After  unpacking,  allow  the  TV  set  to  reach  the 

• 

ambient room temperature before you connect the 
set to the mains. Plug the power cable to the mains 
socket outlet.

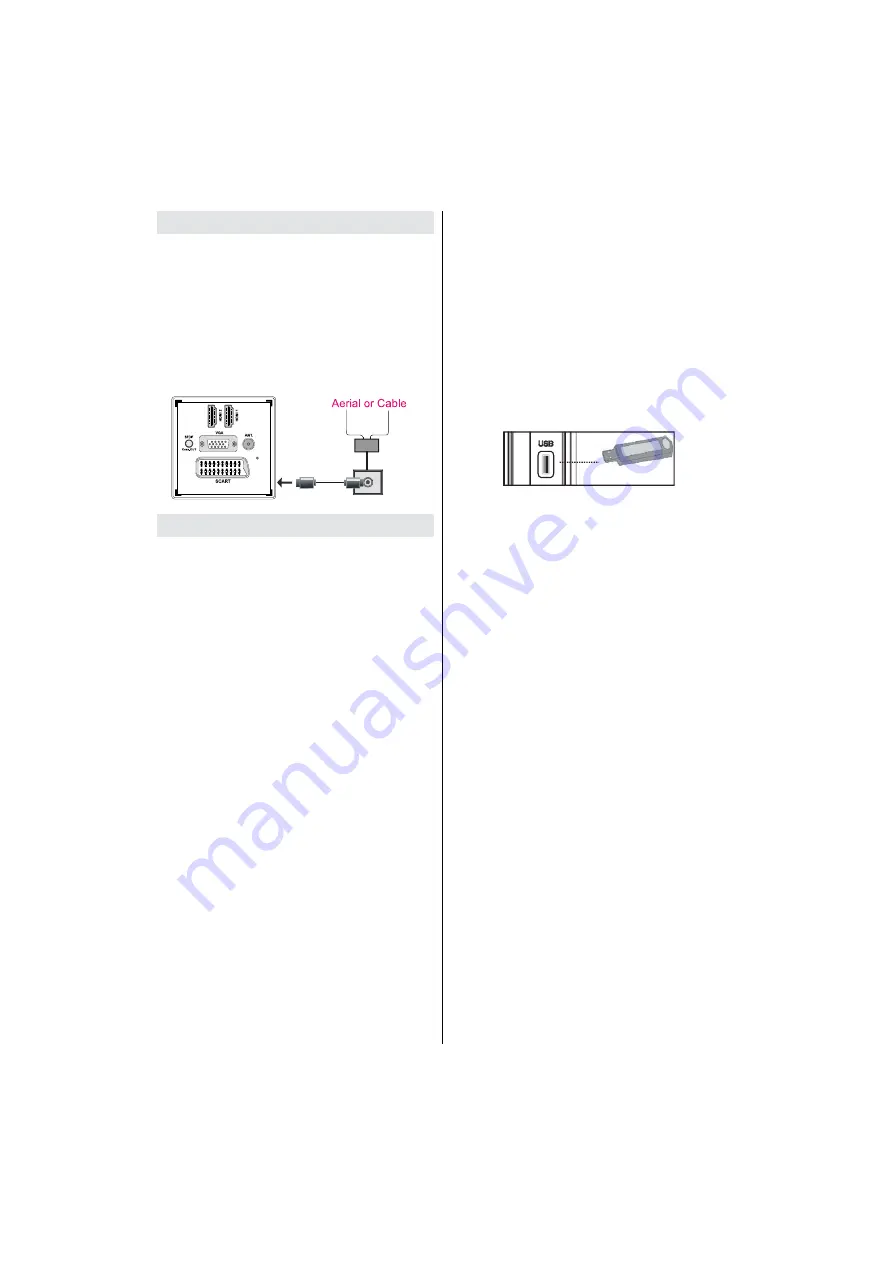
Aerial Connection

Connect  the  aerial  ,cable TV  plug  to  the AERIAL 

• 

INPUT socket located at the rear of the TV.

Using USB Inputs

USB Connection

You  can  connect  a  USB  hard  disk  drive  or  USB 

• 

memory stick to your TV by using the USB inputs 
of the TV. This feature allows you to play 

 les stored 

in a USB drive or record programmes.
2.5” and 3.5” inch (hdd with external power supply) 

• 

external hard disk drives are supported.
To  record  a  programme,  you  should 

 rst  connect 

• 

a  USB  disk  to  your  TV  while  the  TV  is  switched 
off.  You  should  then  switch  on  the  TV  to  enable 
recording feature. Otherwise, recording feature will 
not be available. 

IMPORTANT !

You  may  back  up  your 

 les  before  making  any 

• 

connections  to  the  TV  set  in  order  to  avoid  any 
possible data loss. Note that manufacturer will not 
be responsible for any 

 le damage or dataloss.

It is possible that certain types of USB devices (e.g. 

• 

MP3 Players) or USB hard disk drives/memory sticks 
may not be compatible with this TV.

IMPORTANT

:  The  TV  supports  only  FAT32  disk 

formatting.  NTFS  format  is  not  supported.  If  you 
connect a USB disk with NTFS format, the TV will ask 
you to format the content. See the section, “Format 
Disk” in the following pages for more information on 
disk formatting.
Note that ALL the data stored on the USB disk will 
be lost and then the disk format will be converted to 
FAT32 in such a case.

USB Disk Connection

• Plug your USB device to the USB input of the TV. 

Note: Plug or unplug your USB disk while the TV is 
switched off.
Note: If you are going to connect a USB hard disk drive 
to the TV set, USB connection cable used between 
the disk drive and the TV should have a USB logo 
and should be as short as possible.
Note: While formatting a USB hard disk that has 1TB 
(Tera Byte) or more 

 le capacity, you can experience 

problems  with  the  formatting  process.  In  such  a 
case, you should format the disk with your personal 
computer  and  the  formatted  disk  type  should  be 
FAT32.

SIDE VIEW        USB MEMORY

CAUTION ! 

Quickly  plugging  and  unplugging  USB  devices, 

• 

is  a  very  hazardous  operation.  Especially,  do  not 
repeatedly quickly plug and unplug the drive. This 
may cause physical damage to the USB player and 
especially the USB device itself.
Do  not  pull  out  USB  module  while  playing  or 

• 

recording a 

 le.

Programme Recording

To record a programme, you should 

 rst connect a 

USB  disk  to  your  TV  while  the  TV  is  switched  off. 
You should then switch on the TV to enable recording 
feature.

IMPORTANT: When using a new USB hard disk drive, 
it is recommended that you 

 rst format the disk using 

your TV’s “Format Disk” option.

For using recording function, you should connect a 

• 

USB disk or an external hard disk drive to the TV 
and connected USB disk should have at least 1 GB 
capacity and should have 2.0 speed compatibility. 
If the connected USB device does not support 2.0 
speed, an error message will be displayed.
Recorded programmes are saved into the connected 

• 

USB disk in .TS format (MPEG-2 transport stream). 
If desirable, you can back up / copy these saved 
recordings into a personal computer.

Note:  It  is  possible  that  recorded  broadcasts  in 
.TS  format  may  not  be  supported  by  your  media 
playback software. In such a case, you should install 
an  appropriate  media  playback  software  to  your 
computer.

An  hour  of  the  recordings  stored  occupies 

• 

approximately 2 GB of space.
For  more  information  on  recording  programmes, 

• 

see  sections  “Instant  Recording”,  “Timeshifting”, 

Summary of Contents for 26FLHYR910LHU

Page 1: ...Farbfernsehger t colour television Bedienungsanleitung owner s manual 26FLHYR910LHU...

Page 2: ...ogrammliste 19 Steuern der Kanalliste 19 Kan le verschieben 19 Kan le l schen 20 Kan le umbenennen 20 Kan le sperren 20 Sender verwalten Favoriten 20 Tastenfunktionen 20 Sender verwalten Kanalliste so...

Page 3: ...mit dem Gebrauch elektronischer Ger te bereits vertraut sind Beachten Sie besonders das Kapitel SICHERHEITSHINWEISE Bewahren Sie das Handbuch f r die weitere Verwendung gut auf Geben Sie das Handbuch...

Page 4: ...Akkus kann lebensgef hrlich sein Bewahren Sie Batterien stets f r kleine Kinder unerreichbar auf Wird eine Batterie verschluckt m ssen Sie sofort rztliche Hilfe suchen Bewahren Sie auch Verpackungsfo...

Page 5: ...ausgesetzt werden Kerzen und andere offene Flammen m ssen zu jeder Zeit von diesem Produkt ferngehalten weden um das Ausbreiten von Feuer zu verhindern Batterien d rfen niemals zu gro er Hitze wie di...

Page 6: ...ltsm ll entsorgt werden muss Innerhalb der EU gibt es getrennte Sammel und Recyclingsysteme F r weitere Informationen wenden Sie sich bitte an die rtlichen Beh rden oder an den H ndler bei dem Sie das...

Page 7: ...stellungen nicht ge ndert werden k nnen wenn das TV Ger t im Energiesparmodus ist Wird das TV Ger t nicht verwendet schalten Sie es bitte ab oder trennen Sie es vom Netzstecker Dadurch wird der Energi...

Page 8: ...altung 14 Auswahl Favoritenmodus 15 Exit im DTV Modus Return Indexseite im 16 TXT Modus Keine Funktion 17 Keine Funktion 18 Aufnahmebibliothek 19 Auswahl Bildmodus ndert den Bildmodus im 20 Medienbrow...

Page 9: ...MI Buchse oder die Component Buchsen angeschlossen werden Diese Anschl sse k nnen 720p oder 1080p Signale empfangen F r einen Anschluss von HDMI zu HDMI ist keine Audioverbindung erforderlich RF Einga...

Page 10: ...io und Videoeing nge werden zum Anschlie en der Audio und Videosignale von Zusatzger ten verwendet Um die Videoverbindung herzustellen m ssen Sie das mitgelieferte AV Anschlusskabel verwenden Stecken...

Page 11: ...rke Das NTFS Format wird nicht unterst tzt Wenn Sie ein mit NTFS formatiertes USB Laufwerk anschlie en fragt das TV Ger t ob Sie den Inhalt formatieren m chten Siehe den Abschnitt Laufwerk formatieren...

Page 12: ...Sie eine USB Festplatte oder ein externes Festplattenlaufwerk mit dem USB 2 0 Standard und einerKapazit tvonmindestens1GBandasTV Ger t anschlie en Unterst tzt das angeschlossene Ger t nicht den 2 0 S...

Page 13: ...ten Sie dass nicht alle in der Abbildung gezeigten Kabel im Lieferumfang enthalten sind Hat Ihr Zusatzger t eine HDMI Buchse k nnen Sie es ber HDMI anschlie en um eine bessere Video und Audioqualit t...

Page 14: ...hl mit den Tasten auf der Fernbedienung als auch mit den Tasten am Ger t bedienen Bedienung mit den Tasten am TV Ger t Einstellung der Lautst rke Dr cken Sie die Taste um die Lautst rke zu verringern...

Page 15: ...um die Option Teletext Sprache einzustellen HINWEIS MitderOption TeletextSprache k nnen Sie folgenden die Sprachregionen West Ost Kyrillisch T rkisch Griechisch oder Arabisch ausw hlen Dr cken Sie nac...

Page 16: ...angsauswahl Wenn Sie externe Ger te an Ihr TV angeschlossen haben k nnen Sie dieses auf unterschiedliche Eingabequellen schalten Dr cken Sie mehrmals die Taste SOURCE auf der Fernbedienung um die Quel...

Page 17: ...zum aktuellen Tag zur ckgebl ttert werden falls einige Tage nach vorne gebl ttert wurde Taste Blau N chster Tag Zeigt die Programme des n chsten Tages an Zifferntasten Springen Mit den Zifferntasten...

Page 18: ...Men ausgew hlt haben Der Bildschirm Optionen wird dann angezeigt W hlen Sie die Option Aufnahme und dr cken Sie die Taste OK F r das ausgew hlte Programm ist nun eine Aufnahme programmiert Um eine pr...

Page 19: ...wird in Multiplexen ausgestrahlt Ein Multiplex ist eine Gruppe von Kan len die in der gleichen Frequenz ausgestrahlt werden TV Sendungen Radiosendungen und EPG Daten werden im Multiplex zur Verf gung...

Page 20: ...espeichert sind Dr cken Sie OK um fortzusetzen W hlen Sie die Option Feinabstimmung durch Dr cken der Taste oder aus Wenn Sie fertig sind dr cken Sie OK um fortzusetzen Sender verwalten Programmliste...

Page 21: ...Sie dann die Option Sperren Dr cken Sie die Taste OK um fortzusetzen Sie m ssen nun die Kindersicherungs PIN eingeben Die Standard PIN ist 0000 Geben Sie die PIN Zahl ein Dr cken Sie die Taste OK wenn...

Page 22: ...aste MENU auf der Fernbedienung und w hlen Sie dann die Option Medienbrowser durch Dr cken der Taste oder Dr cken Sie die Taste OK um fortzusetzen Die Men optionen des Medienbrowsers werden angezeigt...

Page 23: ...Sie die Taste RETURN Exit um zum vorhergehenden Men zur ckzuschalten Videos ber den USB anschauen Wenn Sie Fotos aus den Hauptoptionen w hlen werden die verf gbaren Bilddateien ge ltert und am Bildsch...

Page 24: ...atte an das TV Ger t anschlie en wenn dieses ausgeschaltet ist Schalten Sie dann das TV Ger t ein um die Aufnahmefunktion zu aktivieren Andernfalls ist die Aufnahmefunktion nicht verf gbar Um die List...

Page 25: ...k Dr cken Sie die Taste STOP um den Timeshift Modus zu verlassen Die Dauer der max Timeshift Aufnahme h ngt von der Kapazit t des angeschlossenen USB Laufwerks und Ihrer Angabe in der Option Max Times...

Page 26: ...die Zeitlupenwiedergabe vorw rts m glich Dazu k nnen Sie die Taste verwenden Durch wiederholtes Dr cken der Taste k nnen Sie die Zeitlupengeschwindigkeit ndern Bildgr e ndern Bildformate Je nach empf...

Page 27: ...itdieserFunktionwirdeinbreitesBild Bildseitenformat von 16 9 auf volle Bildschirmgr e gezoomt Bildeinstellungen kon gurieren Sie k nnenimDetailunterschiedlicheBildeinstellungen verwenden Dr cken Sie d...

Page 28: ...d Bildzoom in diesem Men sind identisch mit den im Hauptmen system unter dem TV Bildmen vorgenommenen Einstellungen Die Optionen Ton Einstellungen und Quelle in diesem Men entsprechen jenen im Abschni...

Page 29: ...Dynamischer Bass wird zum Erh hen des Basseffekts des TV Ger ts benutzt Digital Ausgang Stellt das Ausgangsformat f r den digitalen Audioausgang ein PCM Digitaler Stereoton Komprimiert DD DD AC3 AC3...

Page 30: ...den den Zugang zu speziellen Men s bereitstellen Ist dies der Fall beachten Sie bitte die Hinweise des Diensteanbieters Sie k nnen ohne Smartcard nur unverschl sselte Kan le ansehen HINWEIS Die Smartc...

Page 31: ...en Sie die Fernbedienung Wenn eine Taste gedr ckt wird erscheint die Meldung Kindersicher ung Ein auf dem Bildschirm PIN einstellen Legt eine neue PIN Zahl fest Geben Sie ber die Zifferntasten eine ne...

Page 32: ...Setup Zur Kon guration der Aufnahmen wird das folgende Men eingeblendet In diesem Men nden Sie die folgenden Optionen Fr her starten Hier legen Sie fest dass die Aufnahme bereits vor der eingestellte...

Page 33: ...Zeit und Zeitzone nicht eingestellt werden Wenn MANUELL ausgew hlt wird kann die Zeitzone ge ndert werden W hlen Sie die Option Zeitzone durch Dr cken der Taste oder aus Verwenden Sie dieTasten oder u...

Page 34: ...rt Wenn Sie die gew nschte bertragungsart mit den Tasten oder einstellen zeigt das TV Ger t die entsprechende Kanalliste an Gibt es f r den gew hlten Typ keine gespeicherten Kan le wird die Meldung Ke...

Page 35: ...enn Sie das TV Ger t bewegen oder transportieren halten Sie es bitte richtig an der Unterseite Zur ckbleibendes Bild Beachten Sie dass bei der Anzeige von stehenden Bildern Geisterbilder auftreten k n...

Page 36: ...um die Aufnahmefunktion zu aktivieren Andernfalls ist die Aufnahmefunktion nicht verf gbar Wenn die Aufnahme nicht funktioniert versuchen Sie das TV Ger t abzuschalten und das USB Ger t nochmals anzus...

Page 37: ...60x768 60 Hz Anhang B AV und HDMI Signalkompatibilit t Eingangssignaltypen Quelle Unterst tzte Signale Verf gbar EXT SCART PAL 50 60 O NTSC 60 O RGB 50 O RGB 60 O Seiten AV PAL 50 60 O NTSC 60 O YPbPr...

Page 38: ...tzte Dateiformate Medium Datei erweiterung Format Hinweise Video Audio Max Au sung Bitrate etc Film mpg dat vob mkv rmvb ts trp tp MPEG1 MPEG Layer 1 2 3 20Mbit sec MPEG2 MPEG2 XviD 3ivx PCM MP3 XviD...

Page 39: ...len nach neuen Softwareupgrades Wird eine neue Software gefunden und erfolgreich heruntergeladen arbeitet das TV Ger t ab dem n chsten Einschaltvorgang mit der neuen Softwareversion Hinweis zum Reboo...

Page 40: ...l 1 x 3 5 mm Klinke Kopfh rerausgang 1 x CI Slot 1 x Seiten A V Digitaler Empfang DVB C bertragungsstandards DVB C MPEG2 DVB C MPEG4 i DEMODULATION Symbolrate 4 0 Msymbole s bis 7 2 Msymbole s Modulat...

Page 41: ...tomatische Lautst rkebegrenzung Helligkeit Diese Steuerung definiert den allgemeinen Helligkeitsgrad des Gesamtbilds Kontrast Damit wird der Bereich der optischen Dichte und der Ton des Gesamtbilds ei...

Page 42: ...VD besteht aus zwei 0 6 mm d nnen Schichten die bereinander gelagert sind Da die Informationsdichte umso h her ist je d nner die Disc ist hat eine DVD eine gr ere Kapazit t als eine einfache Disc von...

Page 43: ...hres Ger tes oder den Austausch gegen ein gleichwertiges Ger t die bei uns anfallenden Arbeitsl hne Materialkosten und die Transportkosten des Ger tes innerhalb der Schweiz 5 Zur Geltendmachung Ihrer...

Page 44: ...aftung unsererseits ins besondere keine Haftung f r Sch den die nicht am Ger t selbst ent standen sind oder die durch den Ausfall des Ger tes bis zur Instandsetzung entstehen z B Wegekosten Handlingsk...

Page 45: ...ng a Channel 60 Deleting a Channel 60 Renaming a Channel 60 Locking a Channel 60 Managing Stations Favourites 61 Button Functions 61 Managing Stations Sorting Channel List 61 On Screen Information 61...

Page 46: ...specially the chapter SAFETY PRECAUTIONS Carefully keep the handbook as future reference When selling the device or giving it away absolutely give these direction for use Thank you for choosing this p...

Page 47: ...e sources such as lighted candles are placed on top of the TV Batteries should not be exposed to excessive heat such as sunshine re or the like Lightning In case of storm and lightning or when going o...

Page 48: ...frequency range galvanic isolator see EN 60728 11 Note The HDMI connection between PC and TV may cause radio interference in which case it is recommended to use VGA DSUB 15 connection LED Screen The L...

Page 49: ...imum level Note that some picture settings will be unavailable to be changed when the TV is in Power Save Mode When the TV is not in use please switch off or disconnect the TV from the mains plug This...

Page 50: ...mode selection 15 Exit in DTV mode Return Index page in 16 TXT mode Media Browser 17 No function 18 Recordings Library 19 Picture mode selecion Changes picture mode 20 in Media Browser video mode Elec...

Page 51: ...MI sockets or Component Socket These sockets can accept either 720p or 1080p signals No sound connection is needed for an HDMI to HDMI connection RF Input 3 connects to an aerial antenna system or a c...

Page 52: ...onnection 3 input is used for connecting video and audio signals of external devices To make a video connection you must use the supplied AV connection cable for enabling connection First plug singula...

Page 53: ...TV is switched off Note If you are going to connect a USB hard disk drive to the TV set USB connection cable used between the disk drive and the TV should have a USB logo and should be as short as po...

Page 54: ...recordings last three digits indicates this Such as 4801 000 ts 4801 001 ts Recorded programmes are stored in the following directory of the connected USB disk DVR RECS All recordings are indicated w...

Page 55: ...pulling backwards from the indicated part Insert two AAA R3 or equivalent type batteries inside Observe the correct polarity when inserting batteries and replace the battery cover Note Remove the batt...

Page 56: ...TV Volume Setting Press V button to increase the volume Press V button to decrease the volume A volume level scale slider will be displayed on the screen Programme Selection Previous or Next Programm...

Page 57: ...arch menu SUBTITLE Press SUBTITLE button to view Select Genre menu Using this feature you can search the programme guide database in accordance with the genre Info available in the programme guide wil...

Page 58: ...ting the language Welcome screen will be displayed requiring you to set Country Teletext Language and Scan Encrypted options By pressing or button select the country you want to set and press button t...

Page 59: ...Digital Cable Analogue Searches and stores both analogue and cable DVB stations Whenever you select an automatic search type and press OK button a con rmation screen will appear on the screen To star...

Page 60: ...K button to continue The following message will be asked Select Yes to continue or select No to cancel If you start Digital Aerial scan process automatic scanning will start You can press MENU button...

Page 61: ...OK button to process Selected channel is now moved Deleting a Channel You can press GREEN button to tag untag all channels YELLOW button to tag untag channel Select the channel that you want to delete...

Page 62: ...y on screen information Details of the station and current programme will be displayed on the information banner The information banner gives information on the channel selected and the programmes on...

Page 63: ...ts subtitle Audio Jump GREEN button Jumps to time Use numeric buttons to type the desired time and press GREEN button again to proceed Yellow Opens subtitle time correction menu Press RETURN button to...

Page 64: ...ure will not be available To view the list of recordings select Recordings Library and press the OK button Recordings Library will then be displayed with available recordings All the recordings are ke...

Page 65: ...ording IMPORTANT To record a programme you should rst connect a USB disk to your TV while the TV is switched off You should then switch on the TV to enable recording feature Otherwise recording featur...

Page 66: ...justed by the information provided by the selected source if available The format being displayed in AUTO mode is completely independent of WSS information which could be included in the broadcast sig...

Page 67: ...option gives white colours a slight blue stress For normal colours select Normal option Setting Warm option gives white colours a slight red stress Noise Reduction If the broadcast signal is weak and...

Page 68: ...NU button and select the Sound icon by using or button Press OK button to view Sound Settings menu Operating Sound Settings Menu Items Press or button to highlight a menu item Use or button to set an...

Page 69: ...cess module CAM can be necessary This module must be inserted in the CI slot of your TV Obtain the Conditional Access Module CAM and the viewing card by subscribing to a pay channel company then inser...

Page 70: ...ttings menu will function as described below Language Settings In the con guration menu highlight the Language Settings item by pressing or buttons Press OK and Language Settings submenu will be displ...

Page 71: ...menu Use or button to highlight Timers and press OK to continue Setting Sleep Timer This setting is used for setting the TV to turn off after a certain time Highlight Sleep Timer by using or button Us...

Page 72: ...l operation however ALL the data stored on the USB disk will be lost in such a case Press OK button while the Format Disk option is highlighted A menu will appear on the screen requiring you to enter...

Page 73: ...t Power Save Mode as On or Off See the section Environmental Information in this manual for further information on Power Save Mode Note Backlight function will be invisible if Power Save Mode is set t...

Page 74: ...Press again to resume Subcode Pages Selects subcode pages if available when the teletext is activated P P and numbers 0 9 Press to select a page Note Most TV stations use code 100 for their index page...

Page 75: ...connections if you have tried to connect a device Recording Unavailable To record a programme you should rst connect a USB disk to your TV while the TV is switched off You should then switch on the T...

Page 76: ...1360x768 60 Hz Appendix B AV and HDMI Signal Compatibility Input Signal Types Source Supported Signals Available EXT SCART PAL 50 60 O NTSC 60 O RGB 50 O RGB 60 O Side AV PAL 50 60 O NTSC 60 O YPbPr 4...

Page 77: ...Format Remarks Video Audio Maximum resolution Bit rate etc Movie mpg dat vob mkv rmvb ts trp tp MPEG1 MPEG Layer 1 2 3 20Mbit sec MPEG2 MPEG2 XviD 3ivx PCM MP3 XviD Verson up to 1 1 2 Mpeg2 TS H264 T...

Page 78: ...re is found and downloaded successfully with next power up TV opens with new software version Note on reboot operation Reboot is the last step in software upgrade operation if download of new software...

Page 79: ...nsmission Standards DVB C MPEG2 DVB C MPEG4 i DEMODULATION Symbolrate 4 0 Msymbols s to 7 2 Msymbols s Modulation 16 QAM 32 QAM 64 QAM 128 QAM and 256 QAM ii VIDEO All MPEG2 MP ML formats with up conv...

Page 80: ...50185351...

Reviews: