background image

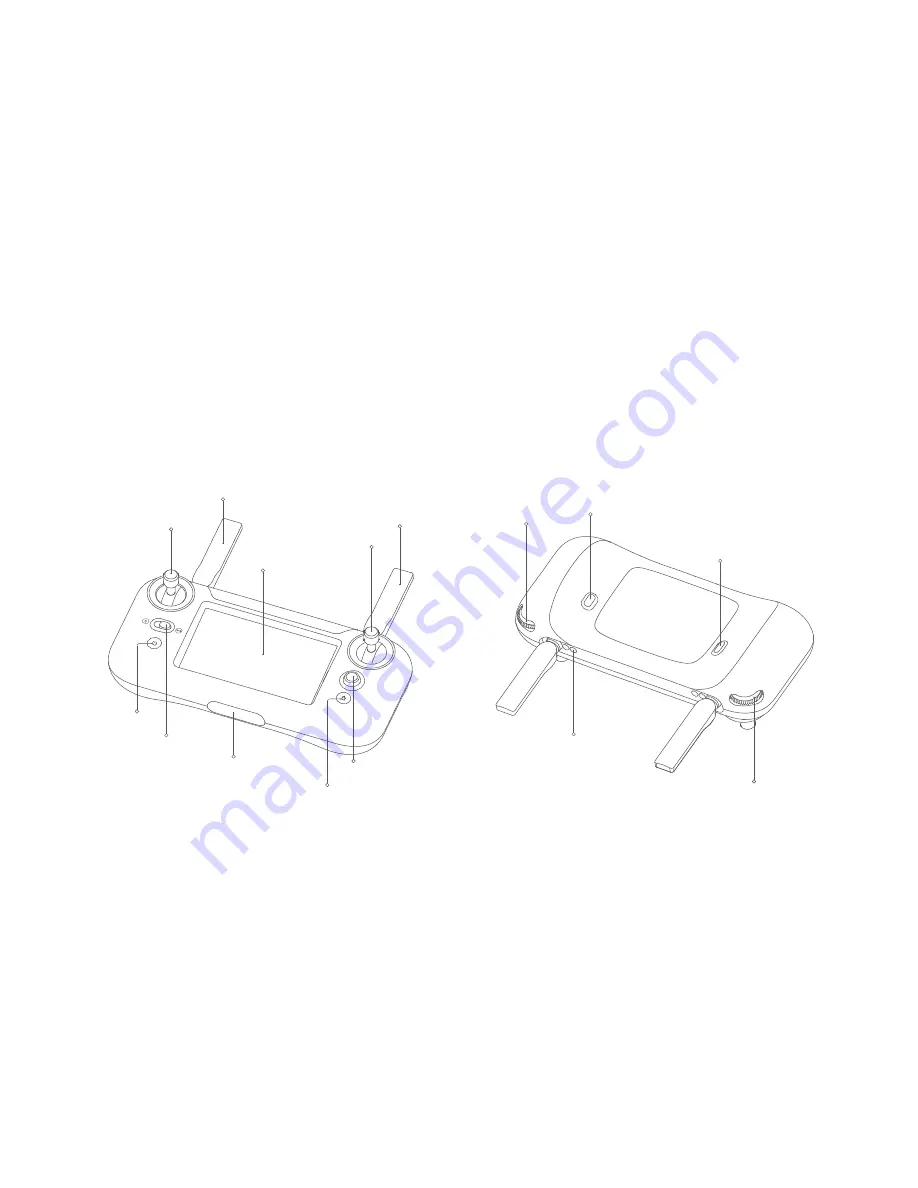
Shoot/Record button

I/O switch

Right dial

Sunshade fixing screw hole

Left dial

2.1 Remote controller

Return button

Mode switch key

Power button

Interface protection cover

Five-directional button

Right stick

Left stick

2.4G flight control antenna 

5.8G transmission antenna 

LCD screen

Summary of Contents for A3

Page 1: ...Please read the user manual carefully before using and keep the manual for future reference FIMI A3 Drone User Manual ...

Page 2: ...V1 0 ...

Page 3: ...tch the instructional video through the link below www a3 fimi com A3 is a small multi functional quadrotor aircraft with integrated aerodynamics intelligent control wireless communication and other advanced technologies which can realize the functions of analog photo transmission remote controller HD aerial photography intelligent flight etc It can play the FPV traversing outdoor freely and can b...

Page 4: ... Charger Aircraft x 1 Remote controller x 1 x 1 x 1 x 1 x 1 Instructions x 2 x 1 Positive propellers x 3 Reverse propellers x 3 Please read the quick start manual carefully before using and keep the quick start manual for future reference FIMI A3 Drone Quick Start Manual ...

Page 5: ...roduction 1 Aircraft Bottom shell Upper shell Power button Landing gear Motor Reverse propeller Battery buckle Integrated gimbal camera Battery Charging protective cover DIY screw hole DIY port Positive propeller ...

Page 6: ...l Sunshade fixing screw hole Left dial 2 1 Remote controller Return button Mode switch key Power button Interface protection cover Five directional button Right stick Left stick 2 4G flight control antenna 5 8G transmission antenna LCD screen ...

Page 7: ...d the aircraft flies forward pull stick downward the aircraft flies backward toggle stick to left the aircraft flies to left toggle stick to right the aircraft flies to right Mode switch key Power button Toggle to left to switch to sport mode Toggle to right to switch to standard mode Long press to turn on off Long press more than 3 seconds can enter auto return short press to exit auto return Ret...

Page 8: ...raft battery level Horizontal velocity Vertical velocity Flight distance Flight altitude RC battery level RC signal Transmission signal Interface status Aircraft tail course relative to the remote controller TF card status Capacity Record time Aircraft voltage Flight mode GPS stars number ...

Page 9: ...uring flying users can select to start ATTI mode from the menu of the remote control When ATTI mode is turned on the mode key can be turned to the left to enter ATTI mode and the mode key can be turned to the right to switch to GPS mode Note When there is no connection between the aircraft and the remote controller the main interface will display N A by default After the connection is established ...

Page 10: ...cond level of low power which is only enough to make the landing Hovering over the edge of a no fly zone The aircraft will automatically hover in the restricted flight area designated by the state such as the edge of the airport and the corresponding prompt of no fly zone will appear on the remote controller screen The user can use the stick to control the aircraft to evacuate the edge of the no f...

Page 11: ...wing flying is supported only in GPS mode and SPORT mode Only when the aircraft and the remote controllerhave six satellites or more can it start following flying If the condition is not met the remote controller indicates that the current GPS signal is poor and the intelligent flying cannot be started Users can choose the following flying in the remote controller menu and set the distance and hei...

Page 12: ...ack so when the operating stick decreases the speed to 0 the aircraft is hovering Left stick Right stick Push up Pull down Push up Pull down Turn left Turn right Turn left Turn right Nose dive Climb up Left turn Right turn Speed up Speed down Left turn Right turn DIY The fuselage is reserved with 6pin standard protocol interface UartTX UartRX GPIO PWM VCC GND and the output voltage of the aircraft...

Page 13: ... ensure that the propeller is pressed to the root of the motor shaft Rotate the propeller to the end in the direction of the lock mark and the propeller will bounce and lock Press the propeller forcefully and rotate the propeller along the opposite direction of the lock mark to remove the propeller Note Take the installation of reverse propeller as an example Turning on and off the aircraft Short ...

Page 14: ...arging the red indicator on the left side of the balance charge is always on After charging completed the red indicator on the left side of the balance charge goes out It takes about 2 5 hours to fully charge the battery Safety tips Please remove the battery from the aircraft and recharge it Be sure to read carefully and strictly follow the instructions and disclaimers before charging The user sha...

Page 15: ... operation The maximum remote operation time is about 4 5 hours 1 Charging 5V 2A Connect the RC and power adapter as shown below When charging the battery icon on the main interface of RC flashes After charging completed the battery icon on the main interface of RC stops flashing It takes about 3 5 hours to fully charge the RC When installing SD card to the RC please remove the protection cover fi...

Page 16: ...ord button to start recording Long press again to stop recording During recording short press the shoot record button to capture a picture The pitch angle of the gimbal can be controlled by toggling the left dial up and down The right dial defaults to adjust EV Users can connect the FPV glasses through the AV OUT interface to experience the flight of the first perspective or connect the monitor et...

Page 17: ...ong press the Return key for more than 3 seconds the aircraft will automatically return to the vicinity of the take off point and automatically land In the process of automatic return short press the key of return and the aircraft will enter the hovering state and wait for the instruction of the stick The return key can exit intelligent flying with one key and return to the main interface with one...

Page 18: ...16 Calibration Custom settings About System Settings Flight Record RC Pair Five directional button Push the five dimensional button to the right to access the media library Toggle the five dimensional button to the left to the settings menu Toggle the five directional button up and down to select the setting item and press the center to enter the setting item After setting completed press the cent...

Page 19: ...erted 1 Inspection before flying Flying 2 Confirm the aircraft heading The installation position of the aircraft battery is the tail direction Once the aircraft is turned on the heading can be told by navigation lights Two white lights indicate the nose and red green lights indicate the tail Safety tips Always keep the tail pointed at the user to avoid direction misjudge White light Green light Wh...

Page 20: ...e air waiting for the stick command 5 Automatic take off landing Keep both sticks to the bottom inner still over 1 second the propellers start spinning Release both sticks once propellers have been spinning and firmly push the left stick upward to fly the aircraft During flight release both sticks to hover At any time during controlled flight release the two levers of the remote controller and the...

Page 21: ...o the takeoff point will be limited based on relevant regulations and policies Do not use this product at the place and time prohibited by regulations and policies To protect the legitimate rights and interests of users please follow the product safety instructions when using Do not operate the aircraft in bad weather such as strong winds rain snow or fog Please operate the aircraft in a broad pla...

Page 22: ...ler interface shows unsuccessful calibration please retry it 1 Remote controller calibration Select RC Calibration in the remote controller setup menu Click OK to start remote calibration Push the two sticks to the maximum extent in the four directions as shown in the figure until the calibration is complete Move the left dial to the upper and lower directions as shown in the figure to the maximum...

Page 23: ...r of the aircraft flashes in pairs please turn the aircraft horizontally according to the figure If the red indicator of the aircraft flashes in pairs please turn the aircraft vertically according to the figure Successful calibration The remote controller screen shows successful calibration and the aircraft indicator returns to the status indication in the current mode Unsuccessful calibration The...

Page 24: ...ler screen Firmware Upgrade Please check the firmware version number regularly and visit www a3 fimi com to download the new firmware Remote controller upgrade Copy the remote controller firmware to the TF card and then insert the TF card into the remote controller Afterwards turn on the power of the remote controller and the remote controller enters the firmware upgrade state At this time the rem...

Page 25: ...rmat MP4 Power adapter Rated input 100 240V 50 60Hz 0 3A Rated output 14V 0 8A Rated power 11 2W Charging ambient temperature 0 C 40 C Remarks The 25 minutes flight time refer to the constant speed flight time when sigle battery cell voltage at 4 35v and with gentle breeze Please use charger supported 4 35V Remote control distance reach to 1km FCC in open and no electro magnetic interference area ...

Page 26: ......

Reviews: