

Page 4
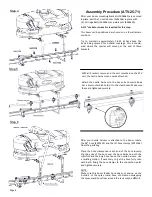
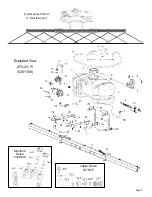
After your boom mounting brackets (5038665) are secured
in place, bolt the 7-nozzle boom (5301164) in place with
(4) Carriage Bolts (5034482) and whiz nuts (5006259).
A 1/2” socket or wrench is required for this step.
This boom can be positioned as shown or in a few alternate
positions.
Try to maintain approximately 18-22 inches above the
items being sprayed, for optimal coverage. This is consid-
ered where the nozzles will mount, at the end of these
brackets.
Step 4
Step 6
Step 5
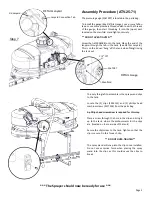
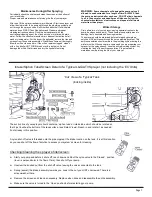
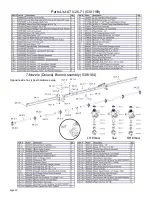
Assembly Procedure (ATV-25-71)
With all brackets secure and the unit mounted on the ATV
unit, the nozzle harness can now be attached.
Attach the nozzle harness to the boom. Each nozzle body
has a brass nut which holds it to the steel boom. Make sure
these are tightened securely.
After your nozzle harness is attached to the boom, locate
the 48” hose (5020122) and the (2) hose clamps (5051144)
from the parts bag.
Place the hose clamps over each end of the hose loosely.
Slip the ends of the hose over the hose barbs on both the
manifold and the poly hose tee on the nozzle harness. Use
a twisting motion, if necessary, to get the hose fully onto
each barb. Bring the hose clamps to the connection point
and tighten securely.
NOTE:
Make sure this boom feeder hose does not end up on the
‘outside’ of the spray wand hose, otherwise unwrapping
the spray wand hose from around the tank may be difficult.


