Page 8
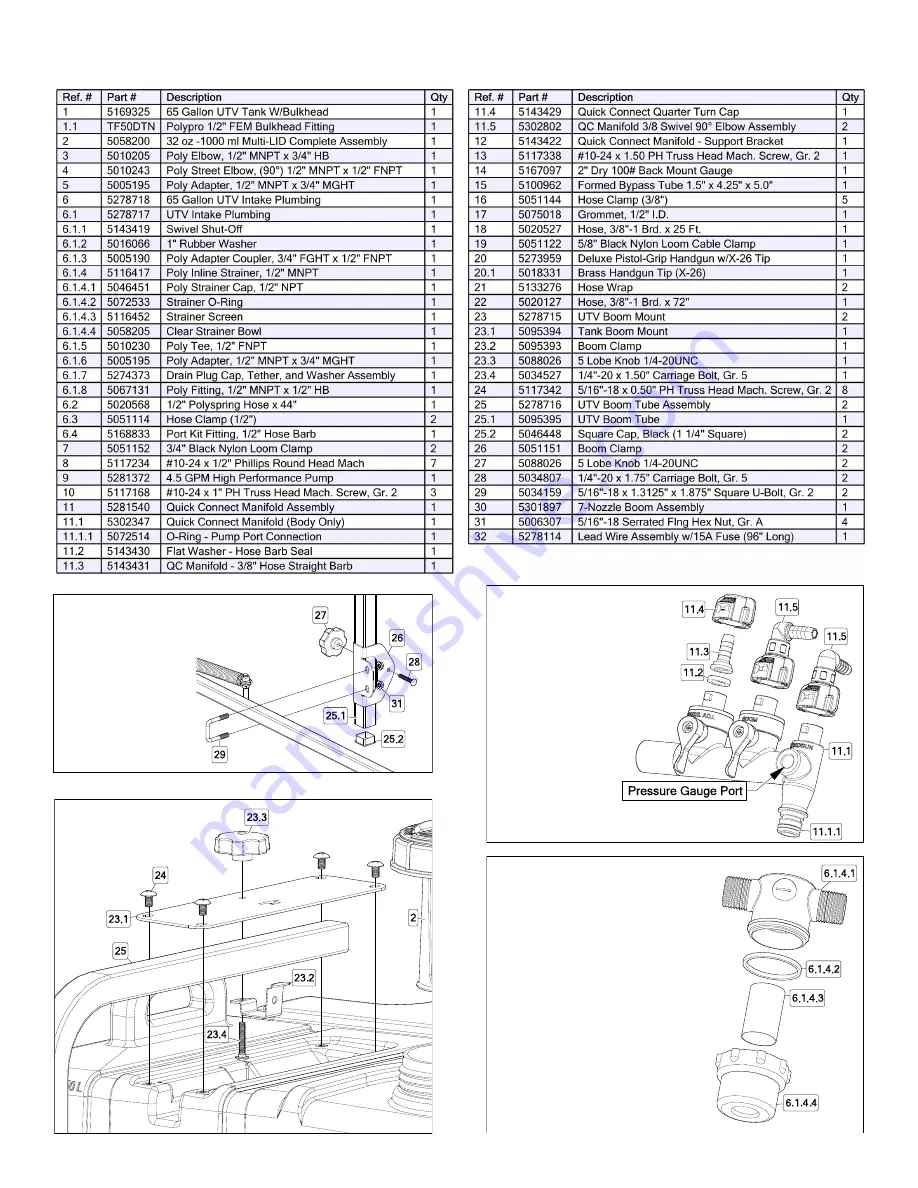
Parts List: UTV-65-7 (5302830)
Manifold Detail
(5281540)
Boom Tube
Assembly
Detail
Boom Mount
(5278715)
Strainer
(5116417)
Page 1: ...within it s load carrying capacity Secure unit in your UTV using tie down straps NOT INCLUDED IMPORTANT REMINDER This sprayer comes with an On Off valve located on your intake line You must make sure the valve is in the open position before using your sprayer OWNER S MANUAL BEFORE RETURNING THIS PRODUCT FOR ANY REASON PLEASE CALL 1 800 831 0027 MONDAY FRIDAY 8 00 AM TO 5 00 PM CST If you should ha...
Page 2: ...om hose Slip 2 3 8 hose clamps onto hose Attach one end of hose to the boom and the other end to the manifold The boom hose can be cut to length if needed Once fully assembled to remove the sprayer from a UTV Box disconnect the boom supply hose from the manifold using the quick connect fitting Then loosen the two lobe knobs on the tank mounts and slide the boom out and set aside Then the tank can ...
Page 3: ...n disconnect the negative black connection and finally the positive red connection The lead wire has an On Off switch to activate the pump is on and O is off Fill the tank part way with water and then add the desired amount of chemical to be sprayed Finish filling tank to proper level Turn the pump on and by depressing the side of the rock er switch The pump is equipped with a pressure switch that...
Page 4: ...rosion and keep the unit from freezing Note RV antifreeze is non toxic and biodegradable and generally safer for the environment than automotive antifreeze Before storing your sprayer for winter or long term storage thoroughly clean and drain it as much as possible Then pour enough pink RV antifreeze into the tank so that when the pump is turned on you can pump the antifreeze throughout the entire...
Page 5: ...e assembly Check for defective check valve Check for clogged strainer filter Check for cracks in the pump housing Check for empty product supply Low Pressure Low Flow Check for leaks in the discharge line Check for restriction in the discharge line Check for debris in nozzle orifice Check for clogged strainer Check for proper voltage try another 12 volt battery Pulsating flow surging Low flow may ...
Page 6: ...move the head of the pump which is held on by 7 screws The first piece inside the head of the pump is called a check valve it s the part responsible for building up pressure and pumping water solution through the lines Clean the check valve under hot soapy water such as a good grade dish soap Checking the Pressure Switch If your motor is not running and you ve checked the following for loose wirin...
Page 7: ...e 7 Exploded View UTV 65 7 5302830 Refer to Parts List Next Page for Part Numbers Detail B Detail A See Detail A Refer to Page 10 for the UTV intake assembly breakdown Reference 6 Detail B Boom Feeder Hose ...
Page 8: ...Page 8 Parts List UTV 65 7 5302830 Manifold Detail 5281540 Boom Tube Assembly Detail Boom Mount 5278715 Strainer 5116417 ...
Page 9: ... spacing Suggested Minimum Spray Height 16 18 above what is being sprayed to plant not ground Optimum Spray Height 20 110 wide tapered flat spray angle with air induction tech nology for better drift management Made of 2 piece UHMWPE polymer construction which provides excellent chemical resistance including acids as well as exceptional wear life Compact size to prevent tip damage Excellent for sy...
Page 10: ...roceed to step 4 4 Open fill cap and place garden hose into tank Add water to the desired gallon marker Close fill cap pressing firmly to seal cap to Multi Lid NOTE If water and chemical has not mixed properly use the pressure adjustment control on the manifold to recirculate the mixture through tank 34 16 47 34 36 Technical Specifications Properly secure the tank to your utility vehicle using tie...
Page 11: ...Page 11 NOTES ...
Page 12: ...obtain warranty service under this Limited Warranty you must 1 provide written notice to Fimco Ind of the defect during the Warranty Period and within thirty 30 days after the defect becomes apparent or the repair becomes necessary at the following address Fimco Ind 1000 Fimco Lane North Sioux City SD 57049 and 2 make the Equipment available to Fimco Ind or an authorized dealer within a reasonable...