Page 10
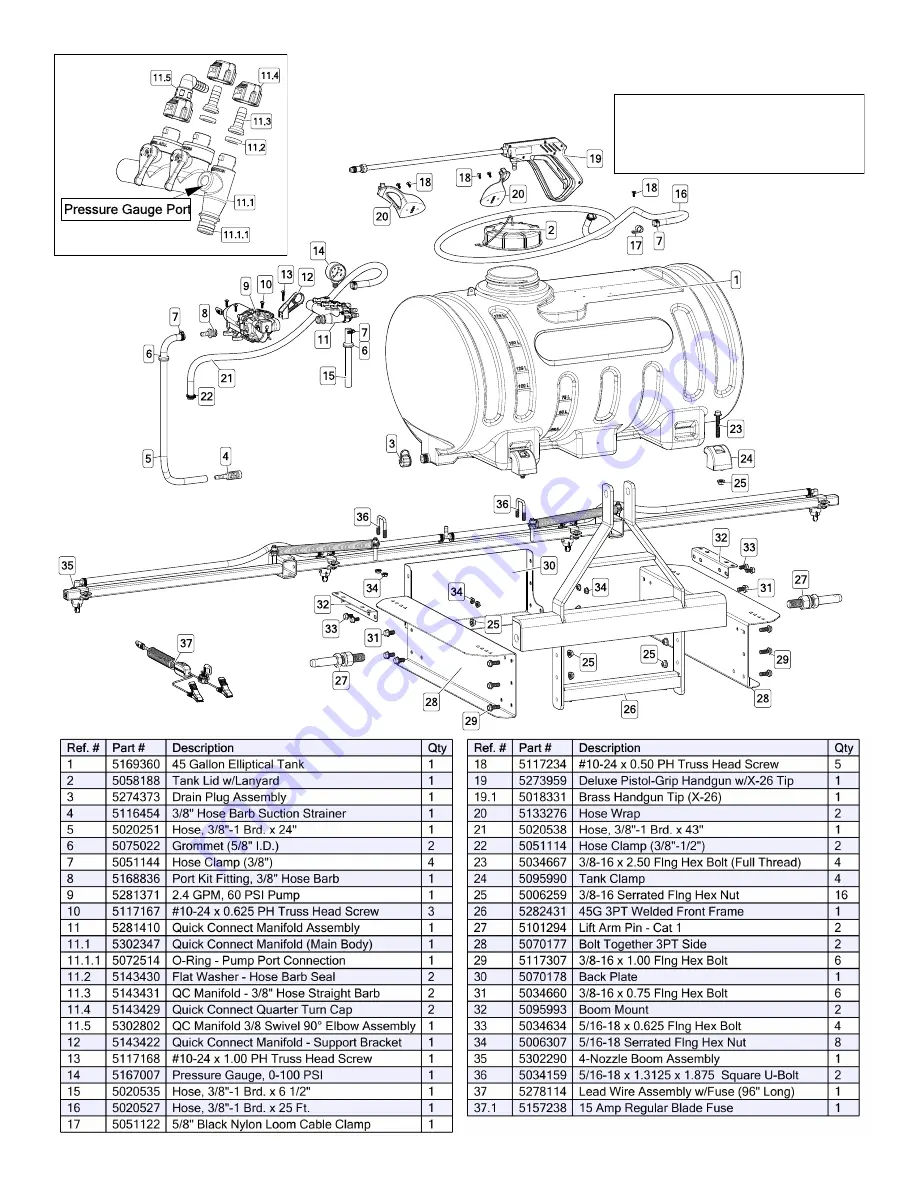
Exploded View/Parts List: 3PT-45-12V-4 (5303244)
NOTE:
Bolt frame together as shown, with
the proper hardware. See Assembly
Instructions earlier in this manual.
Manifold
Detail
Intake Hose
Boom
Hose
Bypass
Page 1: ...ervice always remember to give the following information Correct Part Description and or part number Model number and Serial Number Part descriptions and numbers can be obtained from the illustrated parts list section s of this manual General Information Thank you for purchasing this product The purpose of this manual is to assist you in operating and maintaining your 3 Point sprayer Retain a copy...
Page 2: ...ortant for you to test your sprayer with plain water before actual spraying is attempted This will enable you to check the sprayer for leaks without the possibility of losing any expensive chemicals WARNING Read and Understand the Owner s Manual completely before using this sprayer Assemble test and use in accord ance to manual instructions Read and Follow chemical label instructions and wear prot...
Page 3: ...Owner s Manual Tank Plumbing Pre Assembly Bolt Together 3 PT Sides 3 PT Back Plate 3 PT Welded Front Frame Boom Mounts 4 Nozzle Boom Assembly Contents of Parts Bag 5282432 Contents of Square Boom Parts Bag 5282433 Contents of Bolt Bag 5282434 ...
Page 4: ...lates slip the lock washers on and thread the nuts onto the pin Tighten securely T h is s id e to w a rd s ta n k Step 2 Bolt the frame together as shown Attach one side plate side plates are the same to the front frame weldment using 3 3 8 16 x 1 Flange Whiz Lock Screws and 3 3 8 16 Hex Whiz Nuts Attach back tie plate to side plate using 3 3 8 16 x 3 4 Flange Whiz Lock Screws and 3 3 8 16 Hex Whi...
Page 5: ...e boom and using the nozzle clamps attach the nozzle harness to the boom Step 6 After your nozzle harness is attached to the boom attach the boom feeder hose Place 2 hose clamps loosely onto each end of the hose loosely Slip the ends of the hose over the hose barbs on both the manifold and the poly tee fitting on the nozzle har ness Use a twisting motion if necessary to get the hose fully onto eac...
Page 6: ...h the strainer and to the pump The pump forces the solution under pressure to the handgun or boom nozzles Connect the lead wire to a fully charged 12 volt battery You may use either a stand alone battery or the battery on your towing vehicle Connect to the positive red terminal first then connect to the negative black terminal Then connect the end of the lead wire to the end of the pump When disco...
Page 7: ...ill sprayer half way with clean water and repeat Follow the chemical manu facturer s disposal instructions of all wash or rinsing water If boom or handgun nozzles need cleaning remove them from the sprayer and soak in warm soapy water Clean with a soft bristled brush or toothpick if necessary Never use a metal object Even the slightest damage can change the flow rate and spray distribution Water r...
Page 8: ...iring Make sure the ON OFF switch is on Check to see if connected to good Check for Low Voltage Troubleshooting Check for a clogged strainer Check for proper voltage Check for leaks in the discharge line Check for restrictions in the discharge line Check for debris in intake Check for debris in nozzle orifice Check for worn or dirty check valve Low Pressure Low Flow Pump Does Not Prime No Discharg...
Page 9: ...mmended to replace this part Sprayer and Pump FAQs Why does the pump not run all the time This is an on demand pump and only runs when a discharge is open spray gun bypass boom if applicable or a leak is in the system Why does the pump surge while using the spray gun Low flow high pressure may cause the pump to surge or cycle Typically the spray wand is adjusted at too fine of a mist to overcome a...
Page 10: ...10 Exploded View Parts List 3PT 45 12V 4 5303244 NOTE Bolt frame together as shown with the proper hardware See Assembly Instructions earlier in this manual Manifold Detail Intake Hose Boom Hose Bypass Hose ...
Page 11: ...t is being sprayed to plant not ground Optimum Spray Height 20 110 wide tapered flat spray angle with air induction technology for better drift management Made of 2 piece UHMWPE polymer construction which provides excellent chemical resistance includ ing acids as well as exceptional wear life Compact size to prevent tip damage Excellent for systemic products and drift management Opposite side has ...
Page 12: ...mited Warranty you must 1 provide written notice to Fimco Ind of the defect during the Warranty Period and within thirty 30 days after the defect becomes apparent or the repair becomes necessary at the following address Fimco Ind 1000 Fimco Lane North Sioux City SD 57049 and 2 make the Equipment available to Fimco Ind or an authorized dealer within a reasonable period of time For more information ...