background image


Doc.


No.


06

916

 ●


Rev.


1


ISO


9001:2015


Certified


Page


7


of


7


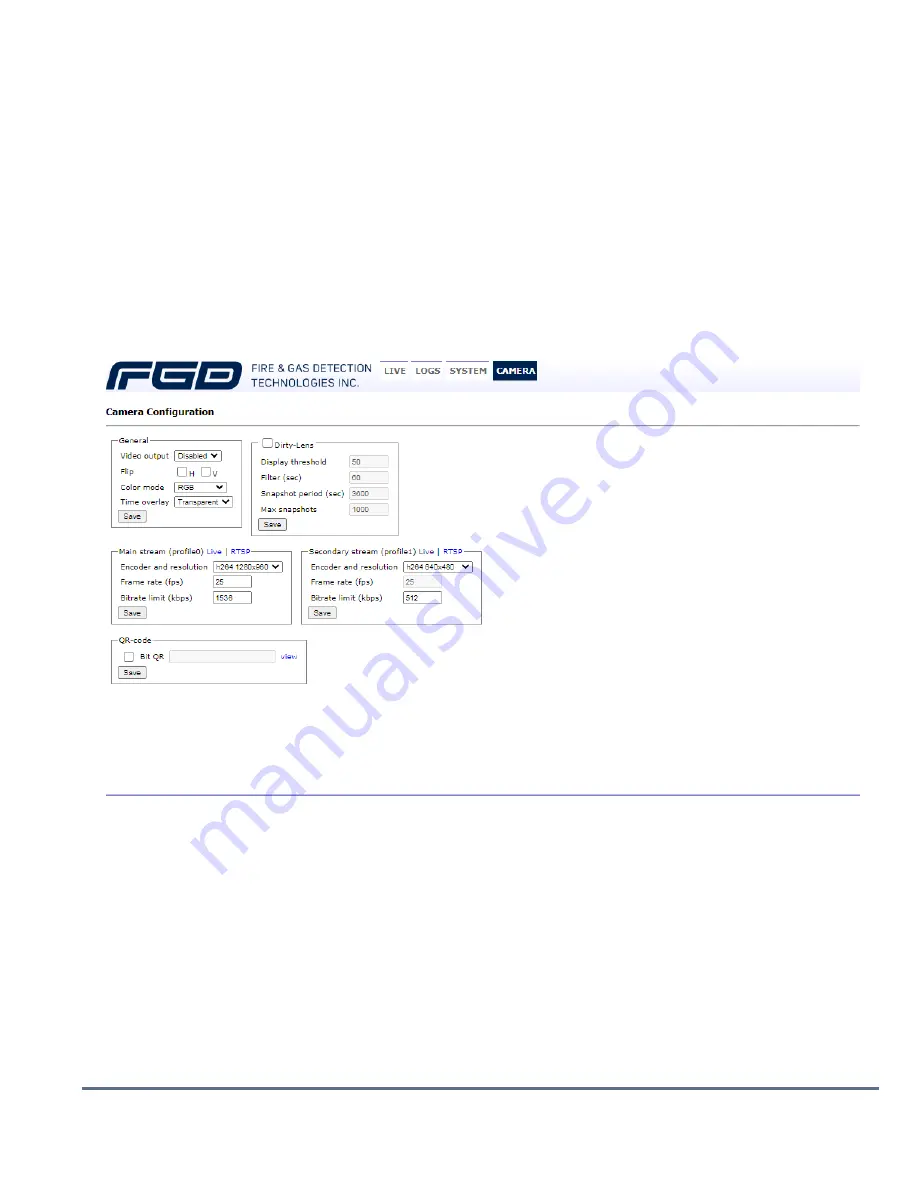
5.


Select


CAMERA


in


the


toolbar


at


the


top


to


access


the


Camera


Configuration


settings.


From


this


screen


you


can


perform


the


following


functions


on


the


camera:


The


options


in


the


General


group


allow


you


to


customize


the


video


display.


The


options


in


the


Dirty

Lens


group


allow


you


to


adjust


the


video


to


account


for


a


dirty

lens.


When


enabled,


the


camera


image


is


checked


once


every


20


minutes.


If


the


image


is


obstructed


due


to


a


dirty


lens,


the


word


‘Dirty’


will


appear


in


the


camera’s


video


stream


near


the


timestamp.


Also,


the


camera’s


fault


relay


will


close,


and


the


0

20mA


signal


will


be


sent.


If


the


lens


is


cleaned


within


20


minutes,


the


fault


relay


will


open,


and


the


0

20mA


signal


will


return


to


normal.


The


options


in


the


Main


and


Secondary


stream


groups


allow


you


to


adjust


the


resolution,


frame


rate,


and


bitrate


of


the


video


stream.


If


connecting


the


camera


to


the


Fike


Video


Analytics


FSM

IP


server,


one


of


the


video


streams


must


be


set


to


provide


a


resolution


of


640


x


480


at


15


frames


per


second


with


a


recommended


bitrate


of


1100


kbps.


The


QR

code


group


is


used


to


functionally


test


the


detector


and


should


only


be


used


by


a


Fike


Factory


Trained


technician.


Figure


8:


FGD


Camera


Configuration


Browser


The


flame


detector


is


now


configured


and


ready


for


installation.


If


you


have


any


questions,


contact


us


at


www.Fike.com


or


call


1

800

YES

FIKE


or


1

800

979

3453,


option


1.


Summary of Contents for FIK-IR3

Page 1: ...test version of the Communicator software Contact Fike at 1 800 979 3453 for the password 3 Detector Connections Connections to the flame detector for configuration and setup will vary depending upon...

Page 2: ...tion Ground Ground earth Connected to a screw on the housing exterior 1 24 VDC Power supply 18 32 VDC 2 24 VDC Power supply return 0 VDC 3 0 20mA in 0 20 mA analog current ouput 4 0 20mA out 5 Fault R...

Page 3: ...et RX 19 Ethernet RX 20 Shield Permanent connection to detector housing internal ground Note Highlighted pins indicate required connections 6 Detector Configuration The RS 485 connection from the flam...

Page 4: ...User Manual for a detailed description of each configuration setting Figure 5 FGD Communicator detector configuration screen Table 3 Detector configuration options Function Options Default Setting Sen...

Page 5: ...address can even change while it is still connected 1 If a static IP address is required connected to the detector and open the Communicator software Locate the Ethernet IP address of the connected de...

Page 6: ...soft or hard reset is used it will default the camera settings to factory defaults Reboot simply restarts the camera Change the camera s time The time will be displayed on the camera s video feed Ass...

Page 7: ...d the 0 20mA signal will be sent If the lens is cleaned within 20 minutes the fault relay will open and the 0 20mA signal will return to normal The options in the Main and Secondary stream groups allo...

Reviews: