FIAMA P3S I User Manual And Maintenance Download Page 3

Position control for Servo unit

P3S_I

Data: 13/01/16

Codice: P3S_I  Rev 1.0

page 3/14

Description

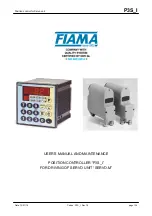
The controller 

P3S_I

 combined to the 

SERVO_E

 positioning unit carries out a particular suitable system for

the automation of machines that require driving of motorized axes.
The inputs of the position controller start, and emergency are opto-insulated.
The values are displayed on a high-brightness 5-digit display (range -9999 +99999) while an auxiliary 2-digit
display shows the program step during execution or the working constants.
The keyboard with 16 keys and 6 function indicators make the use and setting up of the positioning unit very
easy and immediate. The positioning unit can be linked up to 32 Servo units in network and can store up to
99 positioning program.
In order to optimize the positioning accuracy there are some parameters that can balance the system inertia,
clearances, wear and tear of mechanical couplings. Available working modes are: automatic, manual, single
positioning. A relays-output signals the positioning of all axes, a second possible connection error.
Serial connection to SERVO is RS485 with MODBUS RTU protocol. The keeping of data during machine off
is guaranteed by a non-volatile EEPROM memory. Suitable applications are in automatic size change,
motorized adjusting of reference marks, end strokes for cutting and bending.

Installation

Before installing the instrument, read the following warnings:
a) Connect the instrument strictly following the instructions of the manual.
b) Carry out the connections using the correct wires within the limits of the tension and power supply as
indicated in the technical data.
c) The instrument does not have an ON/OFF switch, hence it comes on when connected to the power supply.
For safety reasons, the equipment connected permanently to the power supply requires a bi-phasal selector
switch which should be within easy reach of the operator.
d) If the instrument is connected to any apparatus not isolated electrically, carry out an earth connection to
avoid it being connected directly through the structure of the machine.
d) It is the responsibility of the user to check, before using , the correct settings of the parameters of the
instrument to avoid damage to persons or things.
e) The instrument cannot function in a dangerous environment (inflammable or explosive). It can be
connected to elements that operate in the same atmosphere only through appropriate interfaces, according
to the current safety regulations.
g) Avoid dust, humidity, corrosive gases, heat sources.

Power supply

a) Before connecting the instrument, check that the power supply tension is within the permitted limits and
that it corresponds to the one indicated on the tag.
b) Carry out the electrical connections with the instrument disconnected.
c) For the power line to instruments and sensors, a power supply line separate from that of the power is
required : it is necessary to use an isolating transformer.
d) The power line should provide a device that separates the set fuses of the instruments and should not be
used to regulate relays, contactors, etc.
e) If the network tension is very disordered (eg. from the change-over of the power units, motors, inverters,
welders, etc.), use the appropriate filters of the network.
f) If an earth connection is needed, ensure that the plant has a good earth system: tension between neutral
and earth <1V and the resistance <6 Ohm.

Summary of Contents for P3S I

Page 1: ...Position control for Servo unit P3S_I Data 13 01 16 Codice P3S_I Rev 1 0 page 1 14 USER S MANUAL AND MAINTENANCE POSITION CONTROLLER P3S_I FOR DRIVING OF SERVO UNIT SERVO M ...

Page 2: ...Store the instrument in its original packing Conformity declaration and CEE marking The instrument answers to the following Communitarian Directives 2004 108 CEE Electromagnetic compatibility with reference to general Rules EN61000 6 2 immunity in industrial environment and EN50081 1 emission in residential environment 2006 95 CEE Low tension modified Directive 93 68 CE Maintenance Turn off the po...

Page 3: ... power supply as indicated in the technical data c The instrument does not have an ON OFF switch hence it comes on when connected to the power supply For safety reasons the equipment connected permanently to the power supply requires a bi phasal selector switch which should be within easy reach of the operator d If the instrument is connected to any apparatus not isolated electrically carry out an...

Page 4: ...ctions scheme PROGRAMMING The keys used for programming are the following P Function choice programming E Enter to confirm the entered values C Clear to cancel enter values START Increment or start key only in the automatic semiautomatic function STOP Decrement or stop key only in the automatic semiautomatic function Decimal point prompt selection of a program value KEYBOARD To easy the use of P3S...

Page 5: ...SIGNAL Two types of error are carried out communication error and positioning error Each time there is one of these errors switch on relays ERROR Communication error It happens if there is at least one axis with that the P3SI cannot communicate In most case this is caused by a wrong connection or a wrong setting of parameter number of axes see chapter System Register or of parameter xx address of ...

Page 6: ...on switches on relay END POSITIONING otherwise start the relay ERROR Manual mode Pressing key P followed by 1 is it possible to move by hand a single axis If there is more then 1 axis is it necessary to choose the one that has to be moved with keys and or with C and the numeric keyboard see chapter Choice of working axis Press key to move the axis forward fast Press key to move the axis forward sl...

Page 7: ...p on the main display is showed the Register name while on the auxiliary display appears as constants To select a parameter press key E to visualize its value To confirm this value press E To modify press C to make appear on the main display a blinking 0 digit the wished value and confirm with E After confirming or modifying is it possible to step to next parameter The System Register of P3SI are ...

Page 8: ...s from 1 to 250 preset menu Press E to enter ad access to etc This parameter are used during Calibration installation of system and should not be changed unless it is necessary to proceed with a new calibration see chapter Proceeding of value calibration it means that during standard use should not be changed the stored otherwise you ll loose the calibration value physical address of servomotor ax...

Page 9: ...ID control Suggested values 30 Default values 0 4 Integral inteference time PID da 0 a 255 Explanation indicates after how many control cycles the the integral contribution is updated Suggested values 20 Increasing this value makes the contribution of the integral constant less important while calculating the PID Default values 10 0 0 0 0 5 Present Position Explanation is the present position of t...

Page 10: ...o read on the display at each turn of hollow shaft Example with pitch screw 5mm and reading of decimals of mm set 50 Default value 1 20 Divisor correction factor from 1 to 65535 Impulses number per turn of encoder of division factor of encoder impulses set the number of encoder impulses 1000 multiplied per decimal point position Example display reading with a decimal digit set 1000x10 10000 Defaul...

Page 11: ...We advise to touch the micro only in slow speed When the axis touches the micro the value on the display clears and is possible to stop NB the direction with which touches the micro has always to be the same for every calibration 5 Now without moving the axis and without going out of calibration mode it is necessary to measure the real position of axis on the machine and introduce this value in P3...

Page 12: ...y with slow value increasing it the slow speed and the ramp time to reach the position smoothly Other changeable parameters to better the dynamic of positioning are constants of proportional differential and integral gain of PID ELECTRICAL CONNECTION Disconnect from power supply before connecting disconnecting the equipment machinery The connecting cables must be kept separate from the power lines...

Page 13: ... valid addresses are from 1 to 247 The dip switch S1 and S2 have to be set as in the following schedules NB the values of baud rate and addresses set on the SERVO have to be according with that set on P3S I If the SERVO is the last net knot set at ON the dip switch S3 both switches 1 and 2 on ON IMPORTANT during this phase is advisable to use the maximum wariness to not damage the dip switch and t...

Page 14: ...O_E Motor Magnetic permanent dc power 70W 150W max Power supply 24Vdc 20 2 5A 6 5A max Hollow shaft Ø20mm H7 depth 50mm 50 1 max 115RPM 8Nm 70RPM non continuous Gear motor reduction ratio 75 1 max 75RPM 12Nm 45RPM non continuous Transducer Incremental optical encoder on output shaft Resolution 1000 pulse tourn Electrical connection 4 poles terminal board supply 4 poles terminal board fieldbus max ...

Reviews: