background image

1

DE FR EN 

IT

HEIMTRAINER


VÉLO D'APPARTEMENT


EXERCISE 

BIKE

 / 

BICI DA CASA

EXBK0

6

AUFBAUANLEITUNG / 

MODE D’EMPLOI ORIGINAL

 / ORIGINAL INSTRUCTION 

MANUAL

 / MANUALE DI ISTRUZIONI ORIGINALE

LIEBE KUNDIN, LIEBER KUNDE,

danke, dass Sie sich für unseren Artikel 

entschieden haben. Bitte lesen Sie die 

Bedienungsanleitung aufmerksam durch, bevor 

Sie das Trampolin montieren oder benutzen, um 

Schäden durch unsachgemäßen Gebrauch zu 

vermeiden. Beachten Sie insbesondere die 

Sicherheitshinweise. Sollten Sie dieses Produkt 

an Dritte weitergeben, muss diese 

Bedienungsanleitung weitergereicht werden.

CHÈRES CLIENTES, CHERS CLIENTS,

Nous vous remercions d’avoir choisi notre 

produit. Nous vous prions de bien vouloir lire le 

mode d’emploi attentivement avant de monter 

ou d’utiliser le produit, afin d’éviter des 

dommages causés par une utilisation non 

conforme. Si vous souhaitez donner ce produit à 

une tierce personne, veuillez y joindre cette 

notice d’utilisation.

DEAR CUSTOMER,

Thank you for choosing our product. Please read 

this manual carefully before assembling or using 

the  product  to  avoid  damage  caused  by 

improper  use.  Please  pay  special  attention  to 

the  safety instructions.  If  the  product  is  passed 

on  to  third  parties,  this  manual  has  to  be 

passed on along with the product.

GENTILE CLIENTE,

Grazie per aver scelto il nostro prodotto. 

Leggere attentamente questo manuale prima di 

assemblare o utilizzare il prodotto, per evitare 

danni causati da uso improprio. Se il prodotto 

viene passato a qualcuno, questo manuale deve 

essere trasmesso insieme al prodotto.

Summary of Contents for physionics EXBK06

Page 1: ...rions de bien vouloir lire le mode d emploi attentivement avant de monter ou d utiliser le produit afin d viter des dommages caus s par une utilisation non conforme Si vous souhaitez donner ce produit...

Page 2: ...Sie das Training sollten Sie eines der folgenden Symptome versp ren Schmerzen Engegef hl in der Brust unregelm iger Herzschlag extreme Atemnot Benommenheit Schwindel oder belkeit Halten Sie Kinder un...

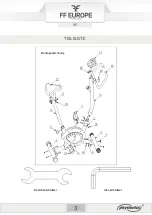
Page 3: ...3 DE FR EN ES DE TEILELISTE Montagezeichnung Ratschenschl ssel Inbusschl ssel...

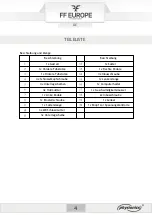
Page 4: ...pfschraube 4x Unterlegscheiben 4x Hutmuttter 1x Linke Pedale 1x Einstellschraube 1x Sattelstange 3x M8 Schlossmutter 3x Unterlegscheibe 1x Sattel 1x Rechte Pedale 4x Inbusschraube 1x Lenkerstange 1x C...

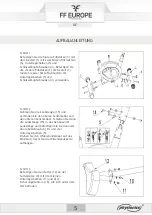
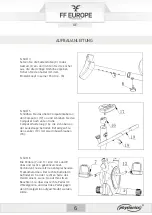
Page 5: ...rwenden Schritt 2 Nehmen Sie die Lenkstange 15 und verbinden Sie den oberen Sensorkabel und den unteren Sensorkabel Schieben Sie dann die Lenkstange 15 in das Geh use der Lenkstange und befestigen Sie...

Page 6: ...ie den Computer nach unten in die Computerhalterung 16 die sich oben an der Lenkstange befindet Befestigen Sie den Lenker 19 mit zwei Inbusschrauben 18 Schritt 6 Die Pedale 7 und 13 sind mit L und R l...

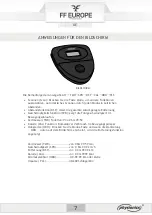
Page 7: ...eigt die Fahrgeschwindigkeit im Bewegungsablauf an Zeitmesser TMR Funktion Von 0 bis 99 59 Kalorie CAL Funktion Kumulativer Verbrauch im Bewegungsprozess Odogramm ODO Dr cken Sie die Modus Taste und w...

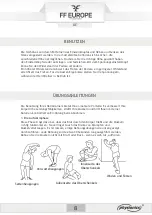
Page 8: ...ner in Betrieb ist BUNGSANLEITUNGEN Die Benutzung Ihres Heimtrainers bietet Ihnen mehrere Vorteile Es verbessert Ihre k rperliche Leistungsf higkeiten strafft Ihre Muskeln und hilft Ihnen mit einer Ka...

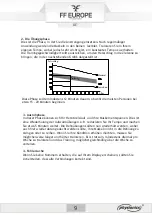
Page 9: ...nnen sich Ihr Herz Kreislauf und Ihre Muskeln entspannen Dies ist eine Wiederholung der Aufw rm bungen z B reduzieren Sie Ihr Tempo und machen Sie etwa 5 Minuten weiter Die Dehn bungen sollten nun wie...

Page 10: ...R cksendeaufforderung Der Eigent mer dieses Artikels ist alternativ anstelle einer R cksendung zur Mitwirkung bei der sachgerechten Verwertung im Falle der Eigentumsaufgabe verpflichtet Der Artikel ka...

Page 11: ...vants douleur oppression thoracique battements de c ur irr guliers essoufflement extr me sensation de t te l g re vertiges ou naus es Tenez les enfants et les animaux domestiques loign s de l quipemen...

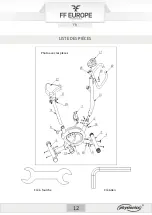
Page 12: ...12 FR LISTE DES PI CES Photo avec les pi ces Cl fourche Cl Allen...

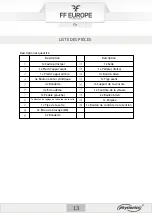
Page 13: ...rou d me 1x P dale gauche 1x ABouton de r glage de la hauteur de la selle 1x Tige de la selle 3x crou de blocage M8 3x Rondelle 1x Selle 1x P dale droite 4x Boulon Allen 1x Tige avant 1x Support de la...

Page 14: ...ylindrique 4 tape 2 Prenez la tige avant 15 et connectez le fil du capteur sup rieur et le fil du capteur inf rieur Glissez ensuite la tige avant 15 dans le bo tier de la tige avant puis fixez le l ai...

Page 15: ...is faites glisser la console vers le bas jusqu au support de la console 16 situ en haut de la tige avant Fixez la poign e 19 l aide de deux boulons Allen 18 tape 6 Les p dales 7 et 13 sont marqu es L...

Page 16: ...que la marque DIST appara t au bas de l cran la fonction de la distance s affiche Calorie CAL Appuyez sur le bouton et lorsque la marque CAL appara t au bas de l cran la fonction de la calorie s affic...

Page 17: ...nt l utilisation du v lo INSTRUCTIONS D EXERCICE L utilisation de votre v lo d appartement vous apportera plusieurs avantages il vous permettra d am liorer votre condition physique de tonifier vos mus...

Page 18: ...les de se d tendre Il s agit d une r p tition de l exercice d chauffement par exemple en r duisant votre rythme puis en continuant pendant environ 5 minutes Les exercices d tirement doivent maintenant...

Page 19: ...un retour Le propri taire de l article s engage jeter l appareil conform ment aux directives de recyclage si il veut plus garder l article et si il ne veut pas le renvoyer Pour ce faire l article peut...

Page 20: ...ny of the following symptoms pain tightness in your chest irregular heartbeat extreme shortness of breath feeling light headed dizzy or nauseous Keep children and pets away from the equipment The equi...

Page 21: ...21 EN PART LIST Assembly drawing Rigent wrench Allen wrench...

Page 22: ...lizer 4x Key head bolt 4x Washer 4x Domed nut 1x Pedal left 1x Adjustment knob 1x Seat post 3x Nylock nut M8 3x Washer 1x Seat 1x Pedal right 4x Allen key bolt 1x Front post 1x Computer holder 1x Spee...

Page 23: ...uts 6 washers 5 and key head bolts 4 Step 2 Take the front post 15 and connect the upper sensor wire and lower sensor wire Then slide the front post 15 into the front post housing then fix with Allen...

Page 24: ...e computer 17 then slide the computer down to the computer holder 16 situated at the top of the Front Post Fix the handle 19 using two Allen key bolts 18 Step 6 The pedals 7 and 13 are marked L and R...

Page 25: ...key and when the DIST mark appears at the bottom of the screen the distance function will be displayed Calorie CAL Press the mode key and when the CAL mark appears at the bottom of the screen the calo...

Page 26: ...e tension while the bike is in use EXERCISE INSTRUCTIONS Using your exercise bike will provide you with several benefits it will improve your physical fitness tone muscles and with a calorie controlle...

Page 27: ...utes 3 The Cool Down Phase This stage is to let your cardiovascular system and muscles cool down This is a repeat of the warm up exercise e g reduce your tempo continue for approximately 5 minutes The...

Page 28: ...duct As an alternative to returnation the owner is obligated to contribute to the proper recycling in case of property disposal To do so the used appliance can also be handed over to a collection poin...

Page 29: ...29 EN...

Page 30: ...di fare esercizi se si verifica uno dei seguenti sintomi dolore senso di oppressione al petto battito cardiaco irregolare respiro corto estremo sensazione di testa leggera vertigini o nausea Tenere lo...

Page 31: ...31 IT ELENCO DELLE PARTI Immagine delle parti Chiave a forchetta Chiave a brugola...

Page 32: ...re 4x Bullone a brugola 4x Rondella 4x Dado cieco 1x Pedale sinistro 1x Manopola di regolazione 1x Reggisella 3x Dado Nylock M8 3x Rondella 1x Sella 1x Pedale destro 4x Bullone a brugola 1x Tubo piant...

Page 33: ...rondelle 5 e bulloni a brugola 4 Passaggio 2 Prendere il tubo piantone 15 e collegare il cavo del sensore superiore con il cavo del sensore inferiore Poi inserire il tubo 15 nell alloggiamento e fissa...

Page 34: ...er 17 e far scorrere il computer verso il basso nel supporto 16 situato nella parte superiore del tubo piantone Fissare il manubrio 19 utilizzando due bulloni a brugola 18 Passaggio 6 I pedali 7 e 13...

Page 35: ...il segno DIST appare nella parte inferiore dello schermo verr visualizzata la funzione della distanza Calorie CAL Premere il tasto e quando il segno CAL appare nella parte inferiore dello schermo verr...

Page 36: ...R GLI ESERCIZI L utilizzo della bici da spinning vi fornir numerosi vantaggi migliorer la vostra forma fisica tonificher i muscoli e in combinazione con una dieta a controllo calorico ti aiuter a perd...

Page 37: ...re il sistema cardiovascolare e i muscoli Si ripetono gli esercizi di riscaldamento ad es si riduce il tempo e si continua per circa 5 minuti Gli esercizi di stretching dovrebbero adesso essere ripetu...

Page 38: ...per lo smaltimento nel luogo dove l hai comprato Da l il prodotto verr quindi consegnato al riciclaggio In alternativa alla restituzione dell oggetto il proprietario obbligato a contribuire al corret...

Reviews: