background image

FFim200 User Manual 


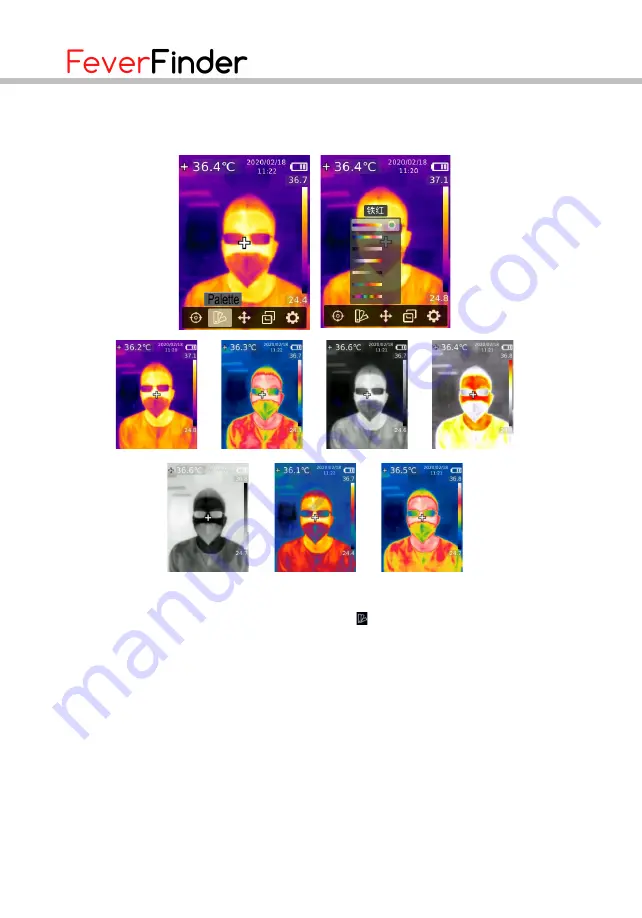
5.2  Palette 


1. 

Press the SET button to open the main menu. 

2. 

Press the left/right button to select the   option. 

3. 

Press the SET button to enter the Palette menu. 

4. 

Press the up/down button to select the desired palette. 

5. 

Press the SET button to apply the palette. 

6. 

Press the back button to exit. 


Summary of Contents for FFim200

Page 1: ...FFim200 User Manual Professional thermal imager...

Page 2: ...REFACE 3 LIMITED WARRANTY AND LIABILITY 3 1 SAFETY INSTRUCTIONS 4 2 STRUCTURE 5 3 DISPLAY 6 4 POWER ON OFF 7 5 MENU INTRODUCTION 7 6 OPERATING INSTRUCTIONS 18 7 SPECIFICATIONS 21 8 MAINTENANCE 23 9 CO...

Page 3: ...ed to give any other warranty on behalf of FeverFinder If you need warranty service within the warranty period please contact your seller directly This product is intended to be used as a screening to...

Page 4: ...ace temperature of the object If temperature compensation is needed adjust in the Settings menu The product has a self calibration function If the reading jumps quickly please read the temperature aft...

Page 5: ...ace 10 Flashlight button 2 SD card slot 11 Left button 3 Interface cover 12 Down button 4 LED light 13 Up button 5 Infrared camera lens 14 Replay button 6 Visual light camera lens 15 Right button 7 Tr...

Page 6: ...0 vertical x 240 horizontal pixels Item Description Item Description 1 Center point temperature 6 High temperature 2 Maximum temperature 7 Maximum temperature 3 Self calibration 8 Temperature bar 4 Mi...

Page 7: ...ontinuously to avoid damage 5 Menu Introduction 5 1 Measurement 1 Press the SET button to open the main menu 2 Press the left right button to select the option 3 Press the SET button to enter the Meas...

Page 8: ...to open the main menu 2 Press the left right button to select the option 3 Press the SET button to enter the Palette menu 4 Press the up down button to select the desired palette 5 Press the SET butt...

Page 9: ...r the Point Temperature menu 4 Press the up down button to select the desired point A Press the SET button to turn on the point and enter the thermal imaging page Press the left right up down button t...

Page 10: ...down button to select the desired mode from Thermal infrared image Digital visual light image and Fusion image blending 5 Press the SET button to apply the current mode 6 Press the back button to exit...

Page 11: ...the option 3 Press the SET button to enter the Settings menu 5 5 1 Language To set language 1 Press the up down button to select the Language option in the Settings menu 2 Press the SET button to ente...

Page 12: ...the parameter adjustment state 5 Press the up down button to increase or decrease the value 6 Press the SET button to save the settings and return to set other parameters 7 Press the back button to ex...

Page 13: ...button to exit 5 5 5 Measurements To set measurement parameters 1 Press the up down button to select the Measurements option in the Settings menu 2 Press the SET button to enter the Measurements subm...

Page 14: ...sired brightness level from Low Medium and High 4 Press the SET button to confirm 5 Press the back button to exit 6 5 5 7 Auto Power Off To set auto power off 1 Press the up down button to select the...

Page 15: ...mode allows users to realize real time image projection after connecting to a PC 5 5 9 Auto Save To set auto save 1 Press the up down button to select the Auto Save option in the Settings menu 2 Press...

Page 16: ...s the SET button to enter the System Settings submenu 5 5 11 Device Information To view the device information 1 Press the up down button to select the Device Information option in the System Settings...

Page 17: ...Reset option in the System Settings submenu 2 Press the SET button to enter 3 Press the up down button to select Yes 4 Press the SET button to confirm 5 Press the back button to exit Note During the f...

Page 18: ...hen formatting the SD card please do not remove it or perform other operation to avoid program errors 6 Operating Instructions 6 1 Image Capture 1 Pull and release the trigger to capture an image 2 In...

Page 19: ...ert the SD card in viewing images 6 3 Temperature Compensation To adapt to different environments and places manual temperature compensation is available For the specific setting method please refer t...

Page 20: ...ing image projection after use please close the PC software before unplugging the USB cable 6 6 SD Card This device supports Micro SD card TF card to store images To avoid affecting the operating spee...

Page 21: ...lor palette Iron Rainbow white Hot Red Hot Black Hot Lava Rainbow HC Infrared spectral band 8pm 14pm Field of view FOV 56 H 42 V Spatial resolution IFOV 6mrad Thermal sensitivity NETD 50mK Frame rate...

Page 22: ...236mm x 75 5mm x 86mm Display type 2 8 TFT LCD Display resolution 320 240 pixels Battery 3 7V 5000mAh rechargeable Li ion battery Auto power off 5 minutes 10 minutes 30 minutes off default 30 minutes...

Page 23: ...ivity Material Emissivity Wood 0 8s Black paper 0 86 Water 0 96 Polycarbonate 0 8 Brick 0 75 Concrete 0 97 Stainless steel 0 14 Copper oxide 0 78 Tape 0 96 Cast iron 0 81 Aluminum plate 0 09 Rust 0 8...

Page 24: ...EAN 08719326877310...

Reviews: