8
Installation
8.1
Pneumatic installation
NOTICE!
Loss of function due to contamination in the connections.
•
Keep ports and tubing lines free from dirt particles and foreign matter.
The use of a check valve prevents the payload from dropping in the event of a
sudden pressure drop.
The use of a one-way flow control valve also permits adjustment of the opening
and closing time.
•
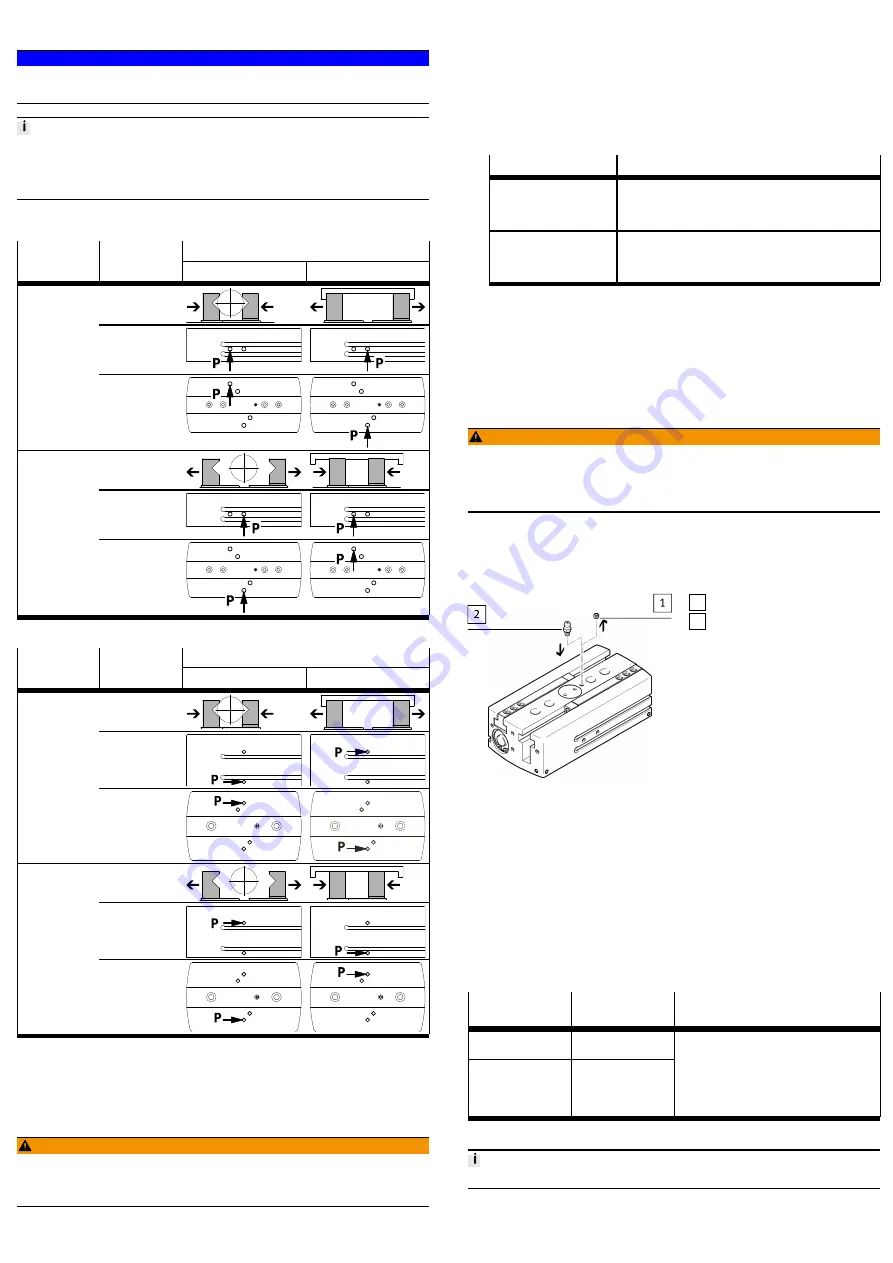
Connect the compressed air supply to the supply ports.
Note the gripper type and gripping method (external/internal gripping).
Gripping type
Function
Supply ports
external gripping
internal gripping
Gripping
side
Bottom
Releasing
side
Bottom
Tab. 5 Supply ports HGPL-B-14/25
Gripping type
Function
Supply ports
external gripping
internal gripping
Gripping
side
Bottom
Releasing
side
Bottom
Tab. 6 Supply ports HGPL-B-40/63
8.2
Electrical installation
•
Connect the proximity sensor.
Follow assembly instructions
è
9
Commissioning
WARNING!
Danger of crushing.
The gripper fingers could move unintentionally and crush body parts.
•
Do not reach into the movement range.
1. Pressurise gripper slowly.
2. Set the opening and closing time with an upstream one-way flow control
valve: screw in the flow control screw completely and then unscrew it one
turn.
3. Perform a test run without payload.
Check the following:
–
Allocation of supply ports
–
Reliable function of the proximity sensors (if installed)
–
Stop noise of the piston: the piston stop must be soft, that means not
audibly hard or metallic.
Piston stop
Insight/conclusion
soft
The gripper speed is correct or can be increased.
With upstream one-way flow control valve: unscrew the flow
control screw slightly.
è
The gripper speed increases.
hard/metallic
The gripper speed is too high. With an upstream one-way flow
control valve: screw in the flow control screw until the piston
stop is no longer audibly hard or metallic.
è
The gripper speed is reduced.
Tab. 7 Piston stop
4. Perform a test run with payload.
Ä
The gripper must hold the payload securely.
5. After successful test runs:
–
Remove payload or lock to prevent it from falling.
–
Exhaust the grippers.
10
Maintenance
10.1
Safety
WARNING!
Risk of injury due to unexpected movement of the gripper fingers or falling pay-
load.
•
Before exhausting: remove the payload at the gripper.
•
Disconnect gripper from the compressed air supply.
10.2
Mounting lubrication nipple
The lubrication nipple can be mounted on the top or bottom of the gripper.
The procedure is the same for mounting the lubrication nipple at the bottom of
the gripper.
1 Threaded pin M5
2 Lubrication nipple
Fig. 5 Mount the lubrication nipple (shown: top of gripper)
1. Unscrew the threaded pin on the top of the gripper (gripper jaw side) or on
the bottom of the gripper.
2. Screw in the included lubrication nipple (tightening torque: 0.7 Nm).
After the lubrication process (as required):
1. Unscrew and remove lubrication nipple.
2. Screw in threaded pin until it is flush.
10.3
Clean product
•
Clean the outside of the product with a soft cloth as required. Cleaning agents
include all non-abrasive media.
10.4
Lubricating guide elements
The maintenance interval depends on the ambient temperature when using the
gripper.
Ambient temper-
ature
Maintenance
interval
Maintenance work
>
20 … 60 °C
every 2 million switch-
ing cycles
³
5 … 20 °C
every 5 million switch-
ing cycles
On the mounted lubrication nipple on the top or
bottom of the gripper: lubricate the guide ele-
ments.
In the delivery status the access holes are sealed
with threaded pins
è
10.2 Mounting lubrication nipple.
Approved lubricant
è
Tab. 8 Maintenance interval and maintenance work
Information on spare parts and accessories
è


