1
2
3
4
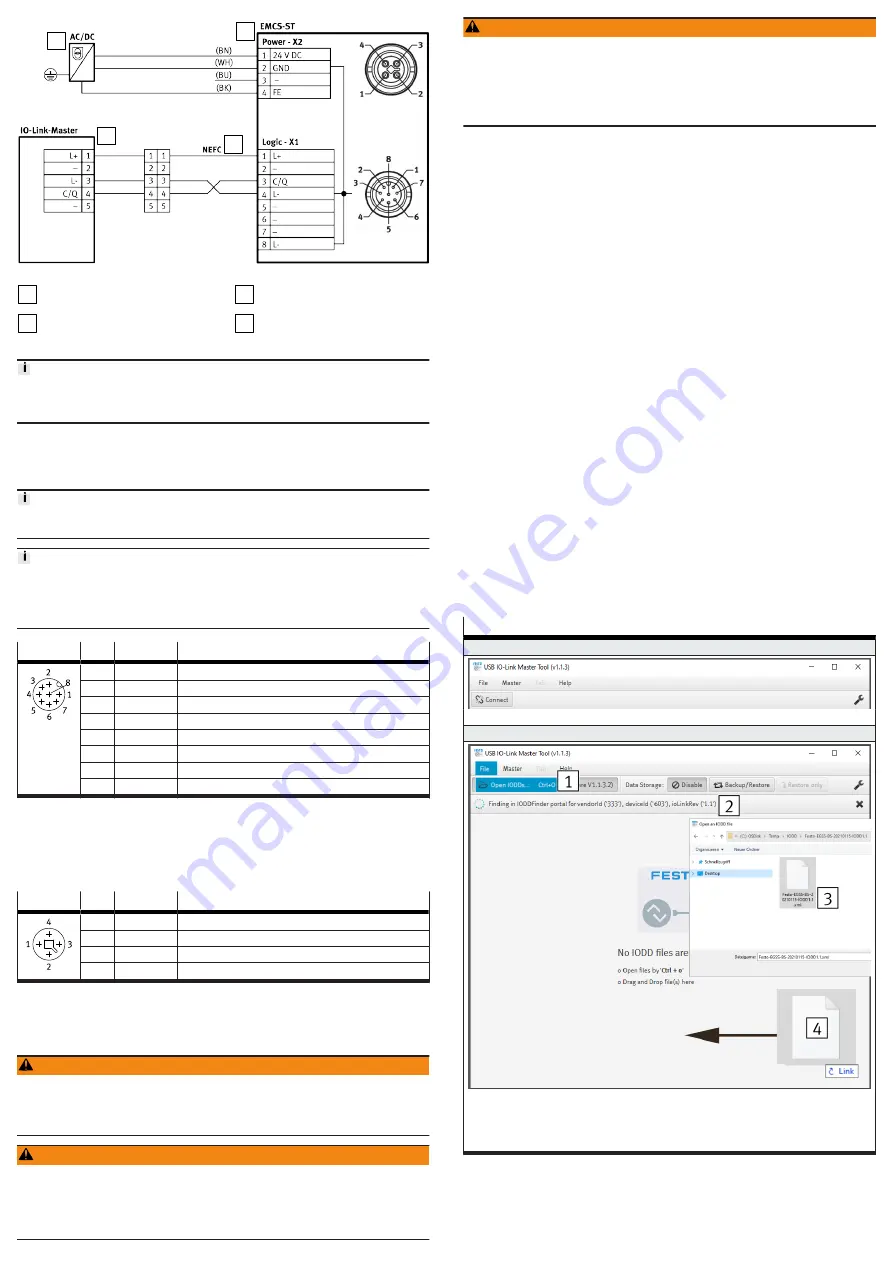
Fig. 4: Wiring diagram: IO-Link operation with adapter, example of port class A
1
PELV fixed power supply for the
load voltage supply
2
Integrated drive EMCS-ST
3
IO-Link master with IO-Link inter-
face, port class A and B
4
Adapter NEFC
Core colours of Festo cables:
BK = black, BN = brown, BU = blue, GN = green, GY = grey, PK = pink,
WH = white, YE = yellow
[Logic] connection: IO-Link (LK), port class A
IO-Link data are exchanged with the IO-Link master via the [Logic] connection and
the logic part of the device is supplied with electrical voltage.
An adapter is available as an accessory for convenient connection to the IO-Link
master
Adapter NEFC
Depending on the production date, the NEFC adapter can be used as follows:
• Until 12/2021: for IO-Link masters, port class A.
• From 01/2022: for IO-Link masters; port class A and B.
[Logic]
1)
Pin
Function
Description
1
L+
IO-Link power supply (24 V DC)
2
–
reserved, do not connect
3
C/Q
Communication to the IO-Link Master
4
L–
Reference potential IO-Link power supply (0 V)
2)
5
–
reserved, do not connect
6
–
reserved, do not connect
7
–
reserved, do not connect
8
L–
Reference potential IO-Link power supply (0 V)
2)
1) M12x1 plug, A-coded, 8-pin
2) Pin 4, 8 [Logic] and Pin 2 [Power] are connected internally.
Tab. 5: [Logic] connection: IO-Link (LK)
[Power] connection: load voltage supply
The power unit of the device is supplied with electrical voltage via the connection
[Power].
[Power]
1)
Pin
Function
Description
1
24 V DC
Load voltage supply (24 V DC)
2
GND
Reference potential load voltage supply (0 V)
2)
3
–
reserved, do not connect
4
FE
Functional earth (FE)
1) M12x1 plug, T-coded, 4-pin
2) Pin 4, 8 [Logic] and Pin 2 [Power] are connected internally.
Tab. 6: [Power] connection: load voltage supply
10
Commissioning
WARNING
Risk of injury due to unexpected movement of components.
• Protect the positioning range from unwanted intervention.
• Keep foreign objects out of the positioning range.
• Perform commissioning with low dynamic response.
WARNING
Severe, irreversible injuries from accidental movements of the connected
actuator technology.
Unintentional movements of the connected actuator technology can result from
exchanging the connecting cables of a servo drive or between servo drives.
• Before commissioning: All cables must be correctly assigned and connected.
WARNING
Danger of burns from hot housing surfaces.
Metallic housing parts can reach high temperatures during operation.
Contact with metal housing parts can cause burn injuries.
• Do not touch metallic housing parts.
• After the power supply is switched off, let the device cool down to room
temperature.
Commissioning: IO-Link operation
Requirement for the IO-Link master/application software
–
The IO-Link master must support the IO-Link standard "IO-Link BLOB Transfer
& Firmware Update V1.1", e.g. the Festo USB IO-Link Master CDSU-1 with
firmware version V2.1.0.11 or higher.
–
An IODD device description file with version V1.2.6 or higher is used in the
application software.
Preparation
1. Check mounting of the drive system.
2. Check the wiring of the power supplies and the IO-Link "C/Q" interface at the
[Power] and [Logic] connections.
3. Download and install the application software of the IO-Link master.
4. Download parameter set
Procedure
1. Switch on load voltage.
2. Switch on logic voltage via IO-Link master (switch-on delay ≥50 ms required).
If the logic voltage is switched on before the load voltage, the EMCS-ST starts
with an error that must be acknowledged.
3. Wait for initialisation until C/Q LED is yellow (
L
7 s).
4. Updating parameter set
5. Make the drive system ready for operation
–
If data backup is performed (Data Storage), the application data is auto-
matically transferred to the integrated drive and must then be permanently
saved
10.1 Data backup (Data Storage), 8. Save application data
–
If data backup is not performed (Data Storage), homing with end-position
determination must be carried out
10.1 Data backup (Data Storage), 9.
Referencing the new drive system
The drive system is then ready for operation.
10.1
Data backup (Data Storage)
Perform data backup (Data Storage)
The table shows all steps for executing the data storage function using the appli-
cation software of the Festo USB IO-Link Master CDSU-1 as an example.
Steps for executing the data storage function
1. Start the application software
–
Run app
2. Open the IODD file (device description file)
Variants for opening the file:
–
Open the "File" tab and execute the "Open IODDs" submenu
1
–
Via the automatic search
2
1)
–
Via the key combination "Ctrl + o
3
"
–
By Drag&Drop
4


