5.4 Troubleshooting Procedures
Section 5: Troubleshooting
CV-12SLX User Manual
5-16
0101-8292-0, Rev. C
5.4.2 Troubleshooting Tables
This section contains the following troubleshooting tables:
Table Number and Title
Table 5-1 No Input Power Indicated ........................................................................................... 5-16
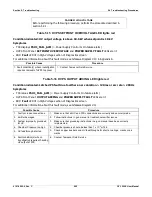
Table 5-2 One or More Interlocks Not Made ................................................................................ 5-17
Table 5-3 General Condition: HVPS Powered Up But Fails to Achieve HV Ready State ..................... 5-17
Table 5-4 HVPS and FPS Are Powered Up but GUN READY State Not Achieved/Confirmed .............. 5-18
Table 5-5 HVPS Powered Up but HV Does Not Switch On When Commanded To Do So .................. 5-18
Table 5-6 FPS Powered Up but Gun Does Not Switch On When Commanded To Do So ................... 5-19
Table 5-7 No Filament Current After GUN ON State Is Achieved .................................................... 5-19
Table 5-8 No Beam Emitted After HV and Gun Are Switched On ................................................... 5-20
Table 5-9 HV Output Unstable ................................................................................................... 5-20
Table 5-10 Filament Current Out Of Regulation ............................................................................. 5-21
Table 5-11 HVPS ARC/OUT OF REGULATION LED Flashes Excessively ............................................ 5-21
Table 5-12 HVPS RAIL UNDERVOLTAGE LED Lights Red ................................................................ 5-22
Table 5-13 HVPS HV OVERCURRENT LED Lights Red ..................................................................... 5-23
Table 5-14 HVPS HV OVERVOLTAGE LED Lights Red ..................................................................... 5-24
Table 5-15 HVPS SETPOINT OVERVOLTAGE LED lights red ............................................................ 5-25
Table 5-16 HVPS OUTPUT ARCING LED lights red ......................................................................... 5-25
Table 5-17 HVPS INVERTER OVERLOAD LED lights red ................................................................. 5-26
Table 5-18 HVPS OVERTEMPERATURE LED lights red .................................................................... 5-27
Table 5-19 Fan fails to rotate when HVPS is powered up ............................................................... 5-27
Table 5-20 HVPS AUXILIARY SUPPLY LOW LED lights red .............................................................. 5-28
Table 5-21 HVPS EXTERNAL CONTROL FAULT LED lights red ......................................................... 5-28
Table 5-22 HVPS FILAMENT LOAD FAULT LED lights red ............................................................... 5-28
Table 5-23 HV Is Switched On but FPS Front Panel HIGH VOLTAGE ON LED Fails To Light ............... 5-29
Table 5-24 FPS #1 Is Switched On but Its POWER ON LED Fails To Light ....................................... 5-29
Table 5-25 FPS #2 Is Switched On but Its POWER ON LED Fails To Light ....................................... 5-29
Each table is organized around a set of operational symptoms that should be easily identifiable to
the operator. For functional descriptions of the HVPS front panel LEDs, see section 5.2. For
descriptions of the LEDs on the FPS, see section 3.3.
The Ishikawa diagrams in section 5.3
provide additional information about the faults covered in many of the
troubleshooting tables.
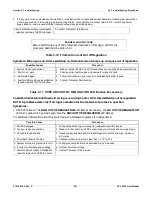
Table 5-1 No Input Power Indicated
Symptoms
•
TCS displays
PSU1_RDY_ALM
( = Power Supply Control Not Ready Timeout Alarm).
•
HVPS Front Panel: No LEDs are lit, and displays are dark.
For additional information about this fault mode, see Ishikawa Diagram #1.
Possible Causes
Procedure
1.
Loss of main line power
1.
Check to see whether input line voltages a HVPS rear panel terminals L1, L2,
and L3 are within specifications for your facility. If so, proceed to next step. If
not, check circuit protection devices (i.e., either circuit breakers or fuses) on
the facility input power circuit to ensure they are not tripped or blown.
2.
Power supply’s front breakers are
tripped.
2.
Reset front breakers and attempt to power up the unit. If breakers trip again,
proceed to next step.


