background image

B

34

EN

cod. 3541Q463  -  Rev. 00  -  09/2021

ATLAS D ECO COND UNIT

The CE marking certifies that the products meet the essential requirements of the rele-
vant directives in force.
The declaration of conformity may be requested from the manufacturer.

COUNTRIES OF DESTINATION: IT ES NL PL GR

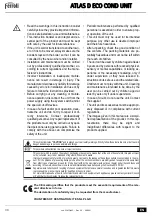
This symbol indicates 

“CAUTION”

 and is placed next to all safety warnings. Strictly follow these instructions in order to avoid 

danger and damage to persons, animals and things

This symbols calls attention to a note or important notice.

This symbol, which is used on the product, packaging or documents, means that at the end of its useful life, this product must 
not be collected, recycled or disposed of together with domestic waste.
Improper management of electric or electronic waste can lead to the leakage of hazardous substances contained in the pro-
duct. For the purpose of preventing damage to health or the environment, users are kindly asked to separate this equipment 
from other types of waste and to ask for it to be dealt with by the municipal waste service or dealer under the conditions and 
according to the methods set down in national and international laws transposing the Directive 2012/19/EU.
Separate waste collection and recycling of unused equipment helps to save natural resources and to guarantee that this waste 
is processed in a manner that is safe for health and the environment.
For more information about how to collect electric and electronic equipment and appliances, please contact your local Council 
or Public Authority competent to issue the relevant permits.

• Read the warnings in this instruction booklet

carefully since they provide important informa-
tion on safe installation, use and maintenance.

• This instruction booklet is an integral and es-

sential part of the product and must be kept
with care by the user for future reference.

• If the unit is sold or transferred to another own-

er or if it is to be moved, always make sure the
booklet stays with the boiler so that it can be
consulted by the new owner and/or installer.

• Installation and maintenance must be carried

out by professionally qualified personnel, ac-
cording to current regulations and the manu-
facturer's instructions.

• Incorrect installation or inadequate mainte-

nance can result in damage or injury. The
manufacturer declines any liability for damage
caused by errors in installation and use or by
failure to follow the instructions provided.

• Before carrying out any cleaning or mainte-

nance operation, disconnect the unit from the
power supply using the system switch and/or
the special cut-off devices.

• In case of a fault and/or poor operation, deac-

tivate the unit and do not try to repair it or di-
rectly intervene. Contact professionally
qualified personnel. Any repair/replacement of
the products must only be carried out by qual-
ified personnel using genuine parts. Failure to
comply with the above can compromise the
safety of the unit.

• Periodic maintenance performed by qualified

personnel is essential in order to ensure prop-
er operation of the unit.

• This unit must only be used for its intended

purpose. Any other use is deemed improper
and therefore hazardous.

• After unpacking, check the good condition of

the contents. The packing materials are po-
tentially hazardous and must not be left within
the reach of children.

• The unit can be used by children aged at least

8 years and by persons with reduced physical,
sensory or mental capabilities, or lacking ex-
perience or the necessary knowledge, only if
under supervision or they have received in-
structions on its safe use and the related risks.
Children must not play with the unit. Cleaning
and maintenance intended to be done by the
user can be carried out by children aged at
least 8 years only if under supervision.

• In case of doubt, do not use the unit. Contact

the supplier.

• The unit and its accessories must be appropri-

ately disposed of in compliance with current
regulations.

• The images given in this manual are a simpli-

fied representation of the product. In this rep-
resentation there may be slight and
insignificant differences with respect to the
product supplied.

Summary of Contents for ATLAS D ECO 34 COND SI UNIT

Page 1: ...S INSTRUCCIONES DE USO INSTALACIÓN Y MANTENIMIENTO EN INSTRUCTIONS FOR USE INSTALLATION AND MAINTENANCE FR INSTRUCTIONS D UTILISATION D INSTALLATION ET D ENTRETIEN NL AANWIJZINGEN VOOR GEBRUIK INSTALLATIE EN ONDERHOUD PL INSTRUKCJA OBS UGI INSTALACJI I KONSERWACJI GR ΟΔΗΓΊΕΣ ΧΡΉΣΗΣ ΕΓΚΑΤΆΣΤΑΣΗΣ ΚΑΙ ΣΥΝΤΉΡΗΣΗΣ ...

Page 2: ...ttuate in ottemperanza alle norme vigenti secondo le istruzioni del costruttore e devono essere eseguite da personale profes sionalmente qualificato Un errata installazione o una cattiva manutenzione possono causaredanniapersone animaliocose Èesclusaqualsiasi responsabilità del costruttore per i danni causati da errori nell installazione e nell uso e comunque per inosservanza delle istruzioni date...

Page 3: ...a 23 Impostazione temperatura mandata riscaldamento 24 Simbolo riscaldamento 25 Indicazione funzionamento riscaldamento 26 Indicazione raggiungimento temperatura mandata riscaldamento impostata 27 Indicazione modalità Estate Indicazione durante il funzionamento Riscaldamento La richiesta riscaldamento generata da Termostato Ambiente o Cronocomando Remo to è indicata dal lampeggio dell aria calda s...

Page 4: ...l relativo manuale d uso Temperatura scorrevole Quando viene installata la sonda esterna opzionale sul display del pannello comandi part 5 fig 1 è visualizzata l attuale temperatura esterna rilevata dalla sonda esterna stessa Il sistema di regolazione caldaia lavora con Temperatura Scorrevole In questa modalità la temperatura dell impianto di riscaldamento viene regolata a seconda delle condizioni...

Page 5: ...do il locale il co struttore della caldaia non potrà essere ritenu to responsabile Non utilizzare i tubi degli impianti idraulici come messa a terra di apparecchi elettrici Prima dell installazione effettuare un lavaggio accurato di tutte le tubazioni dell impianto per rimuovere residui o impurità che potrebbero compromettere il buon funzionamento dell apparecchio Effettuare gli allacciamenti ai c...

Page 6: ...antigelo additivi e inibitori solo ed esclusivamente se il produttore di suddetti liquidi o additivi fornisce una garanzia che assicuri che i suoi prodotti sono idonei all uso e non arrecano danni allo scambiatore di caldaia o ad altri componenti e o materiali di caldaia ed impianto È proibito l uso di liquidi antingelo additivi e inibitori generici non espressamente adatti all uso in impianti ter...

Page 7: ...ldaia La caldaia è precablata e dotata di cavo di allacciamento alla linea elettrica di tipo Y sprovvisto di spina I collegamenti alla rete devono essere eseguiti con allacciamento fis so e dotati di un interruttore bipolare i cui contatti abbiano una apertura di almeno 3 mm interponendo fusibili da 3A max tra caldaia e linea E importante rispettare le polarità LI NEA cavo marrone NEUTRO cavo blu ...

Page 8: ... essere effettuato solo ed esclusivamente con il kit a camera stagna È disponibile a richiesta un kit per la trasformazione della caldaia con bruciatore a came ra stagna Questa trasformazione permette la possibilità di aspirare l aria necessaria per la combustione direttamente dall esterno Per l installazione fare riferimento alle istruzioni contenute nel kit fig 29 Kit trasformazione camera stagn...

Page 9: ...e portate degli ugelli possono variare del 5 Inoltre con bruciatori aventi il preriscaldatore la portata di combustibile diminuisce di circa il 10 Tabella 4 Regolazione pressione pompa La pompa è preregolata in fabbrica a 12 bar Per il controllo della pressione servirsi di un manometro a bagno d olio La pressione può essere regolata fra 11 e 14 bar fig 32 Pompa ITALPUMP fig 33 Pompa DANFOSS 1 Aspi...

Page 10: ...apparecchiatura fig 38 Ciclo dell apparecchiatura R SB W Termostati Pressostati OH Preriscaldatore di gasolio OW Contatto di consenso al funzionamento M Motore bruciatore Z Trasformatore d accensione BV Valvola elettromagnetica FR Fotoresistenza A Inizio avviamento con preriscaldatore A Inizio avviamento senza preriscaldatore B Presenza di fiamma C Funzionamento normale D Arresto di regolazione TA...

Page 11: ... di polveriz zazione con benzina risciacquandolo con gasolio Nel rimontare il tutto si faccia at tenzione al corretto posizionamento degli elettrodi deflettore fig 40 Pulizia della caldaia 1 Togliere l alimentazione elettrica alla caldaia 2 Togliere il bruciatore come descritto precedentemente 3 Togliere i pannelli E e F svitando i relativi dadi 4 Pulire l interno della caldaia e tutto il percorso...

Page 12: ...ionamento del sen sore di riscaldamento Mancanza di circolazione d acqua nell impianto Verificare il circolatore Vedi tabella 6 Presenza aria nell impianto Sfiatare l impianto A04 Anomalia parametri scheda Errata impostazione parametro scheda Verificare ed eventualmente modifi care il parametro scheda F07 Anomalia preriscalda tore non chiude il con tatto in 120 secondi Anomalia preriscaldatore Ver...

Page 13: ...re bloccato Attivare il riavvio manuale o contattare il Servizio Assi stenza Clienti Contatto avvolgimento Avvolgimento difettoso Lampeggiante con luce rossa Sotto sovratensione Tensione di alimentazione lato alimentazione troppo bassa alta Controllare la tensione di rete e le condizioni d impiego Richiedere il Servizio Assi stenza Clienti Temperatura eccessiva del modulo Interno del modulo troppo...

Page 14: ...uperatore fumi 4 2 Circuito idraulico fig 49 Circuito idraulico 4 3 Diagrammi Perdita di carico Prevalenza circolatori Prevalenza del circolatore con impostazione a velocità fissa fig 50 A Perdite di carico caldaia 1 2 3 Velocità circolatore Prevalenza del circolatore con impostazione a prevalenza proporzionale fig 51 A Perdite di carico caldaia 368 85 210 183 92 a4 753 10 11 193 275 11 14 278 338...

Page 15: ...iliario di elettricità Altri elementi Classe di efficienza energetica stagionale del riscaldamento d ambiente da A a D Potenza termica nominale Efficienza energetica stagionale del riscaldamento d ambiente Alla potenza termica nominale e a un regime di alta temperatura Al 30 della potenza termica nominale e a un regime di bassa temperatura Alla potenza termica nominale e a un regime di alta temper...

Page 16: ...a 230 Vac Posizione riscaldamento Non Alimentata Posizione sanitario 138 Sonda esterna opzionale 139 Cronocomando Remoto opzionale 246 Trasduttore di pressione 278 Sensore doppio Sicurezza riscaldamento TR Trasformatore d accensione PR Preriscaldatore FR Fotoresistenza MB Motore bruciatore VE Valvola elettromagnetica DBM06E T T 278 OUT 5V GND 246 DSP05 L N 4 5 6 7 8 9 10 11 12 13 14 15 16 17 18 L ...

Page 17: ...ŝĂ ŝ ĚŝĨĞƫ Ěŝ ĐŽŶĨŽƌŵŝƚă ĐĂƵƐĂƟ ĚĂ ͻ ƚƌĂƐƉŽƌƚŽ ŶŽŶ ĞīĞƩƵĂƚŽ Ă ĐƵƌĂ ĚĞůů ĂnjŝĞŶĚĂ ƉƌŽĚƵƩƌŝĐĞ ͻ ĂŶŽƌŵĂůŝƚă Ž ĂŶŽŵĂůŝĞ Ěŝ ƋƵĂůƐŝĂƐŝ ŐĞŶĞƌĞ ŶĞůů ĂůŝŵĞŶƚĂnjŝŽŶĞ ĚĞŐůŝ ŝŵƉŝĂŶƟ ŝĚƌĂƵůŝĐŝ ĞůĞƩƌŝĐŝ Ěŝ ĞƌŽŐĂnjŝŽŶĞ ĚĞů ĐŽŵďƵƐƟďŝůĞ Ěŝ ĐĂŵŝŶŝ Ğ Ž ƐĐĂƌŝĐŚŝ ͻ ĐĂůĐĂƌĞ ŝŶĂĚĞŐƵĂƟ ƚƌĂƩĂŵĞŶƟ ĚĞůů ĂĐƋƵĂ Ğ Ž ƚƌĂƩĂŵĞŶƟ ĚŝƐŝŶĐƌŽƐƚĂŶƟ ĞƌƌŽŶĞĂŵĞŶƚĞ ĞīĞƩƵĂƟ ͻ ĐŽƌƌŽƐŝŽŶŝ ĐĂƵƐĂƚĞ ĚĂ ĐŽŶĚĞŶƐĂ Ž ĂŐŐƌĞƐƐŝǀŝƚă Ě ĂĐƋƵĂ ͻ ŐĞůŽ ĐŽƌƌĞŶƟ...

Page 18: ...nuevo propietario o el instalador puedan con sultarlo La instalación y el mantenimiento deben ser realiza dos por un técnico autorizado en conformidad con las normas vigentes y las instrucciones del fabricante La instalación incorrecta o la falta del mantenimiento apropiado pueden causar daños materiales o perso nales Se excluye cualquier responsabilidad del fabri cante en caso de daños causados p...

Page 19: ... de funcionamiento en calefacción 26 Indicación de que se ha alcanzado la temperatura programada de ida a cale facción 27 Indicación de modo Verano Indicación durante el funcionamiento Calefacción La demanda de calefacción generada por el termostato de ambiente o el reloj progra mador a distancia se indica mediante el parpadeo del símbolo de aire caliente arriba del símbolo del radiador 24 y 25 fi...

Page 20: ...re al funcionamiento con el reloj pro gramador a distancia consultar su manual de uso Temperatura adaptable Si está instalada la sonda externa opcional en la pantalla del panel de mandos 5 fig 1 aparece la temperatura instantánea medida por dicha sonda El sistema de regu lación de la caldera funciona con Temperatura adaptable En esta modalidad la tem peratura del circuito de calefacción se regula ...

Page 21: ...consi derará responsable No utilice los tubos de las instalaciones hidráu licas para poner a tierra aparatos eléctricos Antes de instalar la caldera lave cuidadosamente todos los tubos de la instalación para eliminar los residuos o impurezas ya que podrían comprometer el funcionamiento co rrecto del aparato Haga las conexiones de acuerdo con el dibujo del cap 4 y los símbolos presentes en el apara...

Page 22: ...os e inhibidores a condi ción de que el fabricante de dichos productos garantice que están indicados para este uso y que no dañan el intercambiador de la caldera ni ningún otro componente o material del aparato o de la instalación Se prohíbe usar líquidos anticongelantes aditivos e inhi bidores genéricos que no estén expresamente indicados para el uso en instalaciones térmicas o sean incompatibles...

Page 23: ...ia máxima absorbida por el aparato indi cada en la chapa de datos La caldera se suministra con un cable para la conexión a la red eléctrica de tipo Y sin enchufe El enlace a la red se ha de efectuar con una conexión fija y un interruptor bipo lar cuyos contactos tengan una apertura no inferior a 3 mm interponiendo unos fusibles de 3 A como máximo entre la caldera y la línea Es importante respetar ...

Page 24: ... con tubos separados aquí indicada se puede realizar exclusiva mente con el kit de cámara estanca Mediante un kit opcional es posible dotar la caldera de quemador con cámara estanca Con esta transformación el aire necesario para la combustión se aspira directamente del exterior Para la instalación vea las instrucciones suministradas con el kit fig 29 Kit de transformación a cámara estanca Con la i...

Page 25: ...los in yectores puede variar en 5 Además en los quemadores provistos de precalenta dor el caudal de combustible disminuye aproximadamente un 10 Tabla 4 Regulación de la presión de la bomba La bomba se regula en fábrica a 12 bar Para controlar la presión utilice un manómetro relleno de aceite La presión se puede regular entre 11 y 14 bar fig 32 Bomba ITALPUMP fig 33 Bomba DANFOSS 1 Aspiración Ø1 4 ...

Page 26: ...a contar el tiempo de seguridad Ciclo del equipo fig 38 Ciclo del equipo R SB W Termostatos presostatos OH Precalentador de gasóleo OW Contacto de habilitación del funcionamiento M Motor quemador Z Transformador de encendido BV Válvula electromagnética FR Fotorresistencia A Comienzo del arranque con precalentador A Comienzo del arranque sin precalentador B Presencia de llama C Funcionamiento norma...

Page 27: ...l inyector desmonte el filtro limpie los cortes y el orificio de pulverización con gasolina y aclárelo todo con gasóleo Al montar nuevamente el conjunto preste atención a la posición correcta de los elec trodos y el deflector fig 40 Limpieza de la caldera 1 Desconecte la alimentación eléctrica de la caldera 2 Desmonte el quemador como se describió anteriormente 3 Quite los paneles E y F previa ext...

Page 28: ...cción No circula agua en la instala ción Controlar el circulador ver tabla 6 Aire en la instalación Purgar de aire la instala ción A04 Anomalía de los parámetros de la tarjeta Parámetro de la tarjeta mal configurado Controlar el parámetro de la tarjeta y modificarlo si es necesario F07 Anomalía del precalentador no cierra el contacto en 120 s Anomalía del precalentador Controlar el precalenta dor ...

Page 29: ... con luz roja Bloqueo Rotor bloqueado Active el reinicio manual o contacte con el Servicio de Asistencia al Cliente Contacto bobina Bobina defectuosa Parpadeante con luz roja Subtensión sobretensión Tensión de alimentación lado ali mentación demasiado baja alta Controle la tensión de red y las condiciones de uso Contacte con el Servicio de Asistencia al Cliente Temperatura excesiva del módulo Inte...

Page 30: ...ito hidráulico fig 49 Circuito hidráulico 4 3 Diagramas Pérdida de carga altura de elevación bombas de circulación Presión de impulsión de la bomba de circulación con velocidad fija fig 50 A Pérdidas de carga de la caldera 1 2 3 Velocidad bomba de circulación Presión de impulsión de la bomba de circulación con presión de impulsión pro porcional fig 51 A Pérdidas de carga de la caldera 368 85 210 1...

Page 31: ...orífica útil Eficiencia útil Consumo de electricidad auxiliar Otros elementos Clase de eficiencia energética estacional de calefacción de A a D Potencia calorífica nominal Eficiencia energética estacional de calefacción A potencia calorífica nominal y régimen de alta temperatura A 30 de potencia calorífica nominal y régimen de baja temperatura A potencia calorífica nominal y régimen de alta temper...

Page 32: ...tada 230 Vca posición calefacción Sin alimentar posición ACS 138 Sonda exterior opcional 139 Cronomando a distancia opcional 246 Transductor de presión 278 Sensor doble seguridad calefacción TR Transformador de encendido PR Precalentador FR Fotorresistencia MB Motor quemador VE Válvula electromagnética DBM06E T T 278 OUT 5V GND 246 DSP05 L N 4 5 6 7 8 9 10 11 12 13 14 15 16 17 18 L N 230V 50Hz 32 ...

Page 33: ... reloj programador a distancia opcional 19 Indicación de quemador encendido 20 Indicación de funcionamiento antihielo 21 Indicación de presión de la instalación de calefacción 22 Indicación de anomalía 23 Ajuste temperatura de ida a calefacción 24 6tPEROR GH FDOHIDFFLyQ 25 Indicación de funcionamiento en calefacción 26 Indicación de que se ha alcanzado la temperatura programada de ida a calefacció...

Page 34: ...stays with the boiler so that it can be consulted by the new owner and or installer Installation and maintenance must be carried out by professionally qualified personnel ac cording to current regulations and the manu facturer s instructions Incorrect installation or inadequate mainte nance can result in damage or injury The manufacturer declines any liability for damage caused by errors in instal...

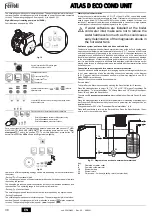
Page 35: ...24 Heating symbol 25 Heating mode 26 Set heating delivery temperature reached 27 Summer mode Indication during operation Heating A heating demand generated by the Room Thermostat or Remote Timer Control is in dicated by flashing of the hot air above the radiator details 24 and 25 fig 1 The heating graduation marks detail 26 fig 1 light up as the heating sensor tempera ture reaches the set value fi...

Page 36: ...lease refer to its user s manual Sliding temperature When the optional external probe is installed the control panel display detail 5 fig 1 shows the actual outside temperature read by the probe The boiler control system op erates with Sliding Temperature In this mode the temperature of the heating system is adjusted according the outside weather conditions in order to ensure high comfort and ener...

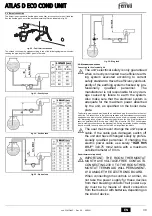
Page 37: ...to the floor in case of overpressure in the heating circuit Otherwise if the dis charge valve cuts in and floods the room the boiler manufacturer cannot be held liable Do not use the water system pipes to earth electrical appliances Before installation flush all the pipes of the system thoroughly to remove any residuals or impurities that could affect proper operation of the unit Carry out the rel...

Page 38: ...6 C The device will not come on if the electricity and or gas supply to the unit are cut off If it becomes necessary it is permissible to use antifreeze fluid additives and inhibitors only if the manufacturer of these fluids or additives guarantees they are suitable for this use and cause no damage to the heat exchanger or other components and or materials of the boiler unit and sys tem It is proh...

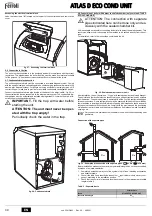
Page 39: ...ewired and provided with a Y cable and plug for connection to the elec tricity line The connections to the grid must be made with a permanent connection and equipped with a bipolar switch whose contacts have a minimum opening of at least 3 mm interposing fuses of max 3A between the boiler and the line It is important to re spect the polarities LINE brown wire NEUTRAL blue wire EARTH yellow green w...

Page 40: ...one only and ex clusively with the sealed chamber kit A kit is available on request for converting the boiler with burner to sealed chamber This conversion allows the air necessary for combustion to be sucked directly from the out side For installation refer to the instructions contained in the kit fig 29 Sealed chamber conversion kit After installation the unit becomes a C type with sealed chambe...

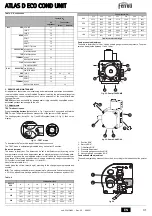
Page 41: ...heater the fuel flow rate decreases by about 10 Table 4 Pump pressure adjustment The pump is factory set to 12 bar Use an oil bath gauge to check the pressure The pres sure can be adjusted between 11 and 14 bar fig 32 Pump ITALPUMP fig 33 Pump DANFOSS 1 Suction Ø1 4 2 Return Ø1 4 3 Oil delivery Ø1 8 4 Pressure adjustment 5 Pressure gauge connection Ø1 8 6 Vacuum gauge connection Ø1 8 Combustion he...

Page 42: ...Thermostats Pressure switches OH OIl pre heater OW Operation enabling contact M Burner motor Z Ignition transformer BV Electromagnetic valve FR Photoresistance A Starting with pre heater A Starting without pre heater B Flame present C Normal operation D Adjustment stop TA TC t1 Pre ventilation time TSA Safety time t3 Pre ignition time t3n Post ignition time tw Pre heating time Output signals from ...

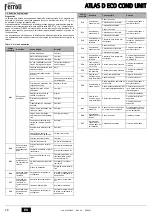
Page 43: ...ntion to the correct positioning of the electrodes baffle fig 40 Boiler cleaning 1 Disconnect the power supply to the boiler 2 Remove the burner as described above 3 Remove the panels E and F undoing the respective nuts 4 Clean the inside of the boiler and the entire path of exhaust fumes using a tube brush or compressed air 5 Close the panels fig 41 Cleaning the fume recuperator To clean the fume...

Page 44: ...vertemperature protection activa tion Heating sensor damaged Check the correct position ing and operation of the heating sensor No water circulation in the sys tem Check the circulating pump See table 6 Air in the system Vent the system A04 Card parameter fault Wrong card parameter setting Check the card parameter and modify it if necessary F07 Preheater fault the contact does not close in 120 sec...

Page 45: ...ternal causes Motor blocked Damaged electronics LED Fault Cause Cure On with red light Fault Blocked rotor Activate manual restart or contact Customer Service Contact winding Faulty winding Flashing with red light Under overvoltage Supply side voltage too low high Check the mains voltage and conditions of use Request Customer Service Excessive module tem perature Inside of module too hot Short cir...

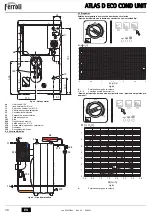
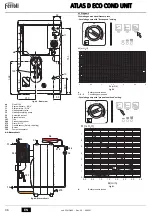
Page 46: ...Fumes recuperator 4 2 Water circuit fig 49 Water circuit 4 3 Diagrams Circulating pumps Head Pressure loss Circulating pump with fixed speed setting fig 50 A Boiler pressure losses 1 2 3 Circulating pump speed Circulating pump with proportional head setting fig 51 A Boiler pressure losses 368 85 210 183 92 a4 753 10 11 193 275 11 14 278 338 193 246 56 10 32 36 Min 4 1 7 III II I 0 1 2 3 4 5 6 7 0 ...

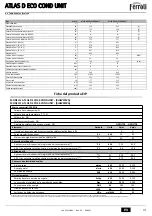
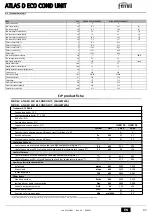
Page 47: ... 003 0 105 0 000 102 62 91 Item Useful heat out put Useful efficiency Auxiliary electricity consumption Other items Seasonal space heating energy efficiency class from A to D Rated heat output Seasonal space heating energy efficiency Useful heat output at rated heat output and high temperature regime Useful heat output at 30 of rated heat output and low temperature regime Useful efficiency at rate...

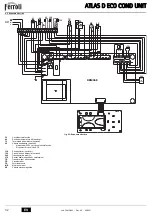
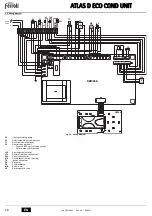
Page 48: ...nal Powered 230 Vac Heating position Not powered DHW position 138 External probe optional 139 Remote Timer Control optional 246 Pressure transducer 278 Double sensor Safety Heating TR Ignition transformer PR Preheater FR Photoresistance MB Burner motor VE Electromagnetic valve DBM06E T T 278 OUT 5V GND 246 DSP05 L N 4 5 6 7 8 9 10 11 12 13 14 15 16 17 18 L N 230V 50Hz 32 138 139 72 TR MB 1 M PR Tm...

Page 49: ... et l entretien doivent être effectués conformé ment aux normes en vigueur selon les instructions du con structeur et par un professionnel qualifié Une installation incorrecte ou un entretien impropre peuvent entraînerdesdommagesàdespersonnes àdesanimauxou à des choses Le constructeur n assume aucune responsabi lité pour les dommages causés par des erreurs d installation et d utilisation et dans t...

Page 50: ...onnement antigel 21 Indication pression installation de chauffage 22 Indication Anomalie 23 Programmation température de départ chauffage 24 Symbole chauffage 25 Indication fonctionnement chauffage 26 Indication température de départ chauffage programmée atteinte 27 Indication mode Été Indication durant le fonctionnement Chauffage En cas de besoin thermique détecté par le thermostat d ambiance ou ...

Page 51: ...dée Pour le fonctionnement par chronocommande à distance se reporter au manuel d utilisation spécifique Température évolutive Lorsqu une sonde extérieure option est installée l afficheur du tableau des comman des rep 5 fig 1 montre la température extérieure actuelle mesurée par la sonde Le système de régulation de la chaudière travaille en mode température évolutive Dans ce mode la température d e...

Page 52: ...auteries des installations hydrauliques comme mise à la terre d appa reils électriques Avant l installation laver soigneusement toutes les tuyauteries de l installation afin d éli miner toutes les impuretés ou résidus risquant de compromettre le bon fonctionnement de l appareil Effectuer les raccordements aux raccords prévus comme indiqué au chapitre cap 4 et conformément aux plaques des pictogram...

Page 53: ...el des additifs et des inhi biteurs seulement et exclusivement si le producteur de ces liquides ou additifs fournit une garantie qui assure que ses produits sont idoines à l utilisation et ne provoquent pas de dommages à l échangeur de la chaudière ou à d autres composants et ou matériaux de la chaudière et de l installation Il est interdit d utiliser des liquides antigel des additifs et des inhib...

Page 54: ...udière La chaudière est précâblée le câble de raccordement au réseau électrique est de type Y sans fiche Les connexions au réseau électrique doivent être réalisées par raccorde ment fixe et dotées d un interrupteur bipolaire avec une distance entre les contacts d ou verture d au moins 3 mm en interposant des fusibles de 3A maximum entre la chaudière et la ligne Il est important de respecter la pol...

Page 55: ...t exclusivement le kit à chambre étanche Un kit de transformation chaudière étanche avec montage d un brûleur est disponible sur demande Cette transformation permet d aspirer l air nécessaire à la combustion di rectement de l extérieur Pour le montage voir instructions contenues dans le kit fig 29 Kit de transformation chaudière étanche Après l installation du kit l appareil devient de type C étan...

Page 56: ...s à titre purement indicatif car il faut tenir compte que les débits des gicleurs peuvent varier de 5 En outre pour les brûleurs avec réchauffeur le débit du combustible diminue de 10 environ Tableau 4 Réglage de la pression de la pompe La pompe est préréglée en usine à 12 bars Pour contrôler la pression utiliser un mano mètre à bain d huile La plage de réglage de la pression est comprise entre 11...

Page 57: ...e de fuel OW Contact de consensus de démarrage M Moteur brûleur Z Transformateur d allumage BV Soupape électromagnétique FR Cellule photorésistante A Début démarrage avec préchauffage A Début démarrage sans préchauffage B Présence flamme C Fonctionnement normal D Arrêt réglage TA TC t1 Temps de préventilation TSA Temps de sécurité t3 Temps de préallumage t3n Temps de post allumage tw Temps de préc...

Page 58: ...e l essence puis rincer avec du gasoil Faire attention au po sitionnement correct des électrodes déflecteur lors du remontage de l ensemble fig 40 Nettoyage de la chaudière 1 Couper l alimentation électrique de la chaudière 2 Retirer le brûleur comme décrit précédemment 3 Déposer les panneaux E et F en desserrant les écrous correspondants 4 Nettoyer l intérieur de la chaudière et tout le parcours ...

Page 59: ...apteur chauffage endommagé Contrôler le positionne ment et le fonctionne ment corrects du capteur de température chauf fage Absence de circulation d eau dans l installation Vérifier le circulateur Voir tableau 6 Présence d air dans l installation Purger l installation A04 Anomalie para mètres carte Mauvais paramétrage de la carte Vérifier et modifier éven tuellement le paramètre carte F07 Anomalie...

Page 60: ... rouge Verrouillage Rotor bloqué Activer leredémarragemanuel ou contacter le service client Contact Enroulement Enroulement défectueux Clignotantaveclumière rouge Sous surtension Tension d alimentation côté ali mentation trop faible élevée Vérifiez la tension du secteur et les conditions d utilisation Contacter le service client Température excessive du module Intérieur du module trop chaud Court ...

Page 61: ...Récupérateur des fumées 4 2 Circuit hydraulique fig 49 Circuit hydraulique 4 3 Diagrammes Perte de charge Pression circulateurs Hauteur d élévation du circulateur avec réglage vitesse fixe fig 50 A Pertes de charge chaudière 1 2 3 Vitesse circulateur Hauteur d élévation du circulateur avec réglage vitesse proportionnelle fig 51 A Pertes de charge chaudière 368 85 210 183 92 a4 753 10 11 193 275 11...

Page 62: ...es caractéristiques Classe d efficacité énergétique saisonnière pour le chauffage des locaux de A à D Puissance thermique nominale Efficacité énergétique saisonnière pour le chauffage des locaux À la puissance thermique nominale et en régime haute température À 30 de la puissance thermique nominale et en régime basse température À la puissance thermique nominale et en régime haute température À 30...

Page 63: ...enté 230 Vca Position chauffage Non Alimenté Position ECS 138 Sonde extérieure option 139 Chronocommande à distance option 246 Transducteur de pression 278 Capteur double sécurité chauffage TR Transformateur d allumage PR Réchauffeur FR Cellule photorésistante MB Moteur brûleur VE Soupape électromagnétique DBM06E T T 278 OUT 5V GND 246 DSP05 L N 4 5 6 7 8 9 10 11 12 13 14 15 16 17 18 L N 230V 50Hz...

Page 64: ... en overeenkomstig de aanwijzingen van de fa brikant Verkeerde installatie of slecht onderhoud kan letsel veroorzaken aan personen of dieren en tot materiële schade leiden De fa brikant aanvaardt geen enkele aansprakelijkheid voor schade die veroorzaakt is door een niet goed uitgevoerde installatie onei genlijk gebruik en het niet opvolgen van de door de fabrikant ver strekte aanwijzingen Alvorens...

Page 65: ...kzijde verwarming 24 Symbool verwarming 25 Aanduiding werking verwarming 26 Aanduiding ingestelde temperatuur drukzijde verwarming bereikt 27 Aanduiding modus Zomer Aanduiding tijdens werking Verwarming Het verzoek om verwarming door de Omgevingsthermostaat of de Timerafstandsbedie ning wordt aangeven met knipperen van de warme lucht boven de radiator detail 24 en 25 fig 1 fig 1De streepjes die de...

Page 66: ...ezen naar de betreffende gebruikershandleiding Weersafhankelijke temperatuur Wanneer de externe temperatuursonde optioneel wordt geïnstalleerd wordt op het di splay van het bedieningspaneel detail 5 fig 1 de werkelijke door de sonde gemeten buitentemperatuur weergegeven Het regelsysteem van de verwarmingsketel werkt met Weersafhankelijke Temperatuur In deze modus wordt de temperatuur van de verwar...

Page 67: ...war mingsketel niet aansprakelijk worden gesteld Gebruik de leidingen van de hydraulische installaties niet voor aarding van elektrische apparaten Reinig voordat u de installatie verricht alle leidingen van het systeem zorgvuldig om eventuele restmaterialen of vuil te verwijderen die de goede werking van het apparaat nadelig kunnen beïnvloeden Verricht de aansluitingen op de overeenkomstige aanslu...

Page 68: ... zijn producten voor het betreffende doel geschikt zijn en geen schade veroorzaken aan de warmtewisselaar of aan overige componenten en of materialen van verwarmingsketel en installatie Het is verboden antivriesmiddelen additieven en remmende stoffen te gebruiken die bestemd zijn voor algemene doelein den en niet specifiek bedoeld voor verwarmingsinstallaties en ongeschikt voor het ma teriaal waar...

Page 69: ...r aansluiting op het elektriciteitsnet De aansluitingen op het net moeten wor den gerealiseerd met een vaste aansluiting door middel van een tweepolige schakelaar met een opening tussen de contacten van minstens 3 mm er moeten zekeringen van max 3A tussen verwarmingsketel en lijn worden geplaatst Het is belangrijk dat de po lariteiten LIJN bruine draad NEUTRAAL blauwe draad AARDE geel groene draad...

Page 70: ... met de kit met gesloten verbrandin gskamer Op aanvraag is een kit verkrijgbaar om de ketel met brander met gesloten kamer om te bouwen Hiermee kan de voor de verbranding benodigde lucht rechtstreeks van buitenaf aangezogen worden Raadpleeg voor de installatie de met de kit meegeleverde aanwijzingen fig 29 Kit ombouwen gesloten verbrandingskamer Na installatie van de kit wordt het apparaat van het...

Page 71: ...als leidraad want er moet rekening wor den gehouden met het feit dat het debiet van de sproeiers 5 kan variëren Bovendien neemt bij branders met voorverwarmer het brandstofdebiet af met ongeveer 10 Tabella 4 Regeling pompdruk De pomp is in de fabriek reeds afgesteld op 12 bar Gebruik voor de controle van de druk een manometer in oliebad De druk kan worden ingesteld tussen 11 en 14 bar fig 32 Pomp ...

Page 72: ...ading tussen de elektroden zorgt ervoor dat er een vlam ontstaat Tegelijkertijd vangt de veiligheidstijd aan Cyclus van het apparaat fig 38 Cyclus van het apparaat R SB W Thermostaten drukmeters OH Olievoorverwarmer OW Contact voor vrijgave werking 2 m Brandermotor Z Ontstekingstransformator BV Magneetklep FR Fotoweerstand A Aanvang inschakelen met voorverwarmer A Aanvang inschakelen zonder voorve...

Page 73: ...oor het filter te demonteren en de sneden en het verstuivingsgat met benzine schoon te maken en met diesel te spoelen Let er bij het hermonteren op om de elektroden deflector correct te plaatsen fig 40 Reiniging van de verwarmingsketel 1 Schakel de stroom naar de verwarmingsketel uit 2 Verwijder de brander zoals eerder beschreven werd 3 Verwijder de panelen E en F door de betreffende moeren los te...

Page 74: ...e tempera tuur Verwarmingssensor beschadigd Controleer positie en werking van de verwarmin gssensor Onvoldoende watercirculatie in de installatie Controleer de circulatie pomp Zie tabella 6 Lucht in de installatie Ontlucht de installatie A04 Storing parame ters kaart Onjuiste instelling parameter kaart Controleer en wijzig even tueel de parameter kaart F07 Storing voorve rwarmer het con tact wordt...

Page 75: ... beschadigd Leds Storing Oorzaak Oplossing Brandt met rood licht Blokkering Rotor geblokkeerd Activeer de handmatige her start of neem contact op met de klantenservice Contact wikkeling Wikkeling defect Knippert met rood licht Onder overspanning Voedingsspanning voedings zijde te laag hoog Controleer de netspanning en de gebruiksomstandighe den Vraag klantenservice aan Te hoge temperatuur van de m...

Page 76: ... 2 Watercircuit fig 49 Watercircuit 4 3 Diagrammen Belastingsverlies Opvoerhoogte circulatiepompen Opvoerhoogte van de circulatiepomp met instelling op vaste snelheid fig 50 A Drukhoogteverlies ketel 1 2 3 Snelheid circulatiepomp Opvoerhoogte van de circulatiepomp met instelling op proportionele prevalen tie fig 51 A Drukhoogteverlies ketel 368 85 210 183 92 a4 753 10 11 193 275 11 14 278 338 193 ...

Page 77: ...items Seizoensgebonden energie efficiëntieklasse voor ruimteverwarming A tot en met D Nominale Warmteafgifte Seizoensgebonden energie efficiëntie voor ruimteverwarming Bij nominale warmteafgifte en werking op hoge temperatuur Bij 30 van de nominale warmteafgifte en werking op lage temperatuur Bij nominale warmteafgifte en werking op hoge temperatuur Bij 30 van de nominale warmteafgifte en werking ...

Page 78: ...Gevoed 230 Vac Stand verwarming Niet gevoed Stand sanitair water 138 Externe sonde optie 139 Klokthermostaat met afstandsbediening optioneel 246 Drukomzetter 278 Dubbele sensor Beveiliging verwarming TR Ontstekingstransformator PR Voorverwarmer FR Fotoweerstand MB Brandermotor VE Magneetklep DBM06E T T 278 OUT 5V GND 246 DSP05 L N 4 5 6 7 8 9 10 11 12 13 14 15 16 17 18 L N 230V 50Hz 32 138 139 72 ...

Page 79: ...winny być wykonane zgodnie z obowiązującymi normami według instrukcji producenta i pr zeprowadzone przez wykwalifikowany personel Niewłaściwa instalacja lub zła konserwacja może spowo dować obrażenia u ludzi i zwierząt a także szkody material ne Producent nie ponosi jakiejkolwiek odpowiedzialności za szkody powstałe wskutek błędów podczas instalacji i ek sploatacji ani wskutek nieprzestrzegania ws...

Page 80: ...talacji c o 22 Wskaźnik usterki 23 Ustawienie temperatura zasilania układu c o 24 Symbol ogrzewania 25 Wskaźnik działania obiegu c o 26 Wskazanie osiągnięcia ustawionej temperatury zasilania instalacji c o 27 Wskaźnik trybu Lato Komunikat podczas pracy Ogrzewanie Żądanie ogrzewania z Termostatu Pokojowego lub Sterowania Czasowego Zdalnego wskazywane jest poprzez miganie symbolu gorącego powietrza ...

Page 81: ...waniem czasowym patrz odpowiednia instrukcja obsługi Płynna Temperatura Kiedy zainstalowana jest sonda zewnętrzna opcja na wyświetlaczu panelu sterowania poz 5 fig 1 pojawia się aktualna temperatura zewnętrznego wykryta przez tę sondę zewnętrzną System regulacji kotła współpracuje z Płynną Temperaturą W tym trybie temperatura instalacji c o jest regulowana zależnie od zewnętrznych warunków pogo do...

Page 82: ...ie zalane wodą producent kotła nie będzie ponosił żadnej odpowiedzial ności Nie używać rur instalacji hydraulicznych jako uzie mienia urządzeń elektrycznych Przed montażem dokładnie przemyć wszystkie przewody rurowe instalacji aby usunąć pozostałości lub zanieczyszczenia które mogłyby negatywnie wpłynąć na pracę urządzenia Wykonać przyłącza do odpowiednich złączy według rysunku na cap 4 i zgodnie ...

Page 83: ...ub domieszek udziela gwarancji zapewniającej że jego produkty są zdatne do takiego zastosowania i nie spowodują uszkodzenia wymiennika ciepła w kotle lub innych komponentów i lub mate riałów kotła i instalacji Zabrania się użycia płynów przeciwzamarzaniowych domieszek i inhibitorów ogólnego zastosowania nie przeznaczonych wyraźnie do użytku w insta lacjach cieplnych i niekompatybilnych z materiała...

Page 84: ...tabliczce znamionowej kotła Kocioł jest okablowany i wyposażony w kabel przyłączeniowy do linii elektrycznej typu Y bez wtyczki Przyłączenia do sieci muszą być wykonane za pomocą przyłącza stałego i muszą być wyposażone w wyłącznik dwubiegunowy którego styki mają rozwar cie minimum 3 mm z zamontowanymi bezpiecznikami max 3A pomiędzy kotłem a linią Ważne jest przestrzeganie polaryzacji LINIA kabel ...

Page 85: ... z zamkniętą komorą spalania Na zamówienie dostępny jest zestaw do przezbrojenia kotła z palnikiem na kocioł z zamkniętą komorą spalania Takie przezbrojenie pozwala na zasysanie powietrza potr zebnego do spalania bezpośrednio z zewnątrz W przypadku instalacji zapoznać się z instrukcjami podanymi w zestawie wygląd 29 Zestaw do przezbrajania na zamkniętą komorę spalania Po zainstalowaniu zestawu urz...

Page 86: ...tkowo w przypadku palników z nagrzewac zem podawanie paliwa zmniejsza się o ok 10 Tabela 4 Regulacja ciśnienia pompy Pompa jest fabrycznie ustawiona na 12 bar Aby sprawdzić ciśnienie użyć manometru w kąpieli olejowej Ciśnienie można ustawić w zakresie od 11 do 14 bar wygląd 32 Pompa ITALPUMP wygląd 33 Pompa DANFOSS 1 Ssanie Ř1 4 2 Powrót Ř1 4 3 Tłoczenie oleju Ř1 8 4 Regulacja ciśnienia 5 Złącze m...

Page 87: ...e rozpoczyna się czas bezpieczeństwa Cykl urządzenia wygląd 38 Cykl urządzenia R SB W Termostaty presostaty OH Nagrzewacz paliwa OW Styk zezwolenia na działanie C Silnik palnika Z Transformator zapłonu BV Zawór elektromagnetyczny FR Fotorezystor A Początek rozruchu z nagrzewaczem A Początek rozruchu bez nagrzewacza B Obecność płomienia C Działanie normalne D Zatrzymanie regulacji TA TC t1 Czas wst...

Page 88: ...ną krawędzie oraz otwór rozpylania a następnie przepłukać olejem Podczas ponownego montażu zwrócić uwagę na prawidłowość położenia elektrod deflektora wygląd 40 Czyszczenie kotła 1 Odłączyć kocioł od zasilania elektrycznego 2 Odłączyć palnik zgodnie z opisem powyżej 3 Odłączyć panele E oraz F W tym celu odkręcić odpowiednie nakrętki 4 Oczyścić wnętrze kotła oraz całą trasę przelotu spalin za pomoc...

Page 89: ... nadmierną temperaturę Uszkodzony czujnik ogrzewania Sprawdzić prawidłowość położenia oraz działanie czujnika ogrzewania Brak obiegu wody w instalacji Sprawdzić pompę obiegową Patrz tabela 6 Obecność powietrza w instalacji Odpowietrzyć instalację A04 Nieprawidłowe parametry płyty Błędne ustawienie parametru płyty Sprawdzić i ewentualnie zmienić parametr płyty F07 Usterka nagr zewacza nie otwiera s...

Page 90: ...owany silnik Uszkodzona elektronika LED Usterka Przyczyna Rozwiązanie Włączona i świeci na czerwono Blokada Zablokowany wirnik Przeprowadzić ponowne uru chomienie ręczne lub skon taktować się z serwisem technicznym Styk uzwojenie Nieprawidłowe uzwojenie Miga na czerwono Zbyt niskie zbyt wysokie napięcie Napięcie zasilania od strony zasilania jest zbyt niskie zbyt wysokie Sprawdzić napięcie sieciow...

Page 91: ...2 Obwód hydrauliczny wygląd 49 Obwód hydrauliczny 4 3 Wykresy Straty ciśnienia Wysokość ciśnienia pomp obiegowych Wysokość ciśnienia pompy obiegowej przy ustawieniu na stałą prędkość wygląd 50 A Straty ciśnienia kocioł 1 2 3 Prędkość pompy obiegowej Wysokość ciśnienia pompy obiegowej przy ustawieniu na Wysokość ciśnienia proporcjonalna wygląd 51 A Straty ciśnienia kocioł 368 85 210 183 92 a4 753 1...

Page 92: ...ŽǁĞ SprawnoƑđ ƵǏLJƚŬŽǁĂ ƵǏLJĐŝĞ energii elektrycznej na ƉŽƚƌnjĞďLJ ǁųĂƐŶĞ Inne parametry Klasa sezonowej ĞĨĞŬƚLJǁŶŽƑĐŝ ĞŶĞƌŐĞƚLJĐnjŶĞũ ŽŐƌnjĞǁĂŶŝĂ ƉŽŵŝĞƐnjĐnjĞŷ od A do D ŶĂŵŝŽŶŽǁĂ ŵŽĐ ĐŝĞƉůŶĂ ĞnjŽŶŽǁĂ ĞĨĞŬƚLJǁŶŽƑđ ĞŶĞƌŐĞƚLJĐnjŶĂ ŽŐƌnjĞǁĂŶŝĂ ƉŽŵŝĞƐnjĐnjĞŷ Przy njŶĂŵŝŽŶŽǁĞũ ŵŽĐLJ ĐŝĞƉůŶĞũ ŝ w ƌĞǏŝŵŝĞ wysokotemperaturowym Przy njŶĂŵŝŽŶŽǁĞũ ŵŽĐLJ ĐŝĞƉůŶĞũ na ƉŽnjŝŽŵŝĞ 30 ŝ w ƌĞǏŝŵŝĞ ŶŝƐŬŽƚĞŵƉĞƌĂƚƵƌŽǁLJŵ Przy njŶĂŵŝŽŶŽǁĞũ ŵŽ...

Page 93: ...pcja Zasilany 230 VAC Pozycja ogrzewania Bez zasilania Pozycja c w u 138 Sonda zewnętrzna opcja 139 Zdalne sterowanie czasowe opcja 246 Przetwornik ciśnienia 278 Czujnik podwójny Zabezpieczenie c o TR Transformator zapłonu PR Nagrzewacz FR Fotorezystor MB Silnik palnika VE Zawór elektromagnetyczny DBM06E T T 278 OUT 5V GND 246 DSP05 L N 4 5 6 7 8 9 10 11 12 13 14 15 16 17 18 L N 230V 50Hz 32 138 1...

Page 94: ...η διάθεση του νέου ιδιοκτήτη ή και του τεχνικού εγκατάστασης Η εγκατάσταση και η συντήρηση πρέπει να εκτελούνται από εξειδικευμένο προσωπικό σύμφωνα με τους ισχύοντες κανονισμούς και τις οδηγίες του κατασκευαστή Η εσφαλμένη εγκατάσταση ή η ανεπαρκής συντήρηση μπορεί να προκαλέσει τραυματισμούς ατόμων ή ζώων ή υλικές ζημιές Ο κατασκευαστής δεν φέρει καμία ευθύνη για βλάβες που οφείλονται σε εσφαλμέ...

Page 95: ... παροχής θέρμανσης 24 Σύμβολο θέρμανσης 25 Ένδειξη λειτουργίας θέρμανσης 26 Ένδειξη επίτευξης ρυθμισμένης θερμοκρασίας παροχής θέρμανσης 27 Ένδειξη θερινής λειτουργίας Ενδείξεις κατά τη διάρκεια της λειτουργίας Θέρμανση Η εντολή θέρμανσης μέσω θερμοστάτη χώρου ή απομακρυσμένου χρονοθερμοστάτη υποδεικνύεται από το σύμβολο ζεστού αέρα που αναβοσβήνει πάνω από το καλοριφέρ λεπτ 24 και 25 fig 1 Οι ενδ...

Page 96: ...σης αναλόγως με την επιθυμητή θερμοκρασία περιβάλλοντος Για τη λειτουργία με εξωτερικό χειριστήριο συμβουλευθείτε το σχετικό εγχειρίδιο χρήσης Μεταβλητή θερμοκρασία Όταν γίνεται εγκατάσταση ενός εξωτερικού αισθητήρα προαιρετικό στην οθόνη του πίνακα χειρισμού εξάρτ 5 fig 1 εμφανίζεται η τρέχουσα εξωτερική θερμοκρασία σύμφωνα με τη μέτρηση του εξωτερικού αισθητήρα Το σύστημα ρύθμισης του λέβητα λει...

Page 97: ...βαλβίδας εξαγωγής Μη χρησιμοποιείτε τους σωλήνες των υδραυλικών εγκαταστάσεων ως γείωση για τις ηλεκτρικές συσκευές Πριν από την τοποθέτηση πρέπει να πλύνετε καλά όλες τις σωληνώσεις της εγκατάστασης ώστε να απομακρυνθούν υπολείμματα ή ακαθαρσίες που θα μπορούσαν να επηρεάσουν τη σωστή λειτουργία της συσκευής Πραγματοποιήστε τις συνδέσεις στις αντίστοιχες υποδοχές σύμφωνα με το σχέδιο στο cap 4 κα...

Page 98: ... προσθετικών αυτών παρέχει εγγύηση η οποία διασφαλίζει ότι τα προϊόντα του είναι κατάλληλα γι αυτήν τη χρήση και δεν προκαλούν βλάβες στον εναλλάκτη του λέβητα ή σε άλλα εξαρτήματα ή και υλικά του λέβητα και της εγκατάστασης Απαγορεύεται η χρήση αντιψυκτικών υγρών προσθετικών και αναστολέων γενικής χρήσης όταν δεν αναφέρεται ρητά ότι είναι κατάλληλα για χρήση σε θερμικές εγκαταστάσεις και συμβατά ...

Page 99: ...βητας είναι προκαλωδιωμένος και διαθέτει καλώδιο σύνδεσης με την ηλεκτρική γραμμή τύπου Y χωρίς φις Οι συνδέσεις με το δίκτυο πρέπει να είναι σταθερές και να διαθέτουν διπολικό διακόπτη οι επαφές του οποίου να έχουν άνοιγμα τουλάχιστον 3 mm παρεμβάλλοντας ασφάλεια των 3A max μεταξύ λέβητα και γραμμής Είναι σημαντικό να τηρείται η πολικότητα ΓΡΑΜΜΗ καφέ καλώδιο ΟΥΔΕΤΕΡΟ μπλε καλώδιο ΓΕΙΩΣΗ κίτρινο ...

Page 100: ...ι ένα κιτ για μετατροπή του λέβητα με καυστήρα σε λέβητα στεγανού θαλάμου Η μετατροπή αυτή παρέχει τη δυνατότητα εισαγωγής του απαιτούμενου αέρα για την καύση απευθείας από τον εξωτερικό χώρο Για την εγκατάσταση ανατρέξτε στις οδηγίες που περιλαμβάνονται στο κιτ εικ 29 Κιτ μετατροπής στεγανού θαλάμου Μετά την εγκατάσταση του κιτ η συσκευή μετατρέπεται σε τύπου C με στεγανό θάλαμο και εξαναγκασμένο...

Page 101: ...ροχή των μπεκ μπορεί να παρουσιάζει διακύμανση 5 Επίσης στους καυστήρες με προθερμαντήρα η παροχή καυσίμου μειώνεται περίπου κατά 10 Πίνακας 4 Ρύθμιση πίεσης αντλίας Η αντλία έχει ρυθμιστεί εκ των προτέρων στο εργοστάσιο στα 12 bar Για τον έλεγχο της πίεσης χρησιμοποιήστε μανόμετρο με λουτρό ελαίου Η πίεση μπορεί να ρυθμιστεί μεταξύ 11 και 14 bar εικ 32 Αντλία ITALPUMP εικ 33 Αντλία DANFOSS 1 Αναρ...

Page 102: ...άζεται Η επαφή με την εκκένωση μεταξύ των ηλεκτροδίων προκαλεί το σχηματισμό της φλόγας Ταυτόχρονα αρχίζει ο χρόνος ασφαλείας Κύκλος συσκευής εικ 38 Κύκλος συσκευής R SB W Θερμοστάτες Πιεσοστάτες OH Προθερμαντήρας πετρελαίου OW Επαφή ελέγχου λειτουργίας M Κινητήρας καυστήρα Z Μετασχηματιστής έναυσης BV Ηλεκτρομαγνητική βαλβίδα FR Φωτοαντίσταση A Έναρξη έναυσης με προθερμαντήρα A Έναρξη έναυσης χωρ...

Page 103: ...ετε το διάφραγμα και τη βίδα 6 για να αφαιρέσετε τα ηλεκτρόδια Καλός καθαρισμός του μπεκ επιτυγχάνεται με αφαίρεση του φίλτρου καθαρισμό των εγκοπών και της οπής ψεκασμού με βενζίνη και ξέπλυμα Κατά την επανατοποθέτηση όλων των στοιχείων απαιτείται προσοχή στη σωστή τοποθέτηση των ηλεκτροδίων του διαφράγματος εικ 40 Καθαρισμός λέβητα 1 Αποσυνδέστε το λέβητα από την ηλεκτρική τροφοδοσία 2 Αφαιρέστε...

Page 104: ...ή φωτός A03 Ενεργοποίηση προστασίας από υπερθέρμανση Βλάβη αισθητήρα θέρμανσης Ελέγξτε τη σωστή τοποθέτηση και λειτουργία του αισθητήρα θέρμανσης Μη κυκλοφορία νερού στην εγκατάσταση Ελέγξτε τον κυκλοφορητή βλ πίνακα Αέρας στην εγκατάσταση Εξαερώστε την εγκατάσταση A04 Ακατάλληλες παράμετροι πλακέτας Εσφαλμένη ρύθμιση παραμέτρου πλακέτας Ελέγξτε και τροποποιήστε εάν απαιτείται την παράμετρο της πλ...

Page 105: ...στήματος Λυχνία LED Δυσλειτουργία Αιτία Λύση Ανάβει με κόκκινο φως Εμπλοκή Εμπλοκή ρότορα Ενεργοποιήστε τη χειροκίνητη επανεκκίνηση ή επικοινωνήστε με το τμήμα τεχνικής υποστήριξης πελατών Επαφή πηνίο Ελαττωματικό πηνίο Αναβοσβήνει με κόκκινο φως Υπόταση υπέρταση Πολύ χαμηλή υψηλή τάση τροφοδοσίας πλευράς τροφοδοσίας Ελέγξτε την τάση δικτύου και τις συνθήκες χρήσης Επικοινωνήστε με το τμήμα τεχνικ...

Page 106: ...νάκτησης καυσαερίων 4 2 Υδραυλικό κύκλωμα εικ 49 Υδραυλικό κύκλωμα 4 3 Διαγράμματα Απώλεια φορτίου Μανομετρικό ύψος κυκλοφορητών Μανομετρικό ύψος κυκλοφορητή με ρύθμιση σταθερής ταχύτητας εικ 50 A Απώλεια φορτίου λέβητα 1 2 3 Ταχύτητα κυκλοφορητή Μανομετρικό ύψος κυκλοφορητή με ρύθμιση αναλογικού μανομετρικού ύψους εικ 51 A Απώλεια φορτίου λέβητα 368 85 210 183 92 a4 753 10 11 193 275 11 14 278 33...

Page 107: ...ɲʋʊɷʉʍɻ Ȳʉɻɽɻʏɿʃɼ ʃɲʏɲʆɳʄʘʍɻ ɻʄɸʃʏʌɿʃɼʎ ɸʆɹʌɶɸɿɲʎ ȿʉɿʋɳ ʖɲʌɲʃʏɻʌɿʍʏɿʃɳ Ɉɳʇɻ ɸʆɸʌɶɸɿɲʃɼʎ ɲʋʊɷʉʍɻʎ ʏɻʎ ɸʋʉʖɿɲʃɼʎ ɽɹʌʅɲʆʍɻʎ ʖʙʌʉʐ ɲʋʊ A ɹʘʎ D Ƀʆʉʅɲʍʏɿʃɼ ɽɸʌʅɿʃɼ ɿʍʖʑʎ ȵʆɸʌɶɸɿɲʃɼ ɲʋʊɷʉʍɻ ʏɻʎ ɸʋʉʖɿɲʃɼʎ ɽɹʌʅɲʆʍɻʎ ʖʙʌʉʐ ʍɸ ʉʆʉʅɲʍʏɿʃɼ ɽɸʌʅɿʃɼ ɿʍʖʑ ʃɲɿ ʐʗɻʄɹʎ ɽɸʌʅʉʃʌɲʍʀɸʎ ʍʏʉ 30 ʏɻʎ ʉʆʉʅɲʍʏɿʃɼʎ ɽɸʌʅɿʃɼʎ ɿʍʖʑʉʎ ʃɲɿ ʐʗɻʄɹʎ ɽɸʌʅʉʃʌɲʍʀɸʎ ʍɸ ʉʆʉʅɲʍʏɿʃɼ ɽɸʌʅɿʃɼ ɿʍʖʑ ʃɲɿ ʐʗɻʄɹʎ ɽɸʌʅʉʃʌɲʍʀɸʎ ʍʏʉ 30 ʏɻʎ ʉʆʉʅɲʍʏɿʃɼʎ...

Page 108: ...οφοδοσία 230 Vac Θέση θέρμανσης Χωρίς τροφοδοσία Θέση νερού οικιακής χρήσης 138 Εξωτερικός ανιχνευτής προαιρετικά 139 Τηλεχειριστήριο με χρονοδιακόπτη προαιρετικά 246 Μετατροπέας πίεσης 278 Διπλός αισθητήρας ασφαλείας θέρμανσης TR Μετασχηματιστής έναυσης PR Προθερμαντήρας FR Φωτοαντίσταση MB Κινητήρας καυστήρα VE Ηλεκτρομαγνητική βαλβίδα DBM06E T T 278 OUT 5V GND 246 DSP05 L N 4 5 6 7 8 9 10 11 12...

Page 109: ......

Page 110: ......

Page 111: ......

Page 112: ...cod 3541Q463 Rev 00 09 2021 Fabbricato in Italia Fabricado en Italia Made in Italy DEULTXp HQ WDOLH 9HUYDDUGLJG LQ WDOLs SURGXNRZDQR ZH áRV HFK ȀĮIJĮıțİȣĮȗİIJĮȚ ıIJȘȞ ǿIJĮȜȚĮ 552 6 S Via 5LWRQGD D 6DQ RQLIDFLR 9HURQD 7 ZZZ IHUUROL FRP ...

Reviews: