background image


ENGLISH 

Introduction 

This booklet will take you through the commissioning process for 

your EnergyHub system. Go to the section that best describes your 
system topology and follow the instructions. Read through all the 

instructions before proceeding with the commissioning. 

1


EnergyHub 

NOTE!

  The  touch  screen  of  the  display  unit  does  not  work  with 

gloves. 

1.


Make  sure  to  perform  all  check  points  in  the 

installer 

verification

, sent with the EnergyHub, under the section 

before 

commissioning

.  Sign  the  installer  verification  and  continue 

with  the  commissioning  (the  installer  verification  can  be 
downloaded  from 

www.ferroamp.com/downloads


Installer 

verification.pdf

). 

2.


To start-up: 

a.


EnergyHub Wall & Single XL:

 Start by switching on 

the  AC-breaker  that  disconnects  your  system  from 

the facility AC-grid.  

b.


EnergyHub  XL  Cabinet:

  In  the  cabinet  distribution 

block, switch on the single-phase AC display breaker. 

Make sure that all the fuse holders are closed, then 

switch on all XL AC breakers. 

3.


Wait 1 min for the system to start up. During the start-up the 

display will show three views: 

a.


Ferroamp logo

 with progress bar 

b.


Booting… 


c.


Please wait… loading system settings


The time for the different views may vary depending on 

system type. When your EnergyHub has finished booting the 

following view is displayed:  

4.


To  change  the  language,  you  must  enter  the  service  menu. 

This is done by pressing the middle of the screen for 5 seconds 

until the text “

Service menu enabled

” 

is displayed. 

5.


Use your finger to swipe between the different views.  
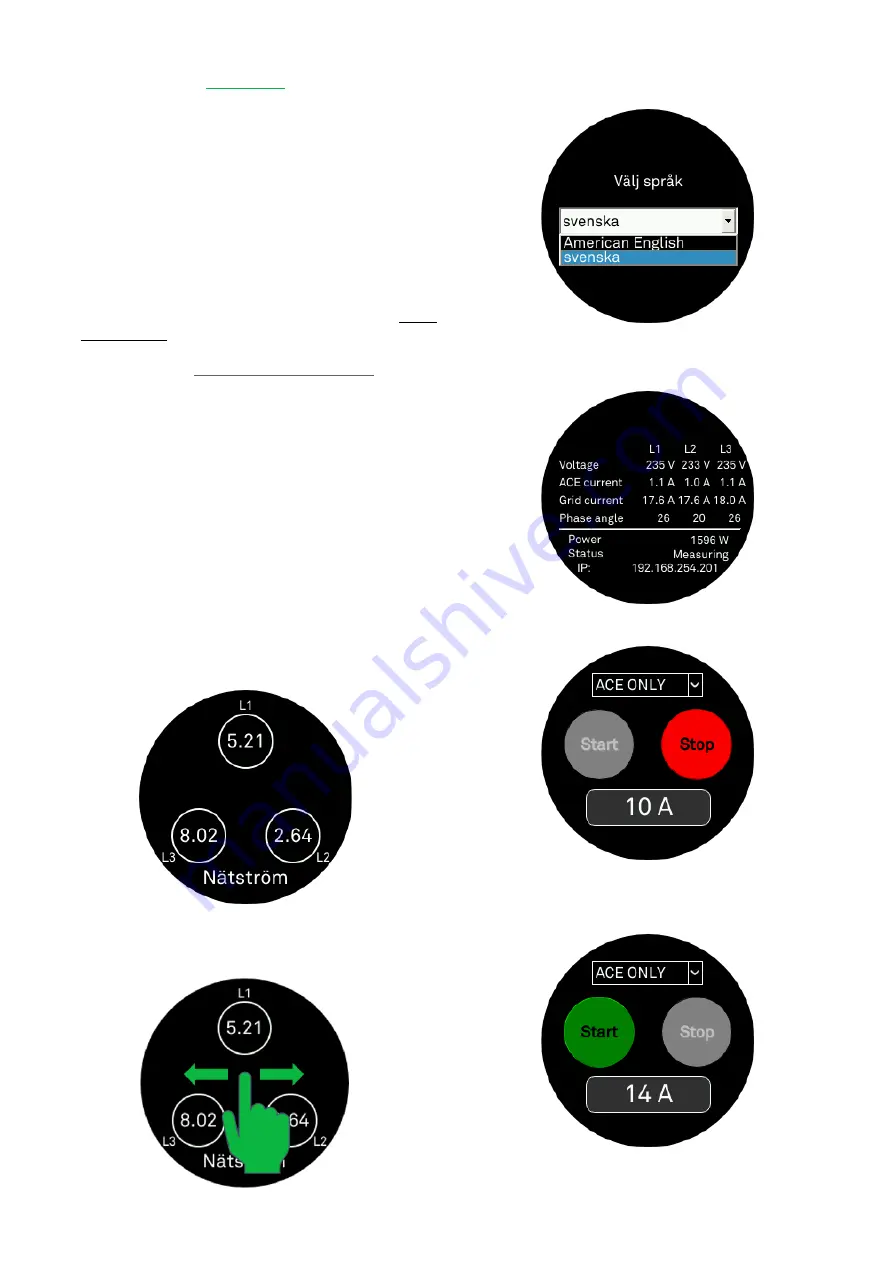
6.


To change language swipe till you find the following view 

and select English.            


7.


Swipe to the following view and verify that the status is set 

to “

Measuring

, continue to step 9. If not do step 8.  


8.


Swipe to the following view and press the red stop button.  


A text box will appear with the text 

”Activating settings. 

Please wait…” 

Then the following view will be displayed: 


Summary of Contents for EnergyHub

Page 1: ...Commissioning guide EnergyHub system Rev A01 ...

Page 2: ......

Page 3: ... EnergyHub 6 2 EnergyHub SSO 8 3 EnergyHub Battery 9 4 EnergyHub SSO Battery 9 Revision history Date Revision 2020 11 03 A01 English Swedish PN PD01295 Copyright Ferroamp Elektronik AB 2020 Document subject to change without prior notice Verify that you have the latest version of this manual on our website www ferroamp com downloads ...

Page 4: ...för displayen Kontrollera att alla säkringshållare är stängda slå sedan på alla AC brytare för XL modulerna 3 Vänta i 1 minut Under tiden systemet startar upp visas tre vyer a Ferroamps logga med underliggande framstegsfält b Booting c Please wait loading system settings Tiden för de olika vyerna kan variera beroende på systemtyp Din EnergyHub är igång när touchdisplayen på framsidan visar 4 Med e...

Page 5: ...Följande vy dyker då upp 12 Skriv in rätt CT kvot för ditt system och tryck den gröna check knappen 13 Följande vy visas tryck åter på den gröna check knappen för att bekräfta din valda CT kvot 14 För att starta konfigurationen av systemet svep till följande vy 15 Starta konfigurationsrutinen genom att trycka på Kör konfiguration av CT status ändras till Beräknar CT konfigurering 16 Konfiguratione...

Page 6: ...stallatören skapar en ritning eller schema över SSO installationen som beskriver var de olika SSO erna är placerade utefter deras unika serienummer som är märkt på sidan av varje SSO 1 Se till att samtliga DC brytare som kopplar bort dina SSO er från likspänningsnätet är öppna t ex via en Power Distribution 5 8 15 2 Följ sedan steg 1 till 16 i avsnitt 1 EnergyHub därefter fortsätter du med följand...

Page 7: ...e steg 3 Mät DC spänningen vid DC brytaren som kopplar bort batteriet från likspänningsnätet a Kontrollera att polariteten är korrekt L och L och att spänningen ligger i intervallet 585 780 VDC 4 Om polaritet och spänning är korrekt kan du slå på DC brytarna 5 Registrera systemet i Ferroamp EnergyCloud genom att följa instruktionerna i EnergyCloud registration häftet 6 För att aktivera och konfigu...

Page 8: ...on block switch on the single phase AC display breaker Make sure that all the fuse holders are closed then switch on all XL AC breakers 3 Wait 1 min for the system to start up During the start up the display will show three views a Ferroamp logo with progress bar b Booting c Please wait loading system settings The time for the different views may vary depending on system type When your EnergyHub h...

Page 9: ...number and the following view appears 12 Type in the correct CT Ratio for your system and press the green check mark 13 The following view is shown press the green check mark to confirm your CT ratio 14 To start the CT configuration swipe to the following view 15 Press Run CT configuration the status will change and the following view will be on display 16 The configuration takes up to 3 minutes p...

Page 10: ...SSO NOTE Ferroamp recommends that the installer creates a schematic document over the SSO installation that describes the location of each SSO using the unique serial number marked on the side of the SSO 1 Make sure that the DC breaker that disconnects your SSOs from the DC nanogrid are open for ex a Power Distribution 5 8 15 2 Follow steps 1 to 17 in section 1 EnergyHub When done proceed with the...

Page 11: ...he following instructions 3 Measure the DC voltage by the DC breaker that disconnects your battery this must be done on all your DC distribution boxes that connect units to the DC nanogrid a Check that the polarity is correct L and L and the voltage is in the range 585 780 VDC 4 If the polarity and voltages are correct go ahead and turn on the DC breakers 5 Register the system in the Ferroamp Ener...

Page 12: ...Electricity Reinvented ...

Reviews: