7
EN
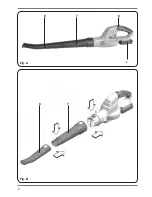
Description
The numbers in the text refer to the diagrams on
page 2
Fig. A, B, C
1. Battery
2. Battery unlock button
3. Battery charge indication
4. Charger
5. Charger LED indicators
6. On/off switch
7. Upper tube
8. Lower tube
3. OPERATING
The machine must be charged before
first use.
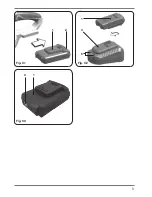
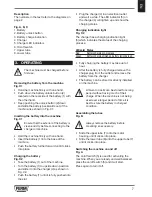
Removing the battery from the machine
Fig. C1
• Hold the machine firmly with one hand.
• Push down the battery unlock button (2)
located on the rear side of the battery (1) with
the other hand.
• Keep pushing the unlock button (2) down
and slide the battery backwards out of the
machine, like shown in Fig. C1.
Inserting the battery into the machine
Fig. C1
Ensure that the exterior of the battery is
clean and dry before connecting to the
charger or machine.
• Hold the machine firmly with one hand.
• Insert the battery (1) into the base of the
machine.
• Push the battery further forward until it clicks
into place.
Charging the battery
Fig. C2
• Take the battery (1) out of the machine
• Turn the battery (1) to upside down position
and slide it onto the charger (4) as shown in
Fig. C2.
• Push the battery (1) until it is fully pushed into
the slot.
• Plug the charger (4) in an electrical outlet
and wait a while. The LED indicator (5) on
the charger (4) will lighten up and show the
charging status.
Charging indication light
Fig. C2
The charger has a charging indication light
(5) which indicates the status of the charging
process:
LED color Status
Red
Battery charging in progress
Green
Battery charging finished, battery fully charged
• Fully charging the battery may take up to 1
hour.
• After the battery is fully charged remove the
charger plug from the outlet and remove the
battery from the charger.
• The battery can be stored or directly installed
on the machine.
Lithium-Ion cells can be stored for a long
period without losing much of their
charge. When the machine is not being
used over a longer period of time it is
best to store the battery in charged
condition.
Assembling the tubes
Fig. B
Always remove the battery before
mounting an accessory.
• Slide the upper tube (7) onto the motor
housing until it clicks into place.
• Slide the lower tube (8) onto the upper tube (7)
until it clicks into place.
Switching the machine on and off
Fig. A
The on/off switch (5) is used for activating the
machine. When you are ready and well balanced,
press the on/off switch (5) and it will start.
Press again to turn it off.


