background image

Ferm

81

13. ªÂÙ·Û¯ËÌ·ÙÈÛÙ‹˜ ÊÔÚÙ›Ûˆ˜ 
14. ºÈ˜ ÙÔ˘ ÊÔÚÙÈÛÙ‹

¶ÂÚȯÔÌÂÓ· Ù˘ Û˘Û΢·ÛÈ·˜

1  

ÃÔÚÙÔÎÔÙÈ΋ Ì˯·Ó‹ Ì ¯ÔÚ‰‹ ‰›¯ˆ˜ ηÏÒ‰ÈÔ

1

™˘ÏÏÔÁ‹ Ì·Ù·ÚÈÒÓ

1

ºÔÚÙÈÛÙ‹˜ Ì·Ù·ÚÈÒÓ

1

¶ÚÔÊ˘Ï·ÎÙÈÎfi˜ ÂÍÔÏÈÛÌfi˜

1

™ÂÙ ‚ȉÒÓ ÙÔ˘ ÚÔÊ˘Ï·ÎÙÈÎÔ‡ ÂÍÔÏÈÛÌÔ‡

6

§Â›‰Â˜

1

√‰ËÁȘ ¯ÚËÛˆ˜

1

√‰ËÁ›Â˜ ·ÛÊ·Ï›·˜

1

∫¿ÚÙ· ÂÁÁ‡ËÛ˘

∂ϤÁÍÙÂ, Â¿Ó Ë Ì˯·Ó‹, Ù· ÂχıÂÚ· ÂÍ·ÚÙ‹Ì·Ù· Î·È Ù· ·ÍÂÛÔ˘¿Ú ‰ÂÓ ¤·ı·Ó ‚Ï¿‚˜ ηٿ
ÙË ÌÂÙ·ÊÔÚ¿.

2. √¢∏°π∂™ ∞™º∞§∂π∞™

∂ÂÍ‹ÊËÛË Û˘Ì‚fiψÓ

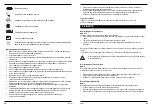
™’ ·˘Ùfi ÙÔ ÂÁ¯ÂÈÚ›‰ÈÔ Î·È/‹ ÛÙÔ Ì˯¿ÓËÌ· ¯ÚËÛÈÌÔÔÈÔ‡ÓÙ·È Ù· ·ÎfiÏÔ˘ı· ۇ̂ÔÏ·:

¢È·‚¿ÛÙ ÙȘ Ô‰ËÁ›Â˜.

™Â ÂÓ·ÚÌfiÓÈÛË Ì ԢÛÈÒ‰Ë ÈÛ¯‡ÔÓÙ· ÚfiÙ˘· ·ÛÊ·Ï›·˜ ÙˆÓ ∂˘Úˆ·˚ÎÒÓ
√‰ËÁÈÒÓ.

ªË¯·Ó‹ ÎÏ¿Û˘ πI  – ¢ÈÏ‹ ÌfiÓˆÛË - ¢ÂÓ ··ÈÙÂ›Ù·È ÁÂȈ̤ÓÔ˜ ÚÂ˘Ì·ÙÔÏ‹Ù˘.

ÀÔ‰ËÏÒÓÂÈ Î›Ó‰˘ÓÔ ÙÚ·˘Ì·ÙÈÛÌÔ‡, ı·Ó¿ÙÔ˘ ‹ ˙ËÌÈ¿˜ ÙÔ˘ ÂÚÁ·Ï›Ԣ, ÛÂ
ÂÚ›ÙˆÛË Ô˘ ‰ÂÓ ·ÎÔÏÔ˘ı‹ÛÂÙ ÙȘ Ô‰ËÁ›Â˜ Ô˘ ·Ó·Ê¤ÚÔÓÙ·È Û ·˘Ùfi ÙÔ
ÂÁ¯ÂÈÚ›‰ÈÔ.

ÀÔ‰ËÏÒÓÂÈ Î›Ó‰˘ÓÔ ËÏÂÎÙÚÔÏËÍ›·˜.

¡· ·Ó·Î˘ÎÏÒÓÂÙ ¿ÓÙÔÙ ÙȘ Ì·Ù·Ú›Â˜.

ªfiÓÔÓ ÁÈ· ÂÛˆÙÂÚÈÎÔ‡˜ ¯ÒÚÔ˘˜.

12

Ferm

5. USE

Head adjustment

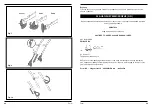
Fig. 6 + 7

Adjusting the angle of the head (Fig. 6):

Grip the head of the trimmer and press and hold the button which has the word “push”
printed on it.

Adjust the head to the desired angle.

Release the button to lock the head in your selected position.

Rotating the head to switch from trimming position to edging position (Fig. 7): 

Grasp the head of the trimmer and twist it half a turn around the handle.

Caution! Ensure that your keep your fingers clear of the trigger during these
operations!

Extension tube adjustment

Fig. 8

The handle length on this product can be varied, allowing you to reach difficult places without
the use of a ladder.

Grip the trimmer firmly and lift the latch on the lower handle.

Extend the handle to the required length.

Press the lever firmly down again to lock the handle.

Central handle adjustment

Fig. 9

The angle and the reach of the central handle can be adjusted to your preference.

Loosen the bolt on the side of the central handle.

Adjust the angle and reach to the position that is most comfortable. 

Tighten the bolt again to fix the central handle in its new position.

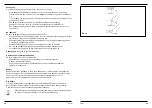
Starting and stopping

Fig. 10

The handle of this product is designed with a safety button to prevent accidental starting.

Press and hold the safety button located on either side of the handle, then press the start
button. You can now release the safety button.

Release the start/stop lever to stop the blades.

Note:  

The blades continue to spin after the trigger is released, wait for it to stop before putting

your feet or hands near the cutting area.

Summary of Contents for FGT-12V

Page 1: ...34 MANUALDEINSTRUCCIONES 43 MANUALDEINSTRU ES 52 MANUALEUTILIZZATI 61 71 O 80 www ferm com 0604 27 1 GB Subjecttochange D nderungenvorbehalten NL Wijzigingenvoorbehouden F Sousr servedemodifications...

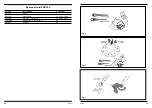
Page 2: ...Ferm 91 Explodedview 02 Ferm Fig 1 Fig 2 Fig 3...

Page 3: ...ig 5 Fig 6 90 Ferm SparepartslistFGT 12V Fermnr Description Positionno 501567 Switch 7 501568 Sidehandle 14 15 16 18 19 501569 Protectivecover set 43 44 45 46 47 LTA1002 SparebladeFHGT 6V 10pcs 48 501...

Page 4: ...Ferm 89 CE GR EN60745 1 98 37 EEC 73 23 EEC 89 336 EEC 2000 14 EEC 01 01 2006 ZWOLLENL W Kamphof FermBV Lingenstraat6 8028PMZwolle 04 Ferm Fig 7 Fig 9 Fig 10...

Page 5: ...Ferm 05 88 Ferm Ferm 6 12 12 Fig 10...

Page 6: ...Assembly 5 Use 6 Maintenance 1 MACHINEDATA Technicalspecifications Dependantonlength thicknessofmaterialthatistrimmed Productinformation Fig 1 1 Mainunit 2 On Offswitch 3 Safetybutton 4 Centralhandle...

Page 7: ...ndaccessoriesfortransportdamage 2 SAFETYINSTRUCTIONS Explanationofsymbols Inthismanualand oronthemachinethefollowingsymbolsareused Readtheinstructions Inaccordancewithessentialapplicablesafetystandard...

Page 8: ...utofreachofchildren Alwaysusesafetyglasses Wealsorecommendtheuseofearprotectors Weartherightclothes notloosefittingorjewelleryandensuregarmentscannotcome intocontactwithmovingparts Wearnon slipshoes D...

Page 9: ...urethattheoutsidesurfaceofthebatterypackortooliscleananddrybeforeplugging intocharger Ensurethatbatteriesarechargedusingthecorrectchargerrecommendedbythe manufacturer Incorrectusemayresultinariskofele...

Page 10: ...emperaturecannotexceed40 C 104 F e g intheopen exposedtodirectsunlightunderglassoralongsidemetalfabrications 3 BATTERYPACKCHARGINGANDRECHARGING Beforefirstusechargethebatterypackfor16hours Chargingbat...

Page 11: ...heholeinthebladeoverthemetalluglocatedonthehubinthebottom ofthetrimmerhead Pullthebladeawayfromthecentreofthebladehubuntilyoufeelitsnapintoplace Removingthecuttingblades Fig 5 Gripthebladeandpushtowar...

Page 12: ...ut theuseofaladder Gripthetrimmerfirmlyandliftthelatchonthelowerhandle Extendthehandletotherequiredlength Presstheleverfirmlydownagaintolockthehandle Centralhandleadjustment Fig 9 Theangleandthereacho...

Page 13: ...ceawayfromchildren Ifstoredinashedpacktheapplianceintoapolythenebagtopreventdamp Note Itisnotnecessarytooiltheproduct Troubleshooting Iftheproductisnotworkingproperly youmayneedto Cleananybuildupofgra...

Page 14: ...anty CE DECLARATIONOFCONFORMITY GB Wedeclareunderoursoleresponsibilitythatthisproductconformswiththefollowing standardsorstandardiseddocuments EN60745 1 inaccordancewithregulations 98 37 EEC 73 23 EEC...

Page 15: ...sAkkus 4 Montage 5 Einsatz 6 Wartung 1 GER TEDATEN TechnischeDaten Abh ngigvonL ngeundDickedesgeschnittenenMaterials Productinformation Abb 1 1 Hauptger t 2 Ein Ausschalter 3 Sicherheitsschalter 4 Han...

Page 16: ...enTeileunddasZubeh raufTransportsch den 2 SICHERHEITSVORSCHRIFTEN Erkl rungderSymbole IndieserAnleitungund oderamGer twerdenfolgendeSymboleverwendet Anweisungendurchlesen Entsprichtgrundlegendenanwend...

Page 17: ...ie nachBenutzungimmerausdemGer t Ger taneinertrockenen f rKindernichterreichbarenStelleaufbewahren TragenSieimmereineSchutzbrille WirempfehlenauchdenGebrauchvon Geh rsch tzern TragenSiedierichtigeKlei...

Page 18: ...enieindieGer teunterseite w hrenddieBatterienochangeschlossenist HaltenSiedieSchneidwerkzeugezurErzielungbessererLeistungscharfundsauber BeachtenSiedieAnweisungenf rSchmierungundReinigungvonZubeh rtei...

Page 19: ...iehen Reinigung UmdieStromschlaggefahrzuverringern mussderSteckerdesLadeger tsvor einerReinigunggezogenunddieBatterieherausgenommenwerden LassenSiedieBatterienachdemGebrauchaneinersicheren k hlen gutb...

Page 20: ...Fu desSchneidkopfs SchraubenSiedieAbdeckungamFu desSchneidkopfsfest DieBohrungbefindetsich hinterdemSchneidkopfobenaufderTrimmer Abdeckung AuswechselnderSchneidemesser Abb 4 5 DieserTrimmeristmiteinem...

Page 21: ...ltenPositionzu arretieren DrehendesSchneidkopfsvondernormalenPositionaufdiePositionzumEckenschneiden Abb 7 HaltenSiedenSchneidkopffestunddrehenSieihneinehalbeDrehungumdenGriff Achtung AchtenSiedarauf...

Page 22: ...im BereichderMesser KontrollierenSiedieMesseraufAbnutzungundersetzenSiediese gegebenenfalls VerwendenSiekeinescheuerndenMittelzurReinigungdesProdukts undtauchenSiees nichtunterWasser WennTeileersetzto...

Page 23: ...etsicheineausf hrliche bersicht berdieTeile diebestellt werdenk nnen Umwelt UmTransportsch denzuverhindern wirddieMaschineineinersolidenVerpackunggeliefert DieVerpackungbestehtweitgehendausverwertbare...

Page 24: ...taamigliorareinostriprodotti Prodottisoggettiamodifiche senzapreavviso FermBV Lingenstraat6 8028PMZwolle Olanda 24 Ferm CE KONFORMIT TSERKL RUNG D Wirerkl reninalleinigerVerantwortung da diesesProdukt...

Page 25: ...erloinacqua Seicomponentidevonoesseresostituitioriparati usaresolopartidiricambioapprovate daFerm Sesononecessariinterventidimanutenzioneoriparazione riportarel apparecchionel puntovenditadovelosi acq...

Page 26: ...ole Stringerenuovamenteilbulloneperfissarelamanigliacentralenellanuovaposizione Avvioearresto Fig 10 Sulmanicodell apparecchio presenteunpulsantedisicurezzacheimpediscel avvio accidentale Tenerepremut...

Page 27: ...nwerkdoenmetdesnelheid waarvoorhijisontworpen Zorgteallentijdedatustevigstaatenuwevenwichtnietverliest Gebruikditapparaatnooitwanneerdebeschermkapnietisaangebracht 66 Ferm Nota Ilpaccobatterianonsidan...

Page 28: ...gebruikvan reserveonderdelenenaccessoiresdienietdoorFermwordengeleverdofaanbevolen komtuwgarantietevervallen bovendienkandittotgevaarlijkesituatiesleiden Gebruikditapparaatalleenvoorhetwerkwaarvoorhij...

Page 29: ...tilizzarel apparecchiosoloperl usoalquale destinato tagliareerbaecespuglileggeri Laprudenzainnanzitutto Istruzionidisicurezzaspecifiche Teneremaniepiedisemprelontanidall areaditaglio Mantenerel altram...

Page 30: ...ilizzaresoloricambiecomponentifornitidaFerm L usodipartinonforniteonon raccomandatedaFerminvalidalagaranziaepotrebbeesserepericoloso 30 Ferm Controleerdatdestartknoppennietzijningeschakeldwanneerudeac...

Page 31: ...9 Dehoekenhetbereikvandecentralehendelkunnennaarwenswordenaangepast Maakdeboutaandezijkantvandecentralehendellos Pasdehoekenhetbereikaanindepositiedievooruhetgemakkelijkstis Draaideboutweervastomdecen...

Page 32: ...nbeidezijdenvandehendelbevindtingedrukt en drukdanopdestartknop Ukuntnudeveiligheidsknoploslaten Laatdestart stopknoplosomdebladenstiltezetten Opmerking debladendraaiennogdoorwanneerdetrekkerwordtlosg...

Page 33: ...W Kamphof Qualitydepartment Hetisonsbeleidomonzeproductenvoortdurendverderteverbeterenenwijbehoudenons daaromhetrechtvooromzondervoorafgaandeberichtgevingdeproductspecificatieste wijzigen FermBV Linge...

Page 34: ...arelho Resolu odeproblemas Seoaparelhon otrabalharcorrectamente poder terde Limparqualqueracumula odeervasoudetritos Carregartotalmenteasbateriasdurante12hrs Verificaroscaboseliga esel ctricaseseneces...

Page 35: ...arojogodebateria Useacorreiadetransportecomojogodabateriatransversalmentenopeitoparase assegurardequeestan ooscila 5 UTILIZA O Regula odacabe a Fig 6 7 Regularo ngulodacabe a Fig 6 Seguraracabe adaro...

Page 36: ...oafastando osparaqueencaixemsobreape ade liga onaunidadeprincipal 36 Ferm N utilisezpasl appareilpartempsdepluie Utilisezdeslunettesdeprotectionetdesprot georeilles Portezdesgantsdeprotection Gardezde...

Page 37: ...eavecleproduitoulespi ces d tach esrequises nousvousconseillonsdeprendrecontactaveclecentrede serviceautoriseoulefournisseurleplusproche Lesmesuresdes curit pourlechargeurdebatterie Lechargeuresttouts...

Page 38: ...mo Advert nciasdeseguran aparaocarregadordabateria Ocarregadorfoiespecificamenteconcebidoparautiliza oapartirdeumafontedeenergia el ctricadom stica 230 volts240volts N otentelig loaoutrafontedeenergia...

Page 39: ...llelameaucentreetpassez lapar dessuslepignonm tallique Tirez la versl ext rieur jusqu cequevoussentiezqu elles enclencheenpositiondetravail 54 Ferm N outilizar chuva Utilizeprotec ovisualeauditiva Use...

Page 40: ...leenplace Poussezlecachesurletrouduboulon Commentporterlabatterie Laceinturedesupport laquelleestaccroch elabatterie doit treport eentraversdela poitrinepour viterqu elleneglisse 5 UTILISATION R glage...

Page 41: ...nsunendroitsecethorsdeport edesenfants Sivousallezrangerl appareildansunabridejardin emballez ledansunsacen poly thyl nepourleprot gerdel humidit Remarque Iln estpasn cessairedelubrifierleproduit D pa...

Page 42: ...onctionnement parexempleapr sl usured unepi ce Voustrouverez lafindece manuel unsch maavectouteslespi cesquevouspouvezcommander Environnement Pour viterlesdommagesli sautransport lamachineestlivr dans...

Page 43: ...iEncabezadoprocesodecostorealest afiladaysustit yaladeser necesario Noutilicematerialesabrasivosparalimpiarelproductonilosumerjaenagua Sinecesitarepararosustituirpiezas utilices lorecambiosadmitidospo...

Page 44: ...gado Fig 10 Elmangodeesteproductosehadise adoconunbot ndeseguridadparaevitararranques accidentales Mantengapulsadoelbot ndeseguridadencualquieradelosladosdelmango ypulseel bot ndearranque Enesemomento...

Page 45: ...relequilibrio Nuncautiliceesteaparatosinelseguro Siempredebeestaracopladoalaparato 48 Ferm Importante Noalmacenenuncalarecortadoraconlasbater asdescargadas C rguelasdespu sdecadausoycada6mesesdealmace...

Page 46: ...aconectarlasbater asalproducto 46 Ferm Uses lorepuestosyaccesoriosproporcionadosporFerm Elusodeaccesorios diferentesalosproporcionadosorecomendadosporFerminvalidar sugarant aypodr a serpeligroso Usees...

Reviews: