7
EN
mains-impedance Zmax <0.348 Ohm, such
disturbances are not expected. (In case of
need, you may contact your local supply
authority for further information.
Immediately switch off the machine when:
• Excessive sparking of the carbon brushes and
verticiliosis in the collector.
• Interruption of the mains plug, mains lead or
mains lead damage.
•
Defect switch
• Smoke or stench of scorched isolation
Electrical safety
When using electric machines always observe the
safety regulations applicable in your country to
reduce the risk of fire, electric shock and perso nal
injury. Read the following safety instructions and
also the enclosed safety instructions.
Always check that the power supply
corres ponds to the voltage on the rating
plate.
Your machine is double insulated;
therefore no earthwire is required.
Replacing cables or plugs
Immediately throw away old cables or plugs
when they have been replaced by new ones. It is
dangerous to insert the plug of a loose cable in the
wall outlet.
Using extension cables
Only use an approved extension cable suitable
for the power input of the machine. The minimum
conductor size is 1.5 mm
2
. When using a cable
reel always unwind the reel completely.
3. ASSEMBLY
Prior to mounting an accessory always
unplug the tool.
Assembling the handle
Fig. 2
The handle is suitable for either left or right-
handed use.
• Install the handle in such way that the holes
match the screwholes on the machine.
• Tighten the handle with the bolts and hexagon
key.
Assembling accessoires
Fig. 3
• Press the spindle lock (5)
• Screw and tighten the pad holder on the spindle
• Depress the spindle lock (5)
• Mount the polishing pad (4) onto the pad
holder (5).
Accessoires
Fig. 4
Polishing pad (3)
This is used for high lustre polishing and waxing.
Wool polishing pad (4)
This is used for a high gloss finish.
4. USE
Always follow the safety instructions and
keep to the applicable regulations.
• Hold the machine away from the workpiece
when switch it on and off.
• Always first switch the machine off after use
before removing the plug from the socket.
Speed control
Fig. 5
The speed of the disc can be controlled with the
rotary knob on top of the handle.
The higher the position, the higher the speed.
When using wax on the polishing pad do not start
at a high speed.
Switching on and off
Fig. 6
Switch the machine on by pressing the On/Off
switch (1). When you release the On/Off switch (1)
the machine will turn off.
Lock-on Button
Fig. 6
• You can lock the On/Off switch (1) by pressing
the On/Off switch (1) and then pressing the
lock-on button (6).
• To release the switch-lock; shortly press the
On/Off switch (1) again.
Summary of Contents for AGM1120P
Page 2: ...2 Fig 1 Fig 2 Fig 3 3 5 4 1 6 2...
Page 3: ...3 Fig 4 Fig 5 Fig 6 A B 5 3 4...
Page 120: ...120 RU 180 M14 3 3 Lpa 86 3 A Lwa 97 3 A 3 51 1 5 2 EN 60745 1 1 2 3 U 4 5 6 2 O a b c...
Page 121: ...121 RU d e f g h i j k l m n o p...
Page 122: ...122 RU a b c d e 30...
Page 123: ...123 RU II 1 5 2 3 2 3 4 5 4 3 4 4...
Page 124: ...124 RU 5 6 1 1 6 1 1 6 1 5...
Page 125: ...125 UK 2012 19 EU 1400W 180mm 3 2 3 1 2 3 4 5 1 220 240 V 50 Hz 1400 1000 3300 180 M 14...
Page 126: ...126 UK 3 3 Lpa 86 3 A Lwa 97 3 A 3 51 1 5 2 EN 60745 1 1 2 3 U 4 5 6 2 a b c d e...
Page 127: ...127 UK f g h i j k l m n o p...
Page 128: ...128 UK a b c d e 1 5 2 30...
Page 129: ...129 UK 1 5 2 3 2 3 4 5 4 3 4 4 5 6 1 1 6 1 1 6 1...
Page 130: ...130 UK 5 2012 19 EU...
Page 132: ...132 EL l...
Page 133: ...133 EL...
Page 134: ...134 EL O 30 Zmax 0 348 Ohm...
Page 135: ...135 EL A H N II 1 5 mm2 3 2 3 4 5 4 3 A 4 4 5...
Page 136: ...136 EL 6 On Off 1 On Off 1 6 On Off 1 On Off 1 6 On Off 1 5 2012 19 EU...
Page 143: ...143 MK a b c c d max e f g 1 min h i j k...
Page 144: ...144 MK l m n o p a b c d e max max f...
Page 145: ...145 MK 30 s Zmax 0 348 1 5 mm2 3 2 3 5 5 4 3 4...
Page 146: ...146 MK 4 5 6 1 1 6 1 6 1 A 7 7 5...
Page 147: ...147 MK 2012 19 EU...
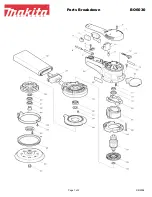
Page 149: ...149 Exploded view...
Page 150: ...150...
Page 152: ...WWW FERM COM 2020 FERM 2005 19...


