


7
8
Removing Bearings:
Installing Bearings:
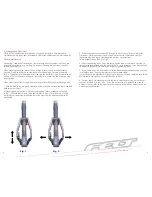
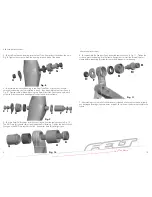
1. To remove the Main Pivot Bearings orient the tool as seen in Fig. 3. Use an Allen
wrench and open wrench to draw the bearings out of the
Chainstay Yoke.
IMPORTANT - The properties that make Acetone and similar solvents work so well
as a cleaner can also harm paint and break down carbon fiber resin. Be very careful
where you apply the solvent as it may compromise the integrity of the rear triangle
and/or the paint finish of your frame.
(Caution-Eye and Hand protection should ALWAYS be used when handling
solvents to avoid contact!)
2. To reassemble the Main Pivot, orient the tools as shown in Fig. 7. Tighten the screw
to press the bearing into the Chainstay Yoke. Repeat for both sides.
1. Once all the bearings have been removed, clean the bearing bores using the
dental pick or X-acto knife to remove all traces of old bearing seating compound/
green loctite. Wipe down the bearing bore with a Q-tip soaked in a small amount
of solvent such as acetone. This will remove any last traces of loctite and other
contaminants. Don’t get solvent on any other portion of the frame or rear triangle as
damage to the paint or carbon resin may occur.
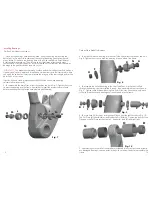
2. To remove the bearings from the Seat Tube orient the tools as seen in Fig. 4.
Holding Tool “M” with a 15mm open wrench will prevent the Link Axle from spinning
as you tighten the M6 x 35mm bolt (T). This will draw the axle from the frame,
bringing one bearing with it. Once the first bearing is removed, repeat this step for
the other bearing.
3. Place the links on your bench and assemble the DU bushing removal tools as
shown in Fig. 5. Use an Allen wrench and open wrench to draw the DU Bushings out
of the back of the links.
4. Disassemble The dropout Pivots as follows:
A) Remove the Chainstays from the seatstays by removing the Dropout Axle at each
dropout.
B) Insert the 12mm Split Bearing Puller (tool “W”) into one bearing in the front
triangle. You should feel it “snap” into place between the bearing and the internal
spacer.
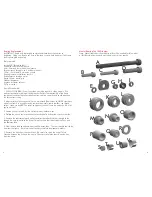
Alloy Model Instructions
Fig. 5
Q
O
D
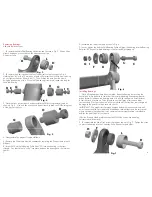
C) Assemble the rest of the tools as seen in Fig. 6.
D) As you tighten the bolt the Split Bearing Puller will draw the bearing into the Bearing
Receiver (U). Repeat for both bearings in the Left and Right dropouts.
D
L
H
Fig. 3
Fig. 4
Fig. 6
Fig. 7
B E Q
K
O
I C
H
D
L
F
G I
F
K
T
S
C
Summary of Contents for Edict Nine
Page 1: ...Edict Nine Manual...