background image

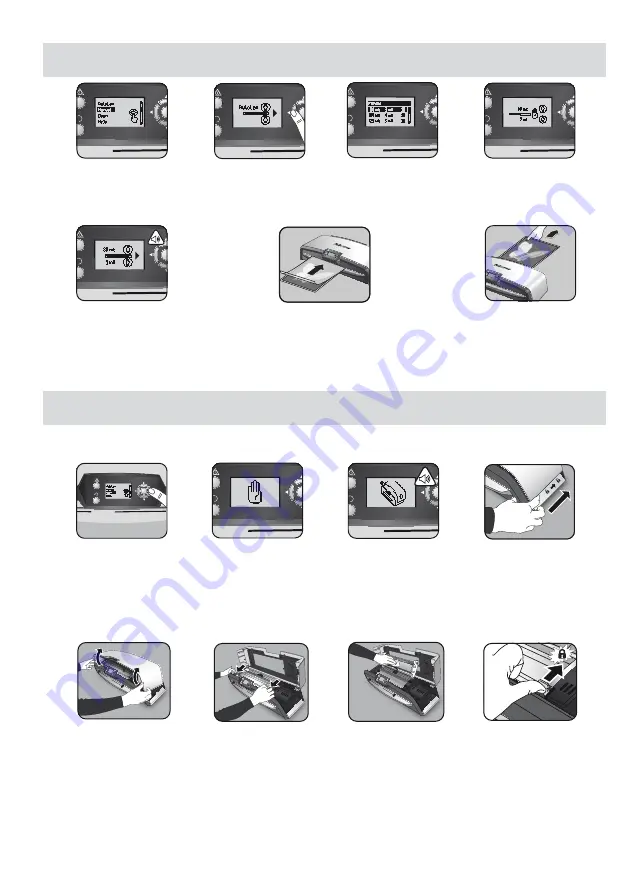
Set up laminator as above. On 

start menu, select “Manual” 

operation within 5 seconds of 

switching machine on.

STEPS TO LAMINATE - MANUAL OPERATION

Select pouch thickness 

with navigation buttons as 

required. Confirm selection 

with “OK” button.  

The ‘Ready’ screen will show 

when warm-up is complete and 

two short beeps indicate that 

machine is ready and user can 

insert pouch.

Place the pouch, sealed edge first, 

into the pouch / document entry. 

Keep the pouch straight and central 

within the document entry, not on 

an angle. Use the entry markings 

as a guide.

Upon exit, the laminated pouch 

is hot and soft. Remove the pouch 

immediately. Place pouch onto a flat 

surface to cool. This helps prevent 

any jamming.

The warm-up screen will 

show until operating 

temperature is reached.

The Voyager laminator can be manually opened via the LCD user interface. Please note that the power supply needs to be 

ON


and the laminator needs to be 

SWITCHED ON

 to open. 

MAINTENANCE - Easi-Access

Select ‘Open’ in the 

start-up menu using the 

navigating buttons and 

confirm the selection with 

the ‘OK’ button.

The machine might 

need to cool down if it 

has already been lami-

nating, this can take 

up to 30 minutes.

The “open” LCD screen 

will show and a beep 

will sound when the 

laminator is ready to be 

opened.

Now move the lever 

on each side of the 

machine backwards to 

open the top cover.

Open the cover with 

both hands. When the 

laminator is opened, 

power to internal 

parts is isolated so 

that the user is not 

in danger of electric 

shock.

For further maintenance, 

the internal mechanism 

can be released by 

experienced users. Pull 

the cam levers forward to 

release the mechanism 

and lift it up.

To clean residue off the 

laminator mechanism, 

please only use 

Fellowes Laminator 

wipes (item No # 

57037). Do not use 

sharp objects to clean 

laminator. 

Please remember to 

re-secure the mecha-

nism with the cam 

levers again before 

closing the cover.

To return to the “Home” 

Menu at  any stage, press 

the “Left/back” key on the 

navigation buttons.

7

Summary of Contents for Voyager A3

Page 1: ...magnetic Compatability Directive 89 336 EEC as amended by directive 92 31 EEC 96 68 EEC and the following Harmonised European Normes EN standards and IEC standards Information Technology Product EN 60...

Page 2: ...High Performance Office Laminator Voyager Please read these instructions before use GB...

Page 3: ...LCD Display Left Right Up Down Standby Reverse 5 sec 30 min 30 min Power Save mode LCD off Z Z Z VOYAGER LAMINATOR AutoLam Automatic Lamination Manual Lamination...

Page 4: ...LAMINATOR CONTROLS QUICK START GUIDE C K I B 3 E F G J A SETTING UP THE LAMINATOR STEPS TO LAMINATE AutoLam 1 2 3 4 5 6 7 8 9 10 11 12 D H...

Page 5: ...Max pouch thickness 250 micron total thickness 2 x 250 500 micron DO ensure the machine is on a stable surface DO test laminate scrap sheets before final laminations DO remove staples and other metal...

Page 6: ...djustable document entry guide H Select OK button C Entry support shelf I Detachable document exit tray D Reverse button J On off switch at rear E Standby button K Carry points at sides F LCD user int...

Page 7: ...straight and central within the document entry not on an angle Use the entry markings as a guide Upon exit the laminated pouch is hot and soft Remove the pouch immediately Place pouch onto a flat sur...

Page 8: ...laminator needs to be SWITCHED ON to open MAINTENANCE Easi Access Select Open in the start up menu using the navigating buttons and confirm the selection with the OK button The machine might need to...

Page 9: ...hick for laminator AUTO REVERSE AND OVERLOAD PROTECTION Item will be ejected out of the front of the laminator again to prevent jams and damage to item and laminator The CleanMe system check warns the...

Page 10: ...is hereby limited in duration to the appropriate warranty period set forth above In no event shall Fellowes be liable for any consequential damages attributable to this product This warranty gives you...

Page 11: ...10 FUNCTION OVERVIEW 0 30 min Secure mechanism and close as described above A B C Open Easi Access function CleanMe Maintenance Overload protection Auto Reverse Help Information display...

Page 12: ...aminator again Item too thick to laminate Choose thinner pouch 80mic and try again Photocopy item and laminate the copy Machine speed and noise varies during lamination Items of different thickness la...

Reviews: