Fellow Ode Brew Safety And Maintenance Download Page 5

9

8

Before Use

Remove and recycle or discard all stickers, descriptive labels, cable ties and 

packing materials, including static stickers and hang tags with ties. 

Before cleaning, we recommend running the grinder for 10 seconds without 

coffee beans to help clear beans/grounds from the burrs and grinds chute.

Always unplug power cord from power outlet before cleaning.

Wipe body of the grinder with a soft, damp cloth. Wipe down magnetically  

aligned catch and catch lid and dry thoroughly.

Place grinder on a level surface and plug into a correct voltage.

How To Use

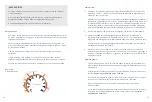
1.  Select grind size by twisting the grinds dial to the left or right  

(1 = fine, 11 = coarse). See our Grind Guide (Diagram B) to help make your selection. 


Please do not use setting 1 for your first 10 lbs of coffee as the burrs will “chirp” and hit 

each other. Your grinder arrives calibrated with its “zero point” (the setting where burrs 

touch) at setting 1. As the burrs are seasoned, the burrs touch setting will drift slightly 

which is normal and as such you should expect the settings to shift slightly coarser.  

(For more information on burrs touching/zero point please see page 14).

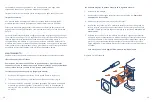
2.  Remove the lid from the single dose load bin by lifting off. 

3.  Pour the desired quantity of roasted whole coffee beans into the load bin up  

to a maximum of 80g / 2.8oz. Replace the lid. Ensure the catch is fully beneath  

the chute and is empty.

Diagram B: Grind Guide

Pr

is

m

o

Elec

tric Coffee Maker

Cu

pp

in

g

Po

ur

-O

ver

Fren

ch P

res

s

Co

ld

 B

re

w

Ae

ro

Pr

es

s

Do not grind more than 80g of coffee without emptying the catch. Allowing the catch  

to overfill can jam the grinder.

4.  Press power button. The grinder will start grinding and stop automatically once 

your beans are done grinding. OR press and hold the power button for more than 

1.5 seconds. The grinder will grind until the button is released.

General Cleaning

If the grinder is used daily, the burrs should be cleaned at least every three  

months using tablets (see below for Automatic Cleaning) or with a stiff brush.

To clean burrs, remove the burrs following the instructions in the  

Removing and Replacing Burrs”

 section. 

Do not immerse the grinder in water. Do NOT wash the burrs with water.

Never place fingers into the grind chute while product is plugged in.

Using the provided brush, gently brush coffee dust off of the burrs  

and replace burrs following the instructions in the 

“Removing and Replacing 

Burrs”

 section. 

To wash the catch, wipe gently with a soft cloth and warm soapy water.  

Dry with a dry cloth after cleaning. 

Wipe grinder exterior and load bin with a soft, damp cloth.

Automatic Cleaning

A fast way to clean your grinder is using grinder cleaning tablets like Urnex Grindz

TM


grinder cleaning tablets. These are designed to prevent clogging by freeing coffee 

particles stuck to the burrs and absorbing/removing odors and coffee oil residue. 

To use cleaning tablets, make sure all beans are run through your grinder by running 

it for 10-20 seconds. Use the cleaning tablet instructions to place appropriate amount 

into grinder. Adjust the grind setting to 11 and press the power button to run the 

grinder. Grind all of the tablets into the catch. Once complete, we recommend grinding 

approximately 30g coffee to remove any tablet residue. Discard the ground tablets/

coffee from the catch and clean.

Summary of Contents for Ode Brew

Page 1: ...Safety and Maintenance Ode Brew Grinder ...

Page 2: ...Designed in San Francisco made in China Model Specifications 120V 60Hz 150W Weight 4 5kg 9 9lbs Dimensions LxWxH 9 4in 239mm x 4 2in 105mm x 9 5in 241 5mm Grinds capacity 80g Cord length 39 3in 1m BGAAUS USA and Canada household only THIS PRODUCT IS FOR USA AND CANADA HOUSEHOLD ONLY SAVE THESE INSTRUCTIONS More info at Fellowproducts com odemanual Ode Brew Grinder ...

Page 3: ...ance The use of attachments not recommended or sold by the manufacturer may cause fire electric shock or injury Use only with AC current and the correct voltage Ensure that your main supply voltage is the same as that marked on the underside of your grinder To avoid an electrical overload do not operate another high wattage appliance on the same circuit Never leave the grinder unattended when in u...

Page 4: ... times stronger than ordinary magnets Items such as mechanical watches heart pacemakers CRT monitors and televisions credit cards diskettes and other magnetically stored media such as video tapes are all affected by powerful magnets Do not use the magnetic catch on top of an electronic scale The magnetic catch may interfere with the accuracy of or even damage an electronic scale It is not recommen...

Page 5: ... emptying the catch Allowing the catch to overfill can jam the grinder 4 Press power button The grinder will start grinding and stop automatically once your beans are done grinding OR press and hold the power button for more than 1 5 seconds The grinder will grind until the button is released General Cleaning If the grinder is used daily the burrs should be cleaned at least every three months usin...

Page 6: ...rd 4 Inspect burrs for coffee beans or foreign materials rocks sticks unroasted coffee bean etc that may be stuck Remove stuck coffee beans and clean burrs as instructed in the Cleaning section of this manual 5 Reinstall burrs Run grinder without coffee for 5 seconds to check that it operates as expected The grinder should spin quietly and at an even speed If the grinder is making an unexpected no...

Page 7: ...l burr is attached to the auger To remove the rotational burr start by using a Phillips head screwdriver to remove the three screws that hold it in place If there is ground coffee in these screws that interferes with their removal use a small brush to clear the ground coffee before attempting to remove the screws Diagram H and I 8 Carefully lift the rotational burr away from the auger To replace t...

Page 8: ...librate please go to Fellowproducts com odemanual One year limited warranty Fellow warrants this product against any defects that are due to faulty material or workmanship for a one year period after the original date of consumer purchase This warranty is valid only for The original consumer When the grinder is purchased through authorized retailers With the original sales receipt for proof of pur...

Page 9: ...stiques 120V 60Hz 150W Poids 4 5 kg 9 9 lb Dimensions LxPxH 9 4 pouces 239 mm x 4 2 pouces 105 mm x 9 5 pouces 241 5 mm Capacité de mouture 80g Longueur du cordon 39 3 pouces 1 m BGAAUS USA et Canada Utilisation ménagère exclusivement CE PRODUIT EST A DESTINATION DES ÉTATS UNIS ET DU CANADA UTILISATION MENAGERE EXCLUSIVEMENT CONSERVEZ CES INSTRUCTIONS Plus d informations sur Fellowproducts com ode...

Page 10: ... aucun appareil à haute puissance sur la même prise que cet appareil N immergez pas le cordon la prise ou toute autre partie du broyeur dans l eau ou dans un autre liquide Cela vous protègera contre le risque de choc électrique L utilisation d accessoires non recommandés ou non vendus par le fabricant peut provoquer un incendie un choc électrique ou des blessures Utilisez uniquement avec du couran...

Page 11: ... JAMAIS être autorisés à jouer avec aimants NEODYMIUM Même des aimants relativement petits peuvent provoquer des blessures graves si avalé Gardez toujours tous les aimants en néodyme hors de portée des enfants Gardez toujours une distance de sécurité au moins 10 cm entre les aimants et tous les objets être endommagé par le magnétisme et rappelez vous les aimants en néodyme sont dix fois plus puiss...

Page 12: ...r le nettoyage automatique ou avec une brosse dure Pour nettoyer les dents retirez les en suivant les instructions de la Section Retrait et remplacement des dents N immergez pas le broyeur dans l eau NE PAS laver les dents avec de l eau Ne placez jamais les doigts dans la goulotte de broyage lorsque l appareil est branché À l aide de la brosse fournie retirez délicatement la poussière de café des ...

Page 13: ... de nettoyage de broyeur Ils sont conçus pour éviter le colmatage en retirant les poussières collées aux dents et en absorbant éliminant les odeurs et les résidus d huile de café Pour utiliser des comprimés de nettoyage assurez vous que tous les grains soient sortis de votre broyeur en faisant fonctionner pendant 10 20 secondes Utilisez les instructions des comprimés de nettoyage pour en placer la...

Page 14: ... brosse fournie brossez délicatement la poussière de café des dents et remontez les dents Si vous remplacez les dents passez aux étapes suivantes 6 La dent fixe est fixée à la chambre de mouture Pour retirer la fixation des dents commencez par utiliser un tournevis cruciforme pour retirer les trois vis qui la maintienne en place S il y a du café moulu dans ces vis qui interfère avec leur retrait u...

Page 15: ...garder des vidéos sur la façon d étalonner rendez vous sur Fellowproducts com odemanual Diagramme H Diagramme I Garantie limitée d un an Fellow garantit ce produit contre tout défaut dû à un matériau défectueux ou à un défaut de fabrication pour une période d un an après la date d achat par le consommateur Cette garantie n est valable que Pour le client d origine Lorsque le moulin est acheté auprè...

Page 16: ... China Modelo Especificaciones 120V 60Hz 150W Peso 4 5kg 9 9lbs Dimensiones AxAxL 9 4 pulg 239 mm x 4 2 pulg 105 mm x 9 5 pulg 241 5 mm Capacidad de molienda 80 g Longitud del Cable Eléctrico 39 3 pulg 1 m BGAAUS Estados Unidos y Canadá solo para el hogar ESTE PRODUCTO ES PARA ESTADOS UNIDOS Y CANADÁ PARA EL HOGAR ÚNICAMENTE GUARDE ESTAS INSTRUCCIONES Mas información en Fellowproducts com odemanua...

Page 17: ... sumerja el cable el enchufe ni ninguna otra parte del molinillo en agua u otro líquido para proteger contra el riesgo de descarga eléctrica El uso de accesorios no recomendados o vendidos por el fabricante puede causar incendios descargas eléctricas o lesiones Use únicamente con corriente AC y el voltaje correcto Asegúrese de que su suministro principal eléctrico sea el mismo que el que está marc...

Page 18: ...nes más pequeños pueden causar un daño severo si se tragan Siempre mantenga los imanes de neodimio fuera del alcance de los niños Siempre mantenga una distancia segura de al menos 10 cm entre los imanes y cualquier objeto que pueda ser dañado por magnetismo recuerde que los imanes de neodimio son más fuertes que los imanes ordinarios Artículos tales como relojes mecánicos marcapasos cardiacos moni...

Page 19: ...el compartimiento de carga de una sola dosis levantándola 3 Vierta la cantidad contenida de granos de café enteros ya rostizados en el compartimiento de carga hasta un máximo de 80 g 2 8 oz Coloque la tapa Asegúrese que el atrapador esté directamente debajo de la tolva y que esté vacío No vaya a moler más de 80 g de café sin antes vaciar el atrapador El sobrellenar el atrapador puede trabar la mol...

Page 20: ...da dentro de la moledora Ajuste la configuración de la moledora a 11 y presione el botón de encendido para correr la moledora Muela todas las tabletas dentro del atrapador Una vez que esté complete recomendamos moler aproximadamente 30 g de café para remover cualquier residuo de tabletas Descarte las tabletas café molido del atrapador y limpie Los trabones mayores se pueden despejar de la siguient...

Page 21: ...ntilmente limpie el polvo de café de las cuchillas y reemplace las cuchillas Si usted está reemplazando las cuchillas continúe con los siguientes pasos 6 La cuchilla estacional está adjunta a la recámara de moler Para remover la cuchilla estacionaria empiece usando un desarmador tipo estrella Phillips para poder remover los tres tornillos que la sostienen en su lugar Si hay café molido en estos to...

Page 22: ...uste Para ver videos de cómo calibrar por favor vaya a la página Fellowproducts com odemanual Diagrama H Diagrama I Encuentre más información en Fellowproducts com odemanual Un año de garantía limitada Fellow garantiza este producto en contra de cualquier defecto que sea por una falta material o por mano de obra por un periodo de un año después de la fecha original de compra del consumidor Esta ga...

Page 23: ...Find more information at Fellowproducts com odemanual ...

Reviews: