background image

10

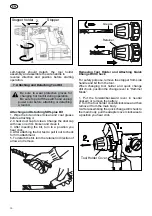
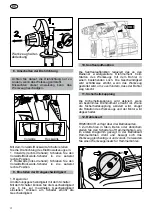
Instalación y extracción de brocas de sds-plus

1.  Limpie  y  engrase  ligeramente  la  punta  de  la 

broca de trabajo.

2.  Compruebe  que  la  tapa  protectora  de  polvo 

no  este  dañada,  si  esta  dañada  es  necesario 

cambiarla.

3. Coloque la broca de trabajo en el portabrocas 

y gire hasta el autobloqueo.

4. Compruebe que la broca esta firme.

5. Para extraer la broca gire el anillo de retención 

y extráigala.

Grasa

Anticipo


9. Cambio rápido de portabrocas

Por razones de seguridad, el cambio de 

broca de trabajo y portabrocas, es mejor 

realizarlo en modo de perforación.

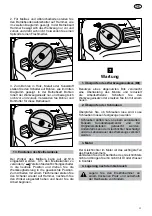
Para fines de seguridad, retire el tapón del mango 

lateral y la broca de la herramienta.

Al  cambiar  portaherramientas  de  cambio  rápido 

de broca y la posición de sujeción, la palanca de 

cambio en el «modo de martillo».

1.  Asegurese  que  la  llave  inversora  esta  en  la 

posición neutra o extraiga la batería.

2. Gire el anillo de retención en el sentido contrario 

a las agujas del reloj y retire el portabrocas del 

cuerpo de la herramienta.

3.  Coloque  el  portabrocas  girando  el  anillo 

retencion en sentido de las agujas del reloj hasta 

un clic. Asegúrese que el portabrocas esta firme.

Herramienta

Cubierta

Holder


10. Regulación de giro

Adelante

Espalda

Para cambiar la rotación es necesario apretar el 

botón inversor de marcha.

1.  Rotación  a  la  derecha:  Cambie  el  botón 

inversor a la izquerda hasta tope.

2.  Rotación  a  la  izquerda:  Cambie  el  botón 

inversor a la derecha hasta tope. 

Para  taladrar  con  percusión  o  cincelar,  poner 

siempre el modo de rotación a la derecha.

Summary of Contents for RH26/36CVR

Page 1: ...RH26 36CVR CORDLESS HAMMER DRILL ORIGINAL INSTRUCTION MANUAL To reduce the risk of injury user must read instruction manual ...

Page 2: ...nditions Water entering a power tool will increase the risk of electric shock d Do not abuse the cord Never use the cord for carrying pulling or unplugging the power tool Keep cord away from heat oil sharp edges or moving parts Damaged or entangled cords increase the risk of electric shock e When operating a power tool outdoors use an extension cord suitable for outdoor use Use of a cord suitable ...

Page 3: ...e when used with another battery pack b Use power tools only with specifically designated battery pack Use of any other battery packs may create a risk of injury and fire c When battery pack is not in use keep it away from other metal objects like paper clips coins keys nails screws or other small metal objects that can make a connection from one terminal to another Shorting the battery teminals t...

Page 4: ...er in the neutral position while you are changing or operating the tool Careless operating of the switch may cause a serious injury by the rotating part of the tool 2 Check before Use 1 The power source Observe correct main voltage The voltage of power source must agree with the voltage specified in the name plate Make sure the rated voltage in the electric drill and the battery are the same When ...

Page 5: ... 3 2 and EN 61000 3 3 Category II EN 60335 1 EN 60335 2 29 in compliance with the directives 2006 42 EC MD 2004 108 EC EMC 2006 95 EC LVD V volts n0 no load speed DC power min RPM revolutions per minute Hammer drill feature Drill feature Hammer feature Angle adjustment function Santiago López Jordi Carbonell ...

Page 6: ...evel LwA 89 dB A Uncertainty K dBA 3 dB 3 Vibration emission Vibration total values triaxial vector sum determined according to EN 60745 Chiselling Hammer mode Vibration emission value ah 7 5 m s Uncertainty K 1 5 m s Hammer drilling mode Vibration emission value ah 11 m s Uncertainty K 1 5 m s 4 The following information The declared vibration total value has been measured in accordance with a st...

Page 7: ...arge State Indicator Lamp Power Input Battery 36V End Cover Handle Trigger Switch Forward Backward Lever Change Lever Tool Holder Cover Stopper Retainer Side Handle Ventilator Opening Battery Level Indicator Battery Button Quick Change Drill Chuck Quick Change Cover Battery Charger F360 RH26 36CVR ...

Page 8: ...a long time can be used again after recharging Be careful not to make the terminals of the battery short Short circuit of battery may cause fire or explosion and serious injuries may be resulted in 2 Charging Status Indication Be sure to use only specified battery and charger If any other battery or charger than specified is used fire explosion charging failure or overheat may be caused 1 Charging...

Page 9: ...the stopper move into desired position When stopper is used boring to the extent as clearance between the drill bit and stopper is available 3 Turn the side handle clockwise and fix it such that stopper does not move 1 Attaching Set the forward backward level in neutral position locked Place the charged battery from under the handle of product and push it to its position until you hear two clicks ...

Page 10: ...d clean it 3 After inserting the bit turn to a position you hear click 4 After attaching the bit test to pull it out to check for firm attachment 5 To detach the bit turn the retainer in direction of arrow and remove Grease Retainer Removing Tool Holder and Attaching Quick Change Drill Chuck For safety purpose remove the stopper from side handle and bit from the tool When changing tool holder and ...

Page 11: ...the tool with bit on existing position of hole It also features gradual speeding up after the tool is started to prevent the bit off its working position 11 Safety Clutch Safety Clutch feature is activated when a specified torque level is reached When Safety Clutch feature is activated revolution of bit stops and motor released 12 Operating Mode RH26 36CVR has three operating modes 1 To drill into...

Page 12: ...treated as household waste Instead it shall be handed over to the applicable collection point for the recycling of electrical and electronic equipment By ensuring this product is disposed of correctly you will help prevent potential negative consequences for the environment and human health which could otherwise be caused by inappropriate waste handling of this product The recycling of materials w...

Page 13: ...RH26 36CVR TALADRO MARTILLO INALÁMBRICO MANUAL DE USO El usuario debe leer este manual de instrucciones para reducir el riesgo de lesión ...

Page 14: ...alida Nunca modifique el enchufe de ninguna manera No utilice ningún adaptador de enchufe con herramientas eléctricas con toma de tierra a tierra Las tomas sin modificar y las salidas correspondientes reducen el riesgo de descarga eléctrica b Evite el contacto corporal con superfi cies conectadas a tierra tales como tuberías radiadores estufas y refrigeradores Hay un riesgo de descarga eléctrica s...

Page 15: ...siones graves No toque con los dedos y las manos la broca durante la operación Cuando los dedos y las manos tocan la broca o quedan atrapados en ella pueden herirse gravemente No deje la herramienta en funcionamiento Otros operadores cerca de usted pueden resultar heridos Coloque la palanca de avance retroceso en posición neutral mientras esté cambiando la herramienta o trabajando con ella Un func...

Page 16: ...eclaración de conformidad a la CE V voltios n0 velocidad sin carga c orriente continua min revoluciones por minuto f unción martillo perforador función perforador función martillo función ajuste del ángulo EN60745 1 2009 EN60745 2 6 2010 EN 60335 1 EN 60335 2 29 EN5014 1 2006 A1 EN55014 2 1997 A1 A2 EN61000 3 3 2 2006 A1 A2 EN61000 3 3 2008 de acuerdo con las directivas 2006 42 CEE 2006 95 CEE 200...

Page 17: ...e la batería puede dañar el interruptor Ademas cambiando el sentido de la rotacion puede provocar una situacion peligrosa 4 Arranque de prueba Antes de efectuar trabajos con la herramienta es necesario realizar un arranque de prueba 3 Especifi caciones y lista de contenidos 1 Especificaciones Modelo RH26 36CVR Herramienta Voltaje V 36 Velocidad en vacio min Rotación a la derecha 0 1150 Rotación a ...

Page 18: ...odo de taladro a percusión Aceleración de vibración ah m s2 11 Error de medición posible k m s2 1 5 Las indicaciones suministradas se midieron con método estándar segun la norma EN60745 y se pueden utilizar para comparar una herramienta con otra 4 ATENCION A la hora de utilizar la herramienta los parametros de vibración pueden diferenciarse de los valores indicados Dependiendo de la manera en que ...

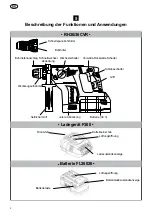
Page 19: ...or de percusión y giro Casquillo de enclavamiento Tope de profundidad Caperuza antipolvo Empuñadura adicional zona de agarre aislada Ventilación de apertura Indicador de carga de bateria Botón de extracción del acumulador Portabrocas intercambiable de cierre rápido RH26 36CVR Selector de sentido de giro Cargador de baterías F360 Bateria FL36026 5 Descripción de las funciones y aplicaciones ...

Page 20: ...ransportar o guardar la herramienta es necesario poner la llave adelante atras en la posición neutra Perforación en el hormigón Percusión en el hormigón Perforar agujeros para tornillos de anclaje Cincelado Ejemplo de uso La instalación de sistemas refrigeración calefacción tuberías de agua y drenaje instalaciones de estructuras metálicas instalaciones eléctricas etc 6 Instrucciones de operación 1...

Page 21: ...ambio de la broca asegúrese que el interruptor esta apagado 4 Indicación de nivel de carga de batería 1 2 3 4 Para comprobar el nivel de la batería es necesario apretar el botón ON 1 66 100 LED 3 diodo luminoso 2 33 66 LED 2 diodo luminoso 3 5 33 LED 1 diodo luminoso 4 Menos 5 LED 1 diodo luminoso parpade 5 Funciones de la iluminación auxiliar 1 Al pulsar el botón de la iluminación auxiliar el LED...

Page 22: ...portaherramientas de cambio rápido de broca y la posición de sujeción la palanca de cambio en el modo de martillo 1 Asegurese que la llave inversora esta en la posición neutra o extraiga la batería 2 Gire el anillo de retención en el sentido contrario a las agujas del reloj y retire el portabrocas del cuerpo de la herramienta 3 Coloque el portabrocas girando el anillo retencion en sentido de las a...

Page 23: ...e acciona el embrague de seguridad Cuando el embrague de seguridad es accionado el motor se desconecta y la rotación de la broca se termina Debido a las fuerzas resultantes en este caso sujetar siempre la herramineta de forma segura con ambas manos y ademas mantener una posición estable En caso de bloqueo de la herramienta apáguela y extráigala del material trabajado 15 Modos de funcionamiento Con...

Page 24: ...naturales Para obtener una información más detallada sobre el reciclaje de este producto consulte a la oficina de representación local de la compañía al servicio de reciclaje de residuos o a la tienda donde usted haya adquirido el producto 3 Posición para perforar a percusión en concreto o piedra 4 Posición para cambiar funcionamiento de cincel 7 Servicios técnicos y mantenimiento Antes de empezar...

Page 25: ...RH26 36CVR Um das Verletzungs risiko zu reduzieren muss der Benutzer diese Bedienungsan leitung lesen ORIGINAL DE BEDIENUNGSANLEITUNG AKKU BOHRHAMMER ...

Page 26: ...difizieren Sie den Stecker nie und in keiner Weise Verwenden Sie keine AdaptersteckermitgeerdetenElektrowerkzeugen Nicht modifizierte Stecker und passende Steckdosen reduzieren das Risiko eines Elektroschocks b Vermeiden Sie Körperkontakt mit geerdeten Oberflächen wie z B Rohren Heizkörpern und Kühlschränken Wenn Ihr Körper geerdet ist besteht ein erhöhtes Risiko eines Elektroschocks c Halten Sie ...

Page 27: ...or Sie Einstellungen vornehmen Zubehör wechseln oder das Elektrowerkzeug lagern Solche vorbeugenden Sicherheitsmaßnahmen verringern das Risiko dass das Elektrowerkzeug versehentlich startet d Lagern Sie nicht in Gebrauch befindliche Elektrowerkzeuge außerhalb der Reichweite von Kindern und erlauben Sie Personen die nicht mit dem Gebrauch von Elektrowerkzeugen oder dieser Bedienungsanleitung vertra...

Page 28: ...ende Teil des Werkzeugs verursachen Stellen Sie sicher dass die Batterie fest mit dem Werkzeug verbunden ist bevor Sie mit der Arbeit beginnen Wenn die Batterie nicht fest mit dem Werkzeug verbunden ist kann Sie während des Betriebs he rausfallen und eine Verletzung an Ihrer Fußober seite verursachen Laden Sie nur von Felisatti zugelassene Batte rien Andere Batterien können explodieren und Persone...

Page 29: ...Hammerbohren Bohren Meißeln Meißelwinkeleinstellung We reserve the right to make technical changes 01 2012 Santiago López Jordi Carbonell EN 60745 1 EN 60745 2 6 EN 55014 1 EN 55014 2 EN 60335 1 EN 60335 2 29 EN 61000 3 2 and EN 61000 3 3 2006 42 EC MD 2004 108 EC EMC 2006 95 EC LVD ...

Page 30: ...den Schalter beschädigen Ebenso kann die Umkehrung der Drehrichtung eine gefährliche Situation verursachen 4 Testlauf Überprüfen Sie das Werkzeug mit einem Testlauf Achten Sie dabei darauf dass rotierende Teile nicht auf Personen gerichtet sind Erklärung sämtlicher für sicheren Gebrauch des Werkzeugs wichtiger Symbole und Piktogramme 3 Technische Merkmale und Lieferumfang 1 Technische Merkmale Mod...

Page 31: ...r angegebene absolute Vibrationswert wurde in Übereinstimmung mit einer in EN 60745 beschriebenen Standardtestmethode ermittelt und kann zum Vergleichen eines Werkzeugs mit einem anderen verwendet werden Der angegebene absolute Vibrationswert kann auch in einer vorläufigen Beurteilung verwendet werden 5 Warnung Je nachdem wie das Werkzeug eingesetzt wird kann die Vibrationsemission während des tat...

Page 32: ...hr Batterie 36 V untere Abdeckung Griff Schiebeschalter Vorwärts Rückwärts Schalter Wechselschalter Schnellwechsel abdeckung Bohrtiefenanschlag Werkzeugaufnahme Seitlicher Griff Lüftungsöffnung Batterieladezustandsanzeige Batterietaste Schnellspannbohrfutter Bohrfutter RH26 36CVR Ladegerät F360 Batterie FL36026 ...

Page 33: ...erden Achten Sie darauf die beiden Batteriepole nicht miteinander kurz zu schließen Kurzschließen der Batteriepole kann Feuer oder eine Explosion verursachen und zu ernsthaften Verletzungen führen 2 Ladezustandsanzeige Achten Sie darauf nur zugelassene Batterien und Ladegeräte zu verwenden Verwenden anderer Batterien kann Feuer eine Explosion Ladefehler oder Überhitzung verursachen 1 Ladezustandsa...

Page 34: ... Arbeitslicht ist sehr praktisch speziell wenn Sie an einer dunklen Stelle arbeiten 2 Drücken Sie die Lichttaste mit der Pfeilmarkierung um das Licht einzuschalten und drücken Sie die Lichttaste erneut um das Licht wieder auszuschalten Das Arbeitslicht schaltet sich 1 Minuten nachdem es eingeschaltet wurde automatisch wieder aus 6 Montage von seitlichem Griff und Bohrtiefenanschlag Es empfiehlt si...

Page 35: ...e den Werkzeugeinsatz und tragen Sie etwas Fett auf bevor Sie ihn einsetzen 2 Prüfen Sie dass die Staubabdeckung sauber ist Reinigen Sie die Staubabdeckung regelmäßig und ersetzen Sie sie wenn sie beschädigt ist 3 Drehen Sie den Werkzeugeinsatz nach dem Einsetzen bis Sie einen Klick hören 4 Prüfen Sie durch Ziehen dass der Werkzeugeinsatz fest im Werkzeug sitzt 5 Um den Werkzeugeinsatz zu entnehme...

Page 36: ...einstellen Drücken am Schalter erhöht die Geschwindigkeit 10 Sanftanlauffunktion Die Sanftanlauffunktion reduziert das an den Bediener weitergeleitete Drehmoment beim Starten des Werkzeugs mit dem Bohrer in einem bestehenden Loch Die Geschwindigkeit wird schrittweise erhöht wenn das Werkzeug gestartet wird um zu verhindern dass der Bohrer weg rutscht 11 Sicherheitskupplung Die Sicherheitskupplung ...

Page 37: ...m Flachmeißel stellen Sie den Schalter wieder auf Hammer nachdem Sie den Winkel eingestellt haben und bevor Sie die Arbeit beginnen 7 Wartung 1 Überprüfen des Werkzeugeinsatzes Bit Benutzen eines abgenutzten Bits verursacht eine Überlastung des Motors und reduziert die Arbeitseffizienz Schärfen Sie den Werkzeugeinsatz oder ersetzen Sie ihn mit einem neuen 2 Überprüfen der Schrauben Überprüfen Sie ...

Page 38: ...en der Kohlebürsten Der Motor verwendet sich abnutzende Kohlebürsten Wenn die Kohlebürsten zu sehr abgenutzt sind wird das Werkzeug automatisch anhalten Ersetzen Sie in diesem Fall die Kohlebürsten Der Austausch muss mit Originalersatzteilen von einem Felisatti Kundendienstcenter erfolgen Andernfalls kann der Gleichrichter schnell abgenutzt werden und die Lebensdauer des Werkzeugs verkürzen ...

Page 39: ...RH26 36CVR MARTEAU PERFORATEUR SANS FIL MODE FR D EMPLOI ORIGINAL Afin de réduire les risques de blessures l utilisateur doit lire attentivement ce mode d emploi ...

Page 40: ...rs de l utilisation de l outil électroportatif Les distractions peuvent vous faire perdre la maîtrise de l outil 2 Sécurité en matière d électricité a Les fiches électriques des outils électroportatifs doivent s adapter parfaitement au prises de courant Ne modifiez jamais la fiche de quelque façon que ce soit N utilisez aucun adaptateur de fiche sur les outils électroportatifs avec mise à la terre...

Page 41: ...portatif adéquat et le respect du régime pour lequel il a été conçu vous permettra de réaliser un travail de meilleure qualité et de façon plus sûre b N utilisez pas l outil électroportatif s il vous est impossible d actionner son interrupteur de marche à arrêt et vice versa Un outil électroportatif dont l interrupteur est défectueux et ne peut pas être contrôlé représente un danger et doit être r...

Page 42: ...nt près de vous peuvent être blessés Lorsque vous utilisez ou changez l outil veuillez positionnez le sélecteur de sens de rotation avant arrière en position neutre Une utilisation inadéquate du sélecteur peut occasionner de graves blessures causées par les pièces rotatives de l outil Assurez vous que la batterie soit fermement fixée avant d utiliser l outil électroportatif Si la batterie n est pa...

Page 43: ...gle We reserve the right to make technical changes 01 2012 Santiago López Jordi Carbonell Nous déclarons que le produit est conforme aux normes suivantesEN 60745 1 EN 60745 2 1 EN 60335 1 EN 60335 2 29 EN 55014 1 EN 55014 2 EN 61000 3 2 and EN 61000 3 3 Catégorie II EN 60335 1 EN 60335 2 29 En conformité avec les directives 2006 42 EC MD 2004 108 EC EMC 2006 95 EC LVD ...

Page 44: ... l interrupteur De plus l inversement du sens de rotation pourrait vous amener à vous trouvez dans une situation dangereuse 4 Essai d utilisation Avant de commencer à travailler faites un essai de l outil Tout en évitant de pointer l outil vers d autres personnes Explication des symboles ou pictogrammes présents sur l outil pour une utilisation sûre 3 Spécifications et liste des élé ments inclus 1...

Page 45: ...té cal culée conformément à un test standard décrit dans la norme EN 60745 et peut servir de compa raison entre différents outils Les valeurs totales de vibrations indiquées peuvent également être utilisées pour une esti mation préliminaire de l émission vibratoire 5 Attention L émission vibratoire durant l utilisation de l outil électroportatif peut différer des valeurs totales in diquées selon l...

Page 46: ...ux de niveau de charge Entrée d alimentation Batterie 36V Coiffe arrière Poignée Interrupteur gâchette Sélecteur Avant Arrière Sélecteur de fonction Couvercle mandrin Tige de profondeur Arrêtoir Poignée latérale Ouvertures du Ventilateur Indicateur de niveau de Batterie Bouton de Batterie Mandrin à changement rapide Couvercle de mandrin à changement rapide ...

Page 47: ...es après une charge complète Prenez soin de ne pas court circuiter les bornes de la batterie Le court circuit de la batterie peut provoquer un incendie ou bien une explosion et entraîner de graves blessures 2 Niveau de charge de la batterie Utilisez uniquement la batterie et le chargeur spécifiés Dans le cas contraire la batterie peut se voir affectée par une erreur de charge prendre feu exploser ...

Page 48: ...ampe La lampe de travail s éteindra automatiquement après 10 minutes de fonctionnement 6 Montage de la poignée latérale et Réglage de profondeur Avant d utiliser l outil lorsque vous allez procéder à une perforation sur béton assurez vous pour votre sécurité de fixer la poignée latérale Pour une utilisation commode de l outil il est pré férable de monter la poignée latérale sur le de vant de l out...

Page 49: ...ermement fixé en tirant dessus 5 Pour retirer l embout de travail faites tourner le mandrin dans le sens de la flèche et retirer l em bout Graisse Mandrin Retirer le Mandrin et Mise en Place d un Man drin à changement Rapide Pour des raisons de sécurité assurez vous de retirer la tige de profondeur et l embout de travail Pour procéder au changement du mandrin et du mandrin à changement rapide posi...

Page 50: ...le de la vitesse une fois l outil démarré afin d éviter que le foret ne sorte de son emplacement de perforation 11 Embrayage de sécurité L embrayage de sécurité s active lorsqu un cer tain niveau de couple est atteint Lorsque l em brayage automatique s active la rotation du foret est stoppée et le moteur relâché 12 Modes d opération Le RH26 36CVR intègre trois modes d opération 1 Pour perforer la ...

Page 51: ...atti A S et les pièces de rechanges doivent êtres des pièces originales Dans le cas contraire le commutateur peut se voir affecté par une usure prématurée et réduire la durée de vie de vos outils 3 Assemblage du moteur Le commutateur est le noyau central de l assem blage du moteur du marteau perforateur Veillez à ne jamais détériorer le commutateur et ne versez jamais d huile ou d eau sur celui ci...

Page 52: ... remis à un point de collecte approprié pour le recyclage des équipements électriques et électroniques En vous assurant que ce produit est bien mis au rebut de manière appropriée vous aiderez à prévenir les conséquences négatives potentielles pour l environnement et la santé humaine Le recyclage des matériaux aidera à préserver les ressources naturelles Pour plus d information supplémentaire au su...

Page 53: ...RH26 36CVR MARTELLO PERFORATORE A BATTERIA MANUALE DI ISTRUZIONI IT ORIGINALE Per ridurre il rischio di infortuni l utente deve leggere il manuale di istruzioni ...

Page 54: ... superfici collegate a terra o a massa come tubi radiatori fornelli o frigoriferi Il rischio di folgorazione aumenta se il corpo è collegato a terra o a massa c Non esporre le macchine utensili alla pioggia o ad ambienti umidi L ingresso di acqua nella macchina utensile aumenta il rischio di folgorazione d Non maltrattare il cavo Non usare il cavo per trasportare tirare o staccare la spina della m...

Page 55: ...nsili Se danneggiato far riparare l utensile prima dell uso Molti incidenti sono provocati da macchine utensili in cattivo stato f Mantenere gli utensili da taglio affilati e puliti Gli utensili da taglio con bordi affilati che sono tenuti in buone condizioni non tendono al grippaggio e sono più facili da controllare g Usare le macchine utensili gli accessori e le parti ecc seguendo le presenti is...

Page 56: ...chio di shock elettrico folgorazione o incendio Gli accessori potrebbero essere caldi dopo un uso prolungato Durante la rimozione della punta dall utensile evitare il contatto con la pelle e usa re dei guanti protettivi adatti per afferrare la punta o l accessorio Usare esclusivamente il caricabatterie e la batteria progettati per gli utensili Felisatti Se il caricabatterie e la batteria non sono ...

Page 57: ...014 1 EN 55014 2 EN 61000 3 2 e EN 61000 3 3 Categoria II EN 60335 1 EN 60335 2 29 conformemente alle normative delle direttive 2006 42 EC MD 2004 108 EC EMC 2006 95 EC LVD V volt n0 velocità a vuoto Alimentazione CC min giri al minuto Funzione martello perforatore Funzione trapano Funzione martello Funzione regolazione angolo Santiago López Jordi Carbonell ...

Page 58: ...terruttore Inoltre l inversione della direzione di rotazione può provocare una situazione pericolosa 4 Giro di prova Controllare l utensile eseguendo un giro di prova con la mola abrasiva girata in una posizione senza persone Spiegazione dei simboli e delle icone sull utensile e utili per l uso sicuro 3 Specifi che tecniche ed Elenco dei contenuti 1 Specifi che tecniche Modello SD10 8L2 Utensile T...

Page 59: ...valore totale delle vibrazioni dichiarato è stato misurato con il metodo di misurazione standardizzato in conformità con EN60745 e può essere usato per eseguire il confronto tra più utensili Il valore totale delle vibrazioni dichiarato può anche essere usato per una valutazione preliminare dell esposizione 5 Avvertenze L emissione di vibrazioni durante l uso eff ettivo della macchina utensile può ...

Page 60: ...i caricamento Alimentazione di ingresso Batteria 36V Copertura inferiore Manico Interruttore di innesco Leva avanti indietro Leva di cambio Copertura portautensile Dispositivo di arresto Dispositivo di tenuta Manico laterale Apertura di ventilazione Indicatore livello batteria Pulsante della batteria Mandrino a sostituzione rapida Copertura a sostituzione rapida ...

Page 61: ...curarsi di non causare il cortocircuito dei terminali della batteria Il cortocircuito della batteria può causare incendi o esplosioni e provocare lesioni gravi 2 Indicazione dello stato di caricamento Assicurarsi di usare solo batterie e caricabatterie originali Sevengonousatibatterieecaricabatterie diversi da quelli consigliati potrebbero verificarsi incendi esplosioni guasti durante il caricamen...

Page 62: ...co laterale e regolazione del dispositivo di arresto Prima di avviare l utensile durante le operazioni di perforazione di cemento e pietra assicurarsi di collegare il manico laterale per questioni di sicurezza Per comodità durante il funzionamento montare il manico laterale sulla parte anteriore dell utensile ed eseguire l operazione Montaggio del manico laterale 1 Impostare la leva avanti indietr...

Page 63: ... aver collegato bene la punta tiran dola verso l esterno 5 Per scollegare la punta ruotare il dispositivo di tenuta nella direzione della freccia e rimuovere Lubrificante Dispositivo di tenuta Rimozione del portautensile e connessione del mandrino a sostituzione rapida Per questioni di sicurezza smontare il dispositivo di arresto dal manico laterale e la punta dall uten sile Durante la sostituzion...

Page 64: ...za La funzione frizione di sicurezza è attivata quan do viene raggiunto un livello di coppia specifico Quando la funzione frizione di sicurezza è attiva ta la rotazione della punta si arresta e il motore viene bloccato 12 Modalità di funzionamento Il modello RH26 36CVR dispone di tre modalità di funzionamento 1 Per perforare pietra cemento e altri materiali simili posizionare la leva di cambio in ...

Page 65: ... La sostituzione di una vite deve essere eseguita con parti di ricambio originali presso un centro di assistenza autorizzato da Felisatti In caso contrario il collettore potrebbe usurarsi rapidamente accorciando la durata dell utensile 3 Gruppo del motore Il collettore del gruppo del motore è il nucleo del martello Prestare attenzione a non graffiare la superficie del collettore o farla entrare in...

Page 66: ...t for the recycling of electrical and electronic equipment By ensuring this product is disposed of correctly you will help prevent potential negative consequences for the environment and human health which could otherwise be caused by inappropriate waste handling of this product The recycling of materials will help to conserve natural resources For more detailed information about recycling of this...

Page 67: ...RH26 36CVR Чтобы уменьшить риски пользователь должен прочитать данную инструкцию по эксплуатации ПЕРФОРАТОР РУЧНОЙ ЭЛЕКТРИЧЕСКИЙ АККУМУЛЯТОРНЫЙ ...

Page 68: ...е подпускайте детей и посторонних лиц к электрической машине в процессе её работы Отвлечение внимания может привес ти Вас к потере контроля над машиной 2 Электрическая безопасность а Штепсельные вилки электрических машин зарядных устройств должны под ходить под розетки Никогда не изменяйте конструкцию штепсельной вилки каким либо образом Не используйте каких либо переход ников для машин с заземляю...

Page 69: ...а рассчитана b Не используйте электрическую ма шину если ее выключатель неисправен не включает или не выключает Любая элек трическая машина которая не может управ ляться с помощью выключателя представляет опасность и подлежит ремонту с Отсоедините вилку от источника пи тания и или аккумуляторную батарею от электрической машины перед выполне нием каких либо регулировок заменой принадлежностей или п...

Page 70: ...пасность вашей машины 2 УКАЗАНИЕ МЕР БЕЗОПАСНОСТИ ДЛЯ АККУМУЛЯТОРНЫХ ПЕРФО РАТОРОВ a При работе с ударными машина ми необходимо использовать средства защиты органов слуха Воздействие шума может привести к потере слуха b Удерживайте машину за изолирован ные поверхности захвата если рабочий ин струмент при работе может прикоснуться к скрытой проводке При их прикосновении к находящемуся под напряжени...

Page 71: ...оянный ток Только сверление Положение для ударного бурения Положение для долбления Положение для изменения поворота зубила II класс защиты n0 Скорость вращения без нагрузки min Число оборотов в минуту Переменный ток Сведения о сертификации Машина имеет сертификат соответствия тре бованиям технического регламента О без опасности машин и оборудования Сертификат соответствия C ES ME77 B 00879 выдан 0...

Page 72: ...апряжение источника питания должно соот ветствовать напряжению указанному на мар кировочной табличке Убедитесь что номинальное напряжение ма шины и батареи одинаковы При номинальном напряжении батареи выше чем у инструмента двигатель может быть по врежден 2 Подключение батареи Убедитесь что батарея установлена правиль но прежде чем использовать машину Прежде чем приступать к работе убе дитесь в то...

Page 73: ...тичное значение корректированного виброускорения ah w 11 м с Неопределенность К 1 5 м с 4 Заявленная вибрационная характеристи ка может служить для сравнения разных моде лей машин одного вида и использоваться для предварительной оценки степени воздействия вибрации на оператора 5 Предупреждение Уровень вибрации при реальном использо вании машины может отличаться от заявлен ного суммарного значения ...

Page 74: ...8 RH26 36CRV 6 ...

Page 75: ...арея пере грета ожидание Мигающий желтый зарядка невоз можна Не забудьте отключить зарядное устройство по за вершению зарядки 2 Применение 1 Перфоратор ручной электриче ский аккумуляторный далее по тексту машина предназначен для бурения отверстий пробивания штроб и борозд в бетоне камне кирпиче и сверления отверстий в различных конструкционных материалах Машина предназначена для бытового и промышл...

Page 76: ...е бата рею назад При снятии установки батареи а также во время транспортировки и хранении необхо димо перевести кнопку реверса в нейтраль ное положение 4 Состояние заряда батареи Для проверки уровня заряда батареи необхо димо нажать кнопку ON 1 66 100 LED 3 светодиода 2 33 66 LED 2 светодиода 3 5 33 LED 1 светодиод 4 Менее 5 LED 1 светодиод мигает 1 2 3 4 5 Функция подсветки 1 При нажатии кнопки п...

Page 77: ...ровать ограни читель 2 1 3 Ограничитель глубины 7 Установка и замена инструмента Обязательно одевайте защитные перчатки во время работы и замены инструмента Перед тем как приступить к замене инструмента убедитесь что выключатель находится в вы ключенном положении 8 Установка и снятие бит SDS plus 1 Очистите и слегка смажьте конец рабочего инструмента 2 Проверьте пылезащитный колпачок на на личие п...

Page 78: ... оборотов ударов осуществ ляется с помощью усилия нажатия кнопки вы ключателя Легкое нажатие на выключатель включает низкое число оборотов и ударов С увеличением силы нажатия число оборотов и ударов увеличивается 12 Плавный пуск Машина оборудована блоком плавного пуска Он позволяет обеспечить постепенное уско рение рабочего инструмента чтобы предо твратить закусывание инструмента во время работы 1...

Page 79: ...ость травмирования Для обеспечения качественной и безопасной работы следует постоянно содержать машину и вентиляционные прорези в чистоте Поврежденный защитный колпачок немед ленно заменить Это рекомендуется выпол нять силами сервисной мастерской По мере необходимости в случае снижения производительности при нормальных усилиях подачи затачивайте рабочий инструмент или меняйте его на новый Очищайте...

Page 80: ...ой темпе ратуре окружающей среды но не выше 40 С и относительной влажности воздуха не более 80 Храните и перевозите машину в фирменной упаковке пластмассовом футляре Перед упаковкой снимите аккумуляторную батарею Утилизация отслужившего электрического и электронного оборудования директива применяется в странах Евросоюза и других европейских странах где действуют системы раздельного сбора отходов Д...

Page 81: ...Interskol Power Tools S L Carretera de Sant Joan de les Abadesses s n17500 RIPOLL Girona SPAIN Tel 34972700200 Fax 34972700554 ...

Reviews: