background image

www.feiyu-tech.com

26

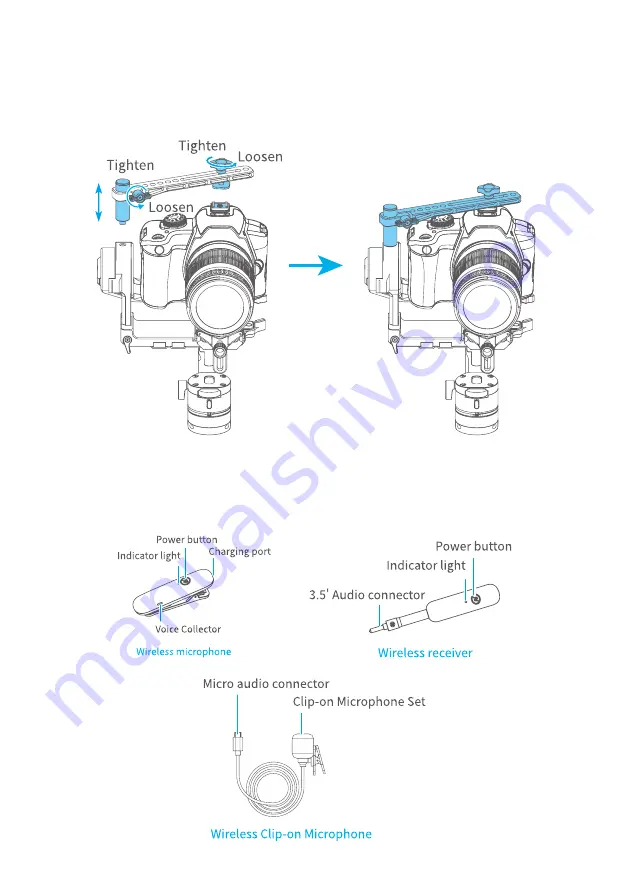
5.6 Multifunctional Bracket

To extra stabilize the camera by mounting it on top of camera and tilt axis. The 

bracket can be used an extension plate for mounting other accessories on it.

5.7 Wireless MIC Kit

The receiver transmitter can collect the sound from the transmitter within 20m 

range.


Summary of Contents for AK2000S

Page 1: ...3 Axis Stabilized Handheld Gimbal for Camera Instruction EN V 1 1 ...

Page 2: ...Screen 13 3 5 Modes Setting 14 3 6 Motion timelapse Mode 17 3 7 Initialization 19 3 8 Manual Lock 20 4 Feiyu ON App 21 4 1 Download the Feiyu ON App 21 4 2 App Connecting 21 4 3 Firmware Upgrade 22 5 Accessories 23 5 1 Tripod 23 5 2 Versatile Arm 23 5 3 Brushless Follow Focus 24 5 4 Hyperlink Remote Controller 24 5 5 Extension Rod 25 5 6 Multifunctional Bracket 26 5 7 Wireless MIC Kit 26 6 Specifi...

Page 3: ...witch the gimbal working mode control the rotation and the parameters setting by one hand The camera shutter cable is equipped for controlling the photography video recording and focus following directly at handle Suggestion Feiyu AK2000S includes below information please read the information before using the gimbal 1 Quick start guide 2 Online instruction 3 Tutorial The tutorial videos can be wat...

Page 4: ...www feiyu tech com 2 1 Product Overview This product does not include the camera ...

Page 5: ...www feiyu tech com 3 ...

Page 6: ...he gimbal 2 1 Charging Please fully charge the battery before power on the gimbal for the first time Open the USB rubber cover Connect the USB 2 0 to Type C C01 cable to charge Quick charge is available It takes only 1 5 hour to fully charge 2 2 Position Lock Each rotating axis has a position lock for convenient balancing and storage Be sure to unlock the position locks before using the gimbal ...

Page 7: ...late on fixed plate lock it Loosen the ARCA quick release plate safety lock take out ARCA quick release plate Step 2 Mount camera on ARCA quick release plate Step 3 Insert ARCA quick release plate directly into quick release plate tighten the safety lock for ARCA quick release plate Step 4 Install lens holder to support lens and tighten the thumb screw ...

Page 8: ... are all powered off 3 If it is needed to add accessories after the balance is completed gimbal needs to be re balanced again 2 4 1 Balance Tilt Axis 1 a Unlock the tilt axis position lock turn the camera lens upwards and check the gravity center of camera b Loosen the sliding arm lock screw slide the sliding arm to balance the camera c Tighten the sliding arm lock screw when the camera lens keeps...

Page 9: ...ilt the camera to the left or right if it stays stable it means balanced 2 4 3 Balance Pan Axis a Tighten the roll axis position lock after balanced tilt axis and roll axis Unlock pan axis position lock loosen vertical arm lock screw b Hold the handle aslant to 15 20 check the camera s movement Roll axis will point down if not balanced c Slide vertical arm to balance it until the camera stays ther...

Page 10: ... Default mode The roll and tilt direction are fixed and the camera moves according to the left right movements of the user s hand Follow Mode The roll direction is fixed and the camera moves according to the left right or up down movements of the user s hand All follow Mode The camera moves according to the user s hand Lock Mode The orientation of the camera is fixed Reset Return to Pan Mode 3 axi...

Page 11: ...It can set rotation route and time Inception Mode Single tap Inception menu on screen setting rotate speed and direction on the screen directly Selfie Mode The camera turns 180 horizontally selfie shooting is available Protrait Mode Single tap Portrait menu on screen to enter portrait mode for livestream Tiktok To get more videography skills with gimbal and it s tutorial please kindly visit our of...

Page 12: ...r Button 2stages way press half way press full way press 1 Focus Single tap half way press 2 Photography Full way press after focusing 3 Video recording Single tap fully tap start stop 4 Continuous shooting Long press for 5 seconds fully press after beep sound Tap again to exit default shoot 1 time every 5 seconds 3 2 3 Function button operation Button Function Description Function Button Photogra...

Page 13: ...ove to left 4 Camera lens move to right select the option on the right on display Move to right 3 2 5 Power button Button Function Description Power Button 1 Power ON OFF Long press 2 Lock unlock screen go back to home page Set up the display Single tap 3 Standby mode Double tap 4 Awaken the gimbal Single tap at standby mode 3 2 6 Trigger button Button Function Description Trigger Button 1 Follow ...

Page 14: ...ween follow Focus Zoom Long press to switch 3 Switch axis rotate among Tilt Roll Pan Axis Single tap to switch under the control of the axis direction mode 4 Switch between Follow Focus Zoom Single tap to switch under the control of the follow focus or zoom mode 3 3 USB Port There are USB2 0 and Type C port at the fixed plate which enable to connect to camera follow focus and other devices ...

Page 15: ...Photography All Lock Mode Camera Unconnected Pan Mode Video Recording Mode Follow Mode Wifi Connected All Follow Mode Wifi Unconnected Tilt Axis Enabled Multi function Knob Dnabled Roll Axis Enabled Multi function Knob Disabled Pan Axis Enabled Zoom Status Battery Level Follow Focus Status ...

Page 16: ...4 4 Lock unlock screen 3 5 Modes Setting Slide right to left Slide left to right Tap to select current menu 3 5 1 Inception Mode setting Single tap Inception Mode on screen the camera lens will rotate to upward Holding the gimbal horizontally and set rotation direction speed one circle or continuous circle The camera will automatically rotate 360 degree to take inception footage with pre set speed...

Page 17: ...melapse mode setting Please refer to the Motion Timelapse Mode chapter 3 5 3 Protrait setting Holding the gimbal horizontally tap Portrait on screen to enter protrait shooting 3 5 4 Other setting Set motor power according to camera weight ...

Page 18: ...www feiyu tech com 16 Set scene modes according to camera function Higher sensitivity gives faster reaction of gimbal camera System setting ...

Page 19: ...r setting The maximum interval time is 59 seconds while maximum staying time for long exposure photograhy is 58 seconds Note The photographing interval setting must be longer than the stop time and less than the panning or the tilting rotation time Method 2 Set the Motion timelapse mode parameters by entering the Motion Timelapse interface on screen Operate with joystick to set up time setting par...

Page 20: ...tilt axis to rotate from the start point to the end point INVL The time between the end of the previous shooting and the end of the next shooting DWELL Gimbal staying time after sending a photographing command for long exposure T1 T2 t P 3 6 2 Route setting 1 Enter Route setting interface under Motion timelapse menu 2 Set the start position Rotate the pan or tilt axis to a desired position hold on...

Page 21: ...and then tilt and pan axis will start to rotate according to the parameter that has been set To get more videography skills with gimbal and it s tutorial please kindly visit our official or download Feiyu ON App http www feiyu tech com 3 7 Initialization Initialization the gimbal when 1 The camera is not in balance 2 Not use for a long period of time ...

Page 22: ...cally initializes If the touch screen prompts that the calibration is successful the initialization ends otherwise the initialization fails 3 After the initialization is successful slide the touch screen interface to the left right or click the ESC on the screen to wake up 3 8 Manual Lock Manually move camera to desired position and hold for half a second New tilt and or pan positions are automati...

Page 23: ...s password on 3 Login Feiyu ON App or register 4 The App will search around the enable devices It will show connect successful the connection is done if not please exit and reconnect again 5 Tap connect to camera on the App select the right camera model in the list 6 Select wifi name which get on step 2 in the camera model list on App input the password Most of the function can be achieved on App ...

Page 24: ...update or newly add gimbal control function parameter and etc LED icons update Repair or update the icons in the screen Support for AK series gimbal only USB Hub update Repair update or newly add control cameras follow focus through USB cable repair the bugs about camera control and etc Support for AK4500 AK2000S only Noted Gimbal has an update protection function When the update fails restart the...

Page 25: ...essory 5 1 Tripod AK2000S is equiped with 1 4 inch thread hole and 3 8 inch thread hole to mount all type of Tripod for standing shooting 5 2 Versatile Arm Installation Install the versatile arm on the handle align screw holes and tighten the screws by L shape wrench it is attached on versatile arm the end cover of the versatile arm can be removed and keeps 3 screws inside ...

Page 26: ... II fear and the lens grar engage and lock the fixed thumb screw on the fixed bracket Insert the USB cable into the USB port on the fixed plate installation is completed 5 4 Hyperlink Remote Controller Steps to connect to gimbal 1 Powering on AK2000S and remote controller 2 Tap setting menu on remote controller screen select bluetooth connection and connect it 3 After successful connection the fun...

Page 27: ...ww feiyu tech com 25 Notice The function of horizontal adjustment button is disable for AK2000S 5 5 Extension Rod It can be used as a mini crane or take the footage of emulating flying at a low altitude ...

Page 28: ...tra stabilize the camera by mounting it on top of camera and tilt axis The bracket can be used an extension plate for mounting other accessories on it 5 7 Wireless MIC Kit The receiver transmitter can collect the sound from the transmitter within 20m range ...

Page 29: ...l after it connected to camera via USB cable 2 Plug in the wireless microphone receiver terminal to camera MIC jack Turn it on 3 Turn on the wireless microphone transmitter terminal it is available to use To get a better effectiveness please wear it as close to the sound source as possible 4 Plug the wireless clip on microphone in the wireless microphone transmitter terminal mount ...

Page 30: ...cription of wireless microphone kit Workable for both receiver and transmitter terminal Status Indicator ICON Power ON Blue light stays on to flashes regularly Power OFF Red light stays on to off Low battery Red light flashes regularly Fully charged Green light stays on Connected Blue light flashes regularly ...

Page 31: ...lb well balanced Weight About 1100g 2 4 lb not included the battery shutter release cable camera lens and so forth Battery 2200mAh built in Theoretical Battery Life 14h well balanced Charging Time 1 5h support all the normal charger and quick charger which charginf power 18W for example 9V 2A 18W 12V 1 5A 18W Compatible Cameras Canon SONY Panasonic and etc Please download the detailed manual for t...

Page 32: ...71mm 281g FE 50mm F2 8 MACRO Φ71mm 71mm 236g FE 4 24 105 G OSS Φ83 4mm 113 3 mm 663g FE 28 70mm f 3 5 5 6 OSS Φ72 5mm 83mm 295g FE 85mm F1 4 GM Φ89 5mm 107 5mm 820g Sony A6400 120 67 60mm 359g Sony A6300 120 66 9 48 8mm 361g SonyA6500 120 66 9 53 3mm 410g E 10 18mm F4 OSS Φ70mm 63 5mm 225g FE 12 24mm F4 G Φ87mm 117mm 565g FE 16 35mm F2 8 GM Φ89mm 122mm 680g FE16 35mm f 4 ZA OSS Φ78mm 99mm 518g Var...

Page 33: ... Φ85mm 100mm 815g EF 17 40mm f 4L USM Φ83 5mm 96 8mm 475g RF 50mm F1 2L USM Φ89 8mm 108mm 950g RF 28 70mm F2L USM Φ103 8mm 139 8mm 1430g RF 24 105mm F4L IS USM Φ83 5mm 107 3mm 670g Canon M50 116 3 88 1 58 7mm 390g EF M 15 45mm F3 5 6 3 IS 130g Fuji X T2 133 92 49mm 457g X T3 132 5 92 8 58 8mm 539g XF 16mm 1 1 4 R WR Φ73mm 73mm 375g XF 23mm 1 1 4 R Φ72mm 63mm 300g XF 35mm 1 1 4 Φ65mm 54 9mm 187g XF...

Page 34: ...r spinning is not blocked by external force when gimbal is power on 2 DO NOT contact the gimbal with water or other liquid if the gimbal is not mark waterproof or splash proof Waterproof and splash proof product DO NOT contact sea water or other corrosive liquid 3 DO NOT disassemble the gimbal except marked detachable It need send to FeiyuTech after sales or authorized service center to fix it if ...

Page 35: ...www feiyu tech com 33 5 Never use the gimbal when the temperature is too high or too low ...

Page 36: ......

Reviews: