


OBID i-
scan
®
MONTAGE / INSTALLATION
ID ISC.ANT1300/680-GPC
FEIG ELECTRONIC GmbH
M90801-5de-ID-B.doc
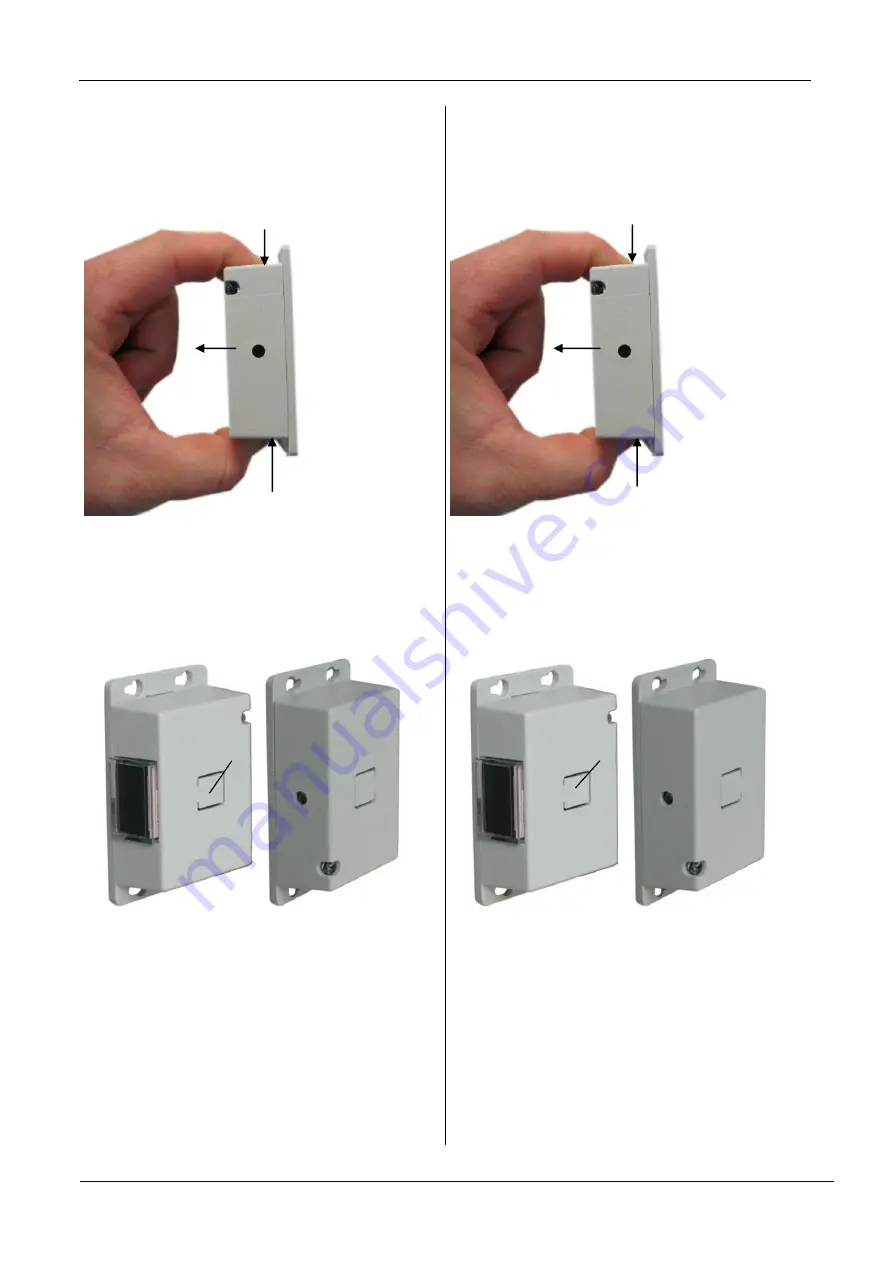
2. Das Einsetzen der Batterie und Batteriewechsel
erfolgt durch öffnen der Gehäusedeckel. Hierzu
mit zwei Fingern das Gehäuse an den Seiten
vorsichtig zusammen drücken und den Deckel
abziehen. Beim Einsetzen der Batterie ist auf die
richtige Polung zu achten.
Insert the battery and a battery change is made by
opening the housing cover. For opening the housing
press cautiously with two fingers at the sides of the
housing and pull of the cover. Take care of the polar-
ity of the battery before setting in.
3. Der Sender/Empfänger ist automatisch mit dem
Einsetzen der Batterie eingeschaltet. Anschlie-
ßend ist der Sender (Taster innen) und Empfän-
ger (Siehe Bild) durch dauerhaftes Drücken (min.
8 Sekunden) des Reset
–Knopfes zu aktivieren.
Beim Sender leuchtet die LED kurz auf und beim
Empfänger wird das Display auf Null gesetzt.
The transmitter/receiver is switched on automatically
by insert the battery. Afterwards the transmitter (but-
ton inside) and receiver (see picture) has to activate
by pressing permanently (min. 8 seconds) the Reset
button.
At the transmitter the LED is flashed briefly. At the
receiver the display is set to zero.
4. Eine Zählung wird durch kurzes Leuchten der
LED am Empfänger angezeigt. Anschließend,
zählt das Display um eine Ziffer weiter.
A counting is shown by a short flash of the LED on
the receiver. The display increases by a digit, after-
wards.
5. Die Anzahl der Zählungen kann am Display ab-
gelesen werden. Um die Zählungen für statisti-
sche Auswertungen zu verwenden, müssen die-
se manuell nach Bedarf abgelesen und doku-
mentiert werden. Erforderlichenfalls muss der
Zähler zurück gesetzt werden.
The number of counts is shown on the display. For
the use of the counts for statistics, the number of
counts has to be read off manually if required and
had to be documented. If required, the display will be
reset.
6. Das Zurücksetzen des Displays erfolgt durch
dauerhaftes drücken des Reset- Knopfes bis das
Display wieder auf Null gesetzt ist.
The Reset of the display is done by permanent
pressing of the Reset button until the display is set
back to zero.
Reset Knopf
Reset Button
LED
LED


