background image

OBID

® 

classic pro

Montage

ID CPR.02-x

Seite 18 von 36

FEIG ELECTRONIC GmbH

D E U T S C H

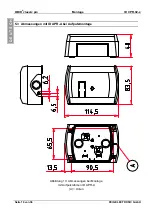
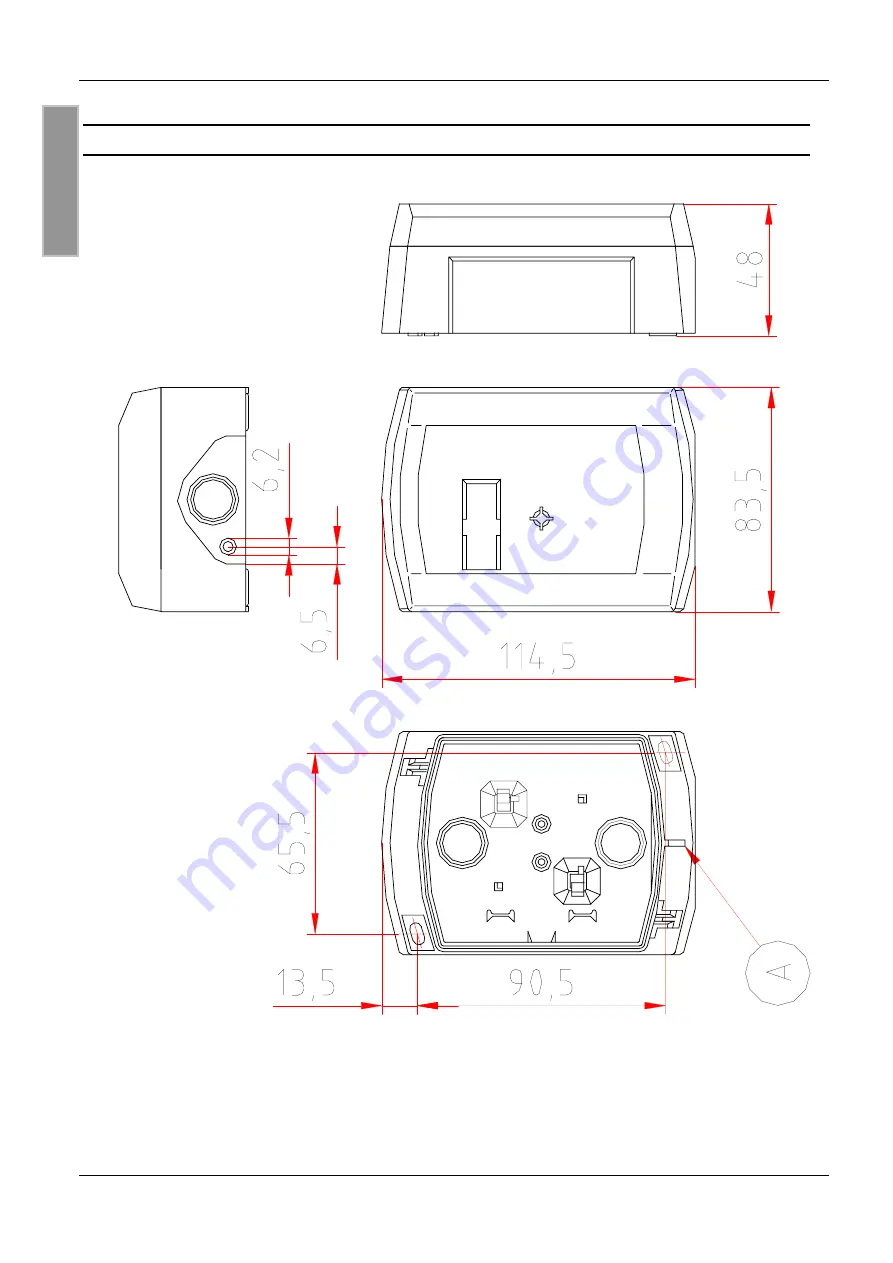
5.3  Abmessungen mit ID APR-A bei Aufputzmontage

Abbildung 13: Abmessungen bei Montage

mit Aufputzrahmen ID APR-A

(A) = Unten

Summary of Contents for ID CPR.02-A

Page 1: ...MONTAGE INSTALLATION preliminary public B 2002 09 13 M10701 1de ID B doc OBID classic pro ID CPR 02 A RS232 Interface ID CPR 02 B RS485 Interface deutsch english...

Page 2: ...OBID classic pro Montage ID CPR 02 x Seite 2 von 36 FEIG ELECTRONIC GmbH D E U T S C H deutsche Version ab Seite 3 english version from page 20 E N G L I S H...

Page 3: ...ng f r die Richtigkeit und Vollst ndigkeit der An gaben in diesem Dokument Insbesondere kann FEIG ELECTRONIC GmbH nicht f r Folgesch den auf Grund fehlerhafter oder unvollst ndiger Angaben haftbar gem...

Page 4: ...und Schalter 10 3 2 Spannungsversorgung 11 3 3 Relais 11 3 4 Digitale Eing nge 11 3 5 RS232 Schnittstelle ID CPR 02 A 11 3 6 RS485 Schnittstelle ID CPR 02 B 12 3 7 Daten Taktschnittstelle 13 4 Inbetr...

Page 5: ...n f r ein Ger t bzw ungeeignete Verwendung ei nes Ger tes wird keine Haftung bernommen Reparaturen d rfen nur vom Hersteller durchgef hrt werden Anschluss Inbetriebnahme Wartungs und sonstige Arbeiten...

Page 6: ...hen montiert werden da diese Fl chen eine Redu zierung der Lesereichweite bewirken Der Abstand zu derartigen Fl chen sollte minde stens 3 cm betragen Ist eine Montage auf einer Metalloberfl che notwen...

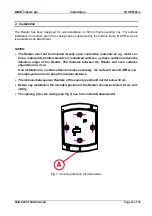
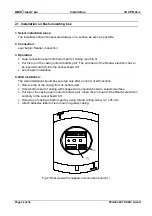
Page 7: ...ber in Buchsenleiste X3 einf hren siehe Kapitel Inbetriebnahme 4 Wandmontage Erst nach Kontrolle der Inbetriebnahmearbeiten sollte die Wandmontage erfolgen Geh useoberteil von Unterteil abziehen Geh u...

Page 8: ...1 gem Abbildung 3 mit den Anschlussklemmen nach unten in das Ge h useunterteil einrasten Dazu die Rasthaken mit den Fingern leicht auseinanderdr cken Geh useoberteil auf Geh useunterteil stecken Dabe...

Page 9: ...wird Abbildung 4 Anschlussplatine Klemme Funktion Leiste Bezeichnung ID CPR 02 A ID CPR 02 B Spannungsversorgung 12 24 AC DC CLS Daten Taktschnittstelle CLS COM NO Relais GND interner GND R A RS232 R...

Page 10: ...per und Schalter sind nur bei demontiertem Ger t zug nglich 1 2 3 4 5 6 7 8 ON OFF X7 1 J1 J2 X1 S1 3 2 1 X4 X3 X2 Abbildung 5 Jumper und Schalter S1 DIP Schalter zur Einstellung der Leseradresse X1 S...

Page 11: ...rden 3 3 Relais Der Leser verf gt ber ein Relais mit einem Schlie erkontakt Der Anschluss erfolgt ber die Klemmen NO und COM 3 4 Digitale Eing nge Die beiden digitalen Eing nge IN1 bzw IN2 d rfen nur...

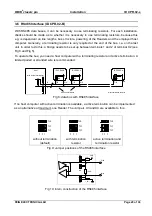
Page 12: ...tzt einen Leitrechner mit Abschlusswiderstand und aktiver Terminierung voraus Als Leitung wird eine paarweise verseilte oder verdrillte Leitung empfohlen Host ohne Abschlusswiderstand R A T B ID CPR 0...

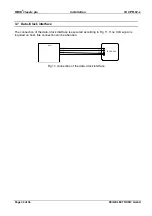
Page 13: ...schnittstelle Der Anschluss der Daten Taktschnittstelle erfolgt gem Abbildung 11 Falls am Host kein CLS Anschluss vorgesehen oder notwendig ist kann auf diese Leitung verzichtet werden Abbildung 11 An...

Page 14: ...erfolgt mittels der DIP Schalter S1 DIP1 DIP4 ge m Tabelle DIP5 DIP8 haben keine Funktion Dabei wird jeder Leser mit einer indivi duellen Adresse versehen Adresse DIP 1 DIP 2 DIP 3 DIP 4 0 OFF OFF OFF...

Page 15: ...693 I CODE1 Signalgeber 1 x Bicolor LED rot gr n orange 1 x Summer Relais 1 x Schlie er Kontaktbelastbarkeit 24 V AC DC 1 5 A digitale Eing nge 2 x konfigurierbar Leitungsl nge max 3 m Schnittstellen...

Page 16: ...on 36 FEIG ELECTRONIC GmbH D E U T S C H 5 1 Zulassung Die Funkanlage entspricht bei bestimmungsgem er Verwendung den grundlegenden Anforde rungen des Artikels 3 und den brigen einschl gigen Bestimmun...

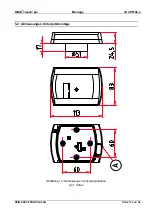
Page 17: ...OBID classic pro Montage ID CPR 02 x FEIG ELECTRONIC GmbH Seite 17 von 36 5 2 Abmessungen Unterputzmontage Abbildung 12 Abmessungen Unterputzgeh use A Unten...

Page 18: ...classic pro Montage ID CPR 02 x Seite 18 von 36 FEIG ELECTRONIC GmbH D E U T S C H 5 3 Abmessungen mit ID APR A bei Aufputzmontage Abbildung 13 Abmessungen bei Montage mit Aufputzrahmen ID APR A A Un...

Page 19: ...mit Leserelektronik 1 x Anschlussplatine 1 x Frontaufkleber 1 x Schneidschraube 3 2 x 25 mm zur Verbindung der Geh useteile 2 x Schneidschrauben 3 2 x 15 mm zur Wandmontage 1 x Montageanleitung 6 1 Op...

Page 20: ...LEC TRONIC GmbH does not guarantee the correctness and completeness of the details given in this manual and may not be held liable for damages ensuing from incorrect or incomplete information Since de...

Page 21: ...r connection 26 3 1 Jumper and Switches 27 3 2 Power supply 28 3 3 Relay 28 3 4 Digital inputs IN1 IN2 28 3 5 RS232 Interface ID CPR 02 A 28 3 6 RS485 Interface ID CPR 02 B 29 3 7 Data Clock interface...

Page 22: ...y responsible for incorrect unsuitable manual or automatical setting of parameters for a device or the incorrect application of a device Repairs can only be executed by the manufacturer Installation o...

Page 23: ...faces metal grids reinforcements or metallized surfaces as these surfaces reduce the detection range of the Reader The distance between the Reader and such surfaces should be min 3 cm If an installati...

Page 24: ...has to be inserted carefully into the socket board X3 see chapter Installation 4 Wall installation The wall installation should be executed only after a control of all functions Remove top of the cas...

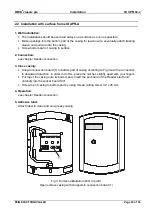
Page 25: ...lose casing Snap in connection board 1 to bottom part of casing according to Fig 3 with the connectors in downward direction In order to do this press the notches slightly apart with your fingers Put...

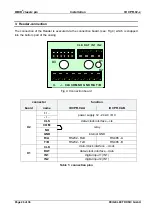
Page 26: ...rt of the casing Fig 4 Connection board connector function board name ID CPR 02 A ID CPR 02 B power supply 12 24 AC DC CLS data clock interface cls COM NO relay GND internal GND R A RS232 RxD RS485 A...

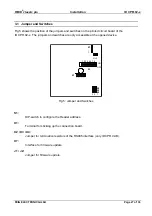
Page 27: ...02 x The jumpers and switches are only accessible at the opened device 1 2 3 4 5 6 7 8 ON OFF X7 1 J1 J2 X1 S1 3 2 1 X4 X3 X2 Fig 5 Jumper and Switches S1 DIP switch to configure the Reader address X...

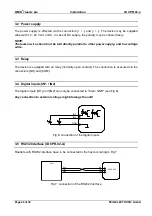
Page 28: ...voltage wires 3 3 Relay The device is equipped with an relay normally open contact The connection is executed via the connectors NO and COM 3 4 Digital inputs IN1 IN2 The digital inputs IN1 and IN2 ca...

Page 29: ...ig 5 To operate the bus you need a host computer with a terminating resistor and active termination A twisted paired or stranded wire is recommended Host without termination R A T B ID CPR 02 A with a...

Page 30: ...GmbH 3 7 Data Clock interface The connection of the data clock interface is executed according to Fig 11 If no CLS signal is required on host this connection can be abandon Fig 11 connection of the d...

Page 31: ...a the DIP switches S1 DIP1 DIP 4 according to the table seen below DIP5 DIP8 are unused Thus each Reader is being provided with an individual address Address DIP 1 DIP 2 DIP 3 DIP 4 0 OFF OFF OFF OFF...

Page 32: ...SO15693 I CODE1 signal transmitter 1 x bicolor LED red green orange 1 x buzzer relay 1 x normally open capacity of contacts 24 V AC DC 1 5 A digital inputs 2 x configurable length of lead in wire max...

Page 33: ...n ID CPR 02 x FEIG ELECTRONIC GmbH Page 33 of 36 5 1 Approval When properly used this radio equipment conforms to the basic requirements of Article 3 and the other relevant provisions of the R TTE Dir...

Page 34: ...OBID classic pro Installation ID CPR 02 x Page 34 of 36 FEIG ELECTRONIC GmbH 5 2 Dimensions for concealed installation Fig 12 Dimensions of concealed casing A below...

Page 35: ...BID classic pro Installation ID CPR 02 x FEIG ELECTRONIC GmbH Page 35 of 36 5 3 Dimensions for surface installation with ID APR A Fig 13 Dimensions for installation with surface frame ID APR A A below...

Page 36: ...Reader electronic 1 x connection board 1 x adhesive label 1 x thread cutting screw 3 2 x 25 mm for connecting parts of casing 2 x thread cutting screws 3 2 x 15 mm for wall installation 1 x Installati...

Reviews: