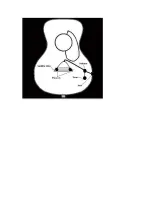
VTP-200 Installation instructions.
Please note;
Although every system is tested before shipping, we recommend that you plug it into your amp and test it before installation. This
can be done by simply tapping on the transducers while plugged in. You should hear the tapping sounds through your amplifier.
Items you will need;
A drill
A 3/8 drill bit
A ¼ drill bit
A standard precision screwdriver
A small amount of super glue
Please note; The piezo’s must be handled with care during installation.
Installation;
1.
Mark the desired locations for the jack, volume, and tone knobs using a pencil.
2.
Remove the strings to provide easier access inside the soundhole.
3.
Carefully drill the holes using the 3/8 bit for the jack and the ¼ bit for the volume and tone knobs.
4.
Remove the nut and washer from the jack. Remove the volume and tone knobs using the precision screwdriver.
Remove the nut and washer from the volume and tone controls.
5.
Install the jack, tone and volume controls by pushing them through the holes from the inside. Replace the nut and
washer on each, then the volume and tone knobs using a small standard precision screwdriver.
PLEASE NOTE; CAREFUL PLANNING MUST TAKE PLACE TO ENSURE THAT YOU DO NOT
DRILL ANYWHERE THAT WILL INTERFERE WITH BRACING OR ANY OTHER INTERNAL
COMPONENT OF YOUR INSTRUMENT.
6.
You may want to experiment with the placement of the piezos before fixing them into place. You can do this using a
piece of masking tape to temporarily hold them in place. You will get a different tone in different places on the guitar
top. The ideal location that will result in the most amount of gain is directly below the saddle on the bridgeplate.
7.
Place a drop of super-glue on the piezo and firmly hold it place for about 45 seconds.
8.
Repeat step 7 for second piezo.
That’s it! Replace strings, tune up, and plug it in!
We cannot accept any responsibility for guitar damage caused by installation.
Summary of Contents for VTP-200
Page 2: ......


