


• 10 •
• 11 •
10. Use of insoles with FeetMe® Evaluation mobile application
a. First use or reinstallation
Create a Gmail account if you do not have one. Go to the « Play Store »
and search for the application : « Feetme Evaluation ».
Download the application and follow the installation instructions.
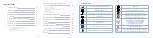
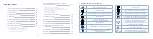
b. Perform a gait recording
1.
Connection to the insoles
Click on the button « Connect the insoles », select the right and left soles
of the corresponding size and then click on « Next step ».
2.
Insoles calibration
For this step, the insoles must be in the shoes, laid on a flat surface.
Click on the « Calibration » button.
3.
Select a test
Click on the chosen test.
You can also acquire gait parameters without the phone and synchronize
the data at the end of the recording by clicking on « Import Recording ».
4.
Start & stop recording
Put on shoes and press « Start » then « Play » to start recording. For
« Standard » tests, press « Stop » and « Save » to save the data. For other
tests, stopping the recording and saving the data are automatic.
5
. Make a new recording
You remain connected by default to the last insoles, so you can make other
recordings without redoing the steps of connection and calibration (repeat
steps from step 3). To make a new recording with other insoles, click on
« Connect the insoles » and repeat the above steps from the beginning.
c. View the data acquired from the mobile application
The data collected for a given patient can be viewed from the application.
To access it, go to the « Recordings » tab to access all the records. To
access the data of a record, click on the associated record.
d. Data backup
In case the user hosts the gait recordings, he is in charge of performing
appropriate and regular data backups in order to prevent any destruction or
loss of information. FeetMe cannot be held responsible for any accidental
or unauthorised destruction or accidental loss of user data.
e. View battery level
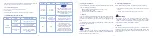
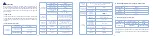
c. Charge light indicators
Continuous green : charged
Continuous white : charging
Discontinuous white : Insoles poorly positioned, reposition
Light off : power cable disconnected or improper positionning of
the charger or the insole. Check position to make the light indicator
steady white.
When the insoles are charging, the indicator light of the chargers
is solid white. Once the insoles are charged, the indicator turns
green. The indicator is flashing white when an insole is incorrectly
positioned, the insole is not charging. It takes approximately 2.5
hours for a complete charge of the insoles.
d. Bluetooth connection to the insoles
Once charged, the insoles are automatically detectable via
Bluetooth using FeetMe® Evaluation app. The insoles go to sleep
mode automatically when not in use. In order to scan them, just
shake them for 3 seconds. No manipulation is therefore necessary
from the user part, to turn the insoles on and off. If the insoles are
not detected, consider charging them. Be careful not to use the
insoles alongside other Bluetooth devices.
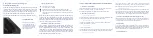
Charging the insoles
To position a pair of insoles
in a charging slot, identify
the insole size and locate the
corresponding slot. Position
each insole on the edge, top
side facing outwards.
b. Charging the insoles with the charging case
Setting up the charging case
Open the case and remove the lid. The insoles wont charge if the lid
is closed. Take out the power cable from the case and connect it to
the case, close to the On/Off switch. Plug the other end to a
power outlet. Switch it on (position I). If the charging slots are
empty, the LED will flash white for a few seconds then go off.
The charging case should be at a temperature below 35° Celsius.


